
At a Glance
When your practice keeps correcting the same field on the same kind of claim, that correction belongs in a rule. This guide covers the three ways to build one: describe it in plain language and let Athelas Assistant draft it, clone a rule that is already close to what you need, or build each condition and action yourself. It then walks through submitting the rule so it can take effect. For how to read, search, edit, and dry run the rules you already have, see The Rules Tab.Creating rules takes write access to rules. If you cannot create one, ask your practice admin to add that access to your role.
Open the Rule Builder
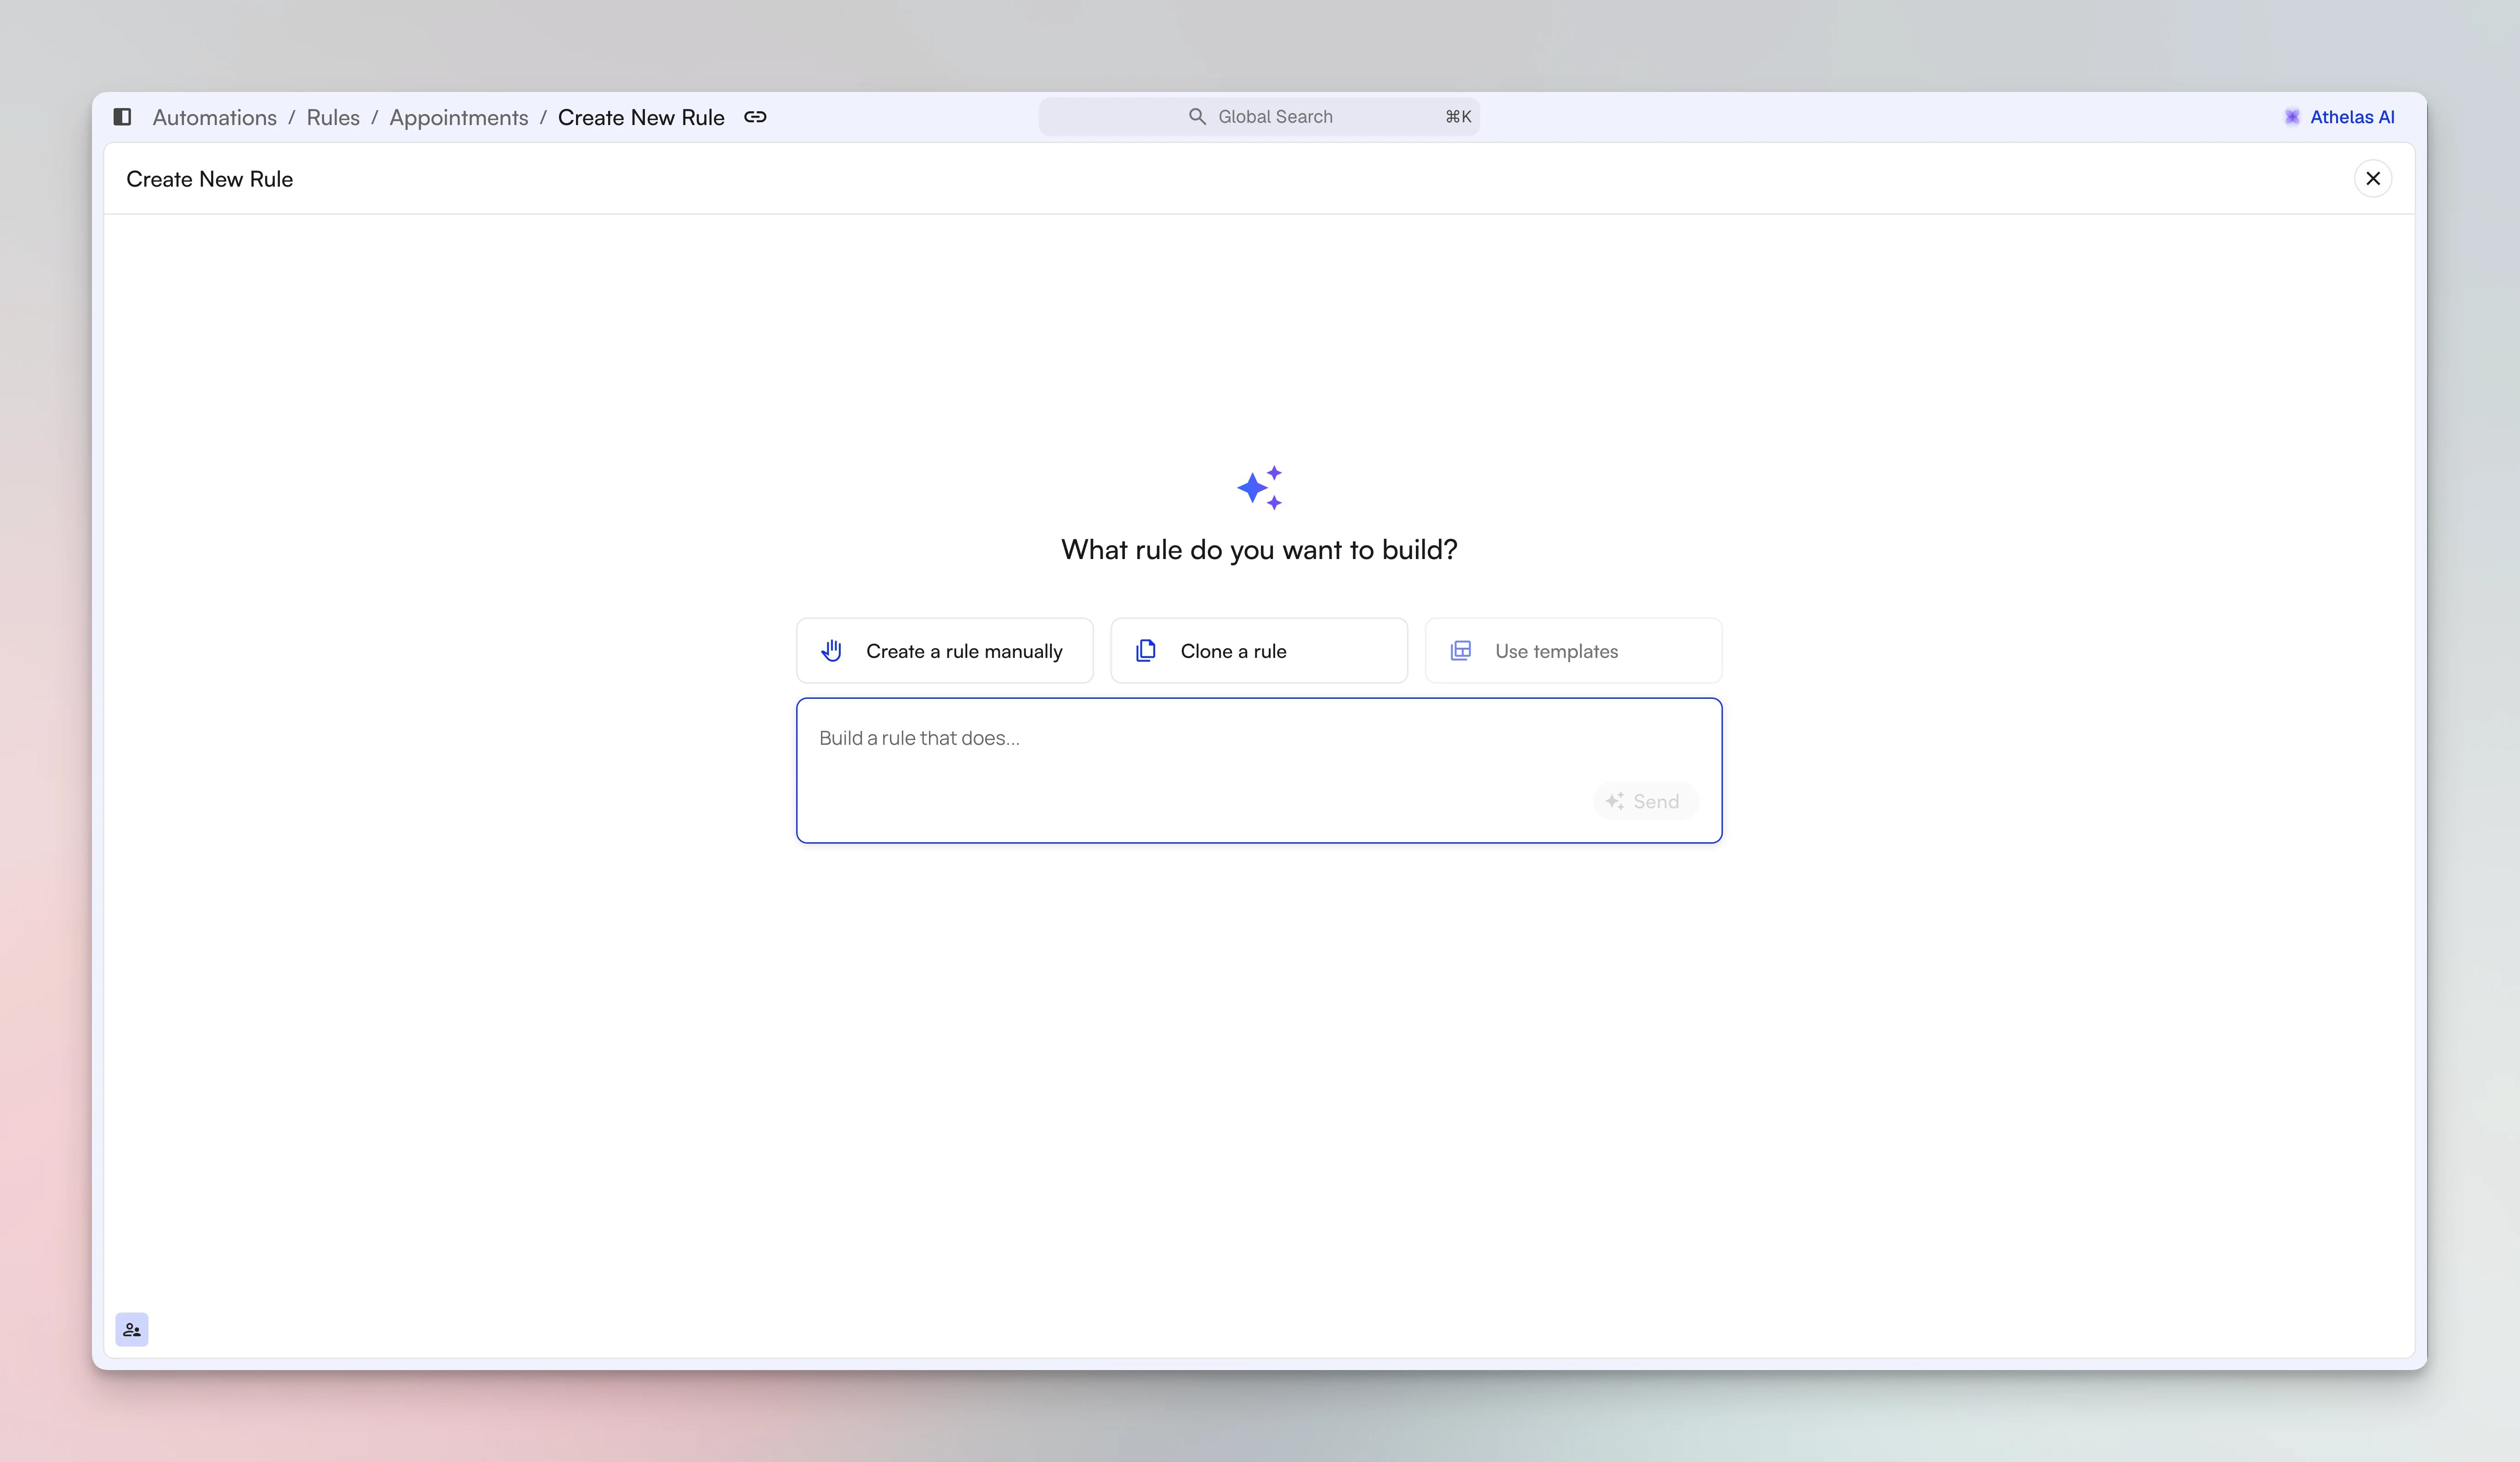
Go to Automations → Rules and click + New Rule in the top right. You do not need to know which rule type you want before you start. When you start from the Rules landing page, describe the rule and Athelas Assistant works out the Rule Type and confirms it with you. If you build the rule manually, you pick the type yourself. If you open a rule type’s card first and click + New Rule from there, the builder starts with that type filled in.Three Ways to Build a Rule
The Create New Rule screen asks what you want to build and gives you three routes to the same builder.What Every Rule Contains
Whichever route you take, you land in the same builder and fill in the same parts:Build a Rule with AI
Instead of assembling conditions field by field, type what you want into the prompt box and click Send. The builder opens as Draft a Rule, with Athelas Assistant working in the panel beside it:- It asks why. If your description does not say why the rule is needed, the assistant asks before it builds anything: a payer requirement, a denial pattern, or an audit finding, for example. Your answer becomes the rule’s reason, and it gives whoever reviews the rule the context they need.
- It builds the rule. The assistant picks the Rule Type, fills in the description, conditions, and actions, and then summarizes what it set.
- It flags what to check. When part of the rule depends on how your data is stored, the assistant calls that out before you save.
- You review and save. Check the form, adjust anything you need, and click Save.
- “For each occurrence of any L CPT code within a claim, add the NU modifier to the procedure.”
- “Block claims from submitting if the rendering provider’s NPI is missing.”
- “Flag any claim over $5,000 for manual review before it goes out.”
- Everything is verified to exist. Every condition, data point, and action you ask for is checked against what the system actually supports. If something is not available, you are told rather than handed an approximation.
- Ambiguity gets resolved. The assistant picks the condition type that matches what you actually mean, for example whether a value simply needs to be present or needs to occur in combination with something else.
- Scope stays where you put it. Conditions and actions stay within the object type they belong to, so a rule cannot quietly reach beyond what you asked it to touch.
Build a Rule by Cloning
Choose Clone a rule to start from something that already works.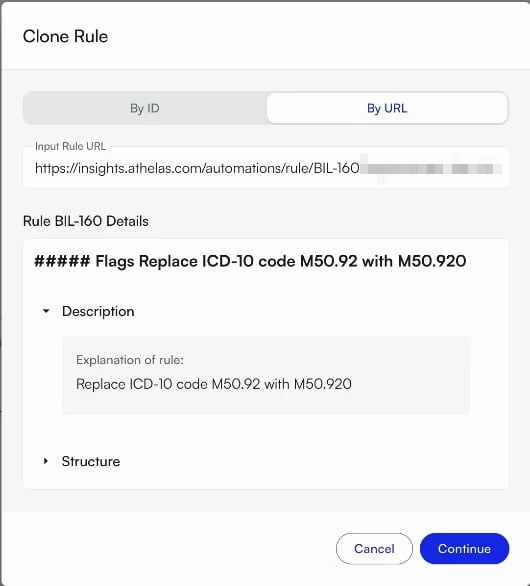
- By ID. In Input Rule ID, enter the ID shown in the top left of the rule you want to copy.
- By URL. Copy the rule’s URL from your browser, or use the link button at the top of the rule, then paste it into Input Rule URL.
Build a Rule Manually
Choose Create a rule manually to work through the builder section by section.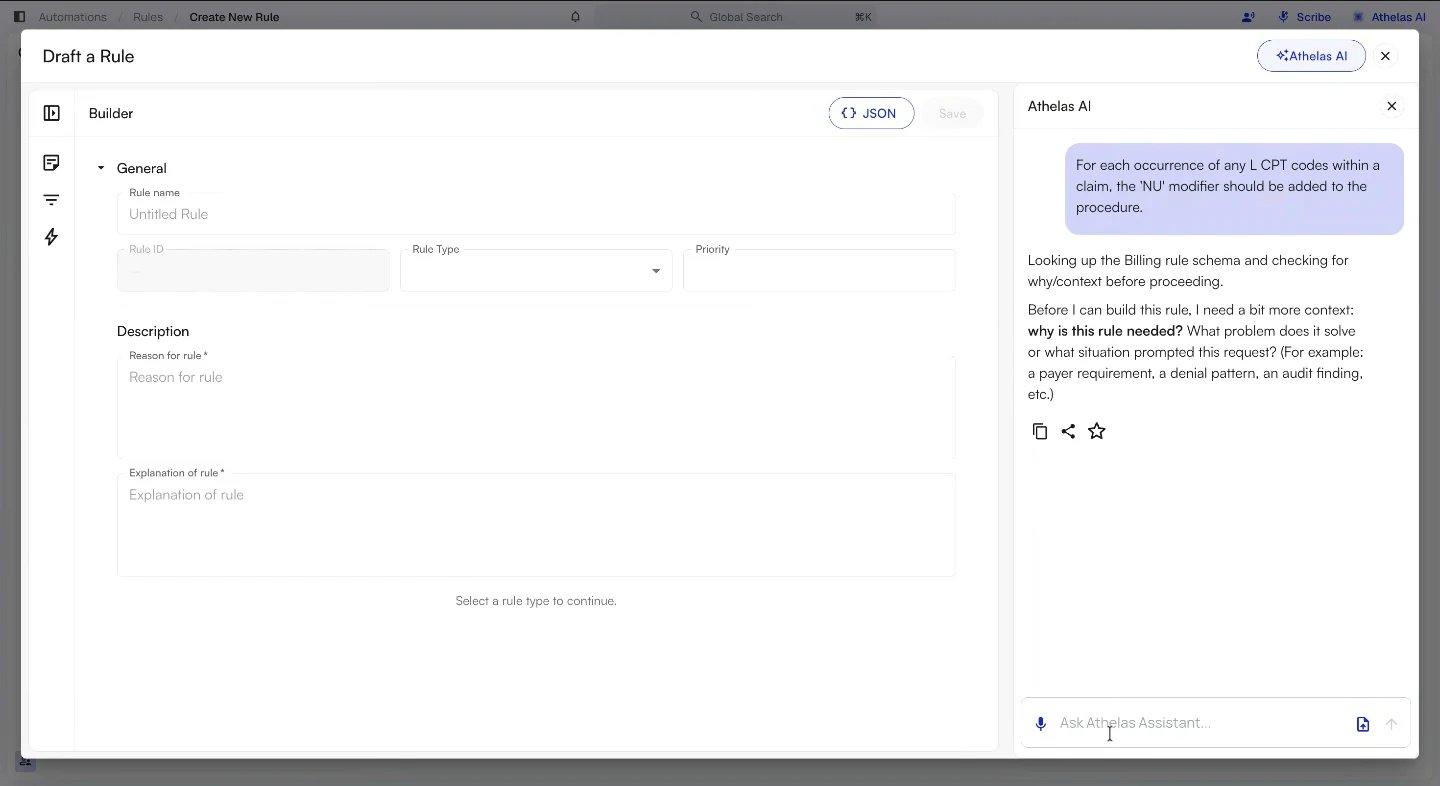
- Fill in General: name the rule, choose its Rule Type if it is not already filled in, and set a Priority. For a submission blocking rule, turn on Overridable if your team should be able to release a claim past the block.
- Write the Description: the Reason for rule and the Explanation of rule. Both are required.
- Add your Conditions. Use + Condition for a single test and + Subgroup or + Group for a nested set, then set the operator on each level to ALL or ANY to control how they combine. Duplicate Group copies a group you want to reuse with small changes.
- Add your Actions with + Action. Add more than one if the same conditions should produce several outcomes. Some actions take extra details: Block Claim From Submission, for example, asks for a Reason To Block and an Owner, the party responsible for fixing the claim.
- Click Save. The rule is saved as a Draft.
Submit Your Rule for Review
Saving a rule does not put it into effect. A saved rule stays a Draft, with an ID such asBIL-D653, until you submit it.
To submit a rule:
- Dry run it first. Replay the rule against real records to see which conditions match and exactly which fields it would change, without touching anything. See Dry Running a Rule.
- Open the draft and click Submit.
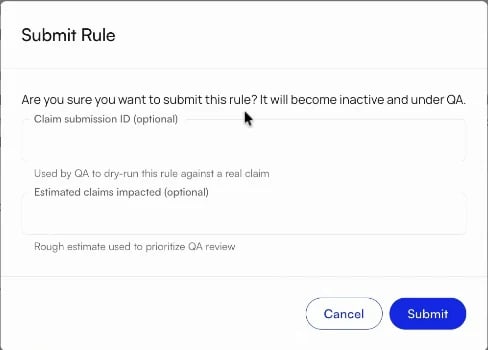
- In Submit Rule, fill in any of the optional fields the dialog shows:
- Claim submission ID gives the reviewer a real claim to test the rule against. Use one you dry ran the rule on.
- Estimated claims impacted is your rough count of the claims the rule will touch, which helps prioritize the review.
- Rollout cap, for rule types that support a phased rollout, limits the rule to a set number of encounters. Leave it blank to apply the rule to all encounters.
- Click Submit.
FAQ
Does my rule start working as soon as I save it?
Does my rule start working as soon as I save it?
No. A saved rule is a Draft, and it takes effect only once you submit it and, if it goes to review, once the review passes. Dry run it first so you know what it would do.
Can one rule do more than one thing?
Can one rule do more than one thing?
Yes. A single rule can trigger several actions off the same set of conditions. Use + Action to add each one rather than building a separate rule per action, which keeps the conditions in a single place if they ever need to change.
I described a rule and the assistant said a condition is not available. Why?
I described a rule and the assistant said a condition is not available. Why?
Every condition, data point, and action you describe is checked against what the system actually supports before it reaches the builder. When something is not available, you are told outright instead of being handed a close-enough approximation that would quietly behave differently from what you asked for.Rephrase using data the rule can see, or clone an existing rule that already tests something similar to find the supported equivalent.
Why does every rule need a reason?
Why does every rule need a reason?
Reason for rule and Explanation of rule are both required, and the assistant asks for the reason before it builds a rule. The reason captures why the rule exists and the explanation captures what it does in practice. Together they are what makes a rule readable to its reviewer and to the next person who opens it, including you in six months.
What should I enter as the Claim submission ID?
What should I enter as the Claim submission ID?
The ID of a claim the rule should affect, ideally one you have already dry run it against. The reviewer uses it to test the rule on a real claim. The field is optional, so leave it blank if you do not have a good example.