
At a Glance
When your organization runs several sites, the rules that work at one location usually belong at the others too. Instead of rebuilding them one site at a time, select the rules on the Rules tab, clone them to your other sites in one step, fix anything that does not carry over, and then submit the new drafts together. This guide is for teams that manage their sites from a parent site. To build a single rule from scratch, see Create a Rule.Cloning and submitting rules take write access to rules. You can clone rules to the sites linked to the site you are working from, such as the child sites under your parent site.
Selecting Rules
Open a rule type on the Rules tab and select the checkbox beside each rule you want. To select a run of rules, select the first one, then hold Shift and select the last. As soon as you select a rule, the Bulk Actions bar appears at the bottom of the table with a count of your selection and two actions:Cloning Rules to Other Sites
To clone rules:- Select the rules and click Clone in the Bulk Actions bar.
- Under Clone into, choose one or more of your sites.
- Click Clone.
BIL-674872 → BIL-D654, and rules that could not clone are listed first so you can deal with them.
Every clone arrives at its site as a Draft, so nothing goes into effect until it is submitted. The original rule is not changed.
Fixing a Rule That Did Not Clone
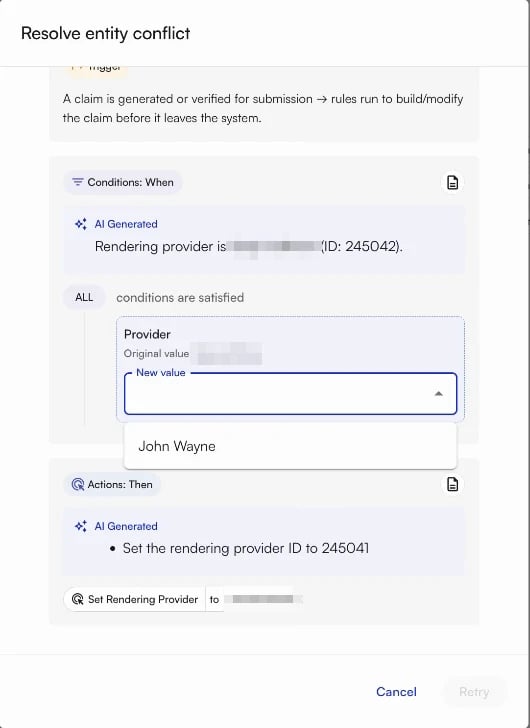
A rule fails to clone when it points at something the target site does not have, such as a provider, payer, or patient that exists only at the original site. Fix the rule instead of rebuilding it:- In the progress panel, choose the fix option beside the rule. Resolve entity conflict opens with a preview of the rule.
- The field that caused the problem shows its Original value. Choose a New value from the target site, for example the rendering provider who does the same work there.
- Click Retry.
Submitting Drafts Together
Cloning leaves a draft at every site you cloned to. To submit a batch of drafts in one step:- Open the Drafts tab and select the drafts you want to submit.
- Click Promote in the Bulk Actions bar.
FAQ
Which sites can I clone rules to?
Which sites can I clone rules to?
The sites linked to the site you are working from, such as the child sites under your parent site. If a site you expect is missing from Clone into, contact your account manager.
Does cloning change the original rule?
Does cloning change the original rule?
No. The original stays exactly as it is. Each clone is a new, separate draft at its site with its own ID, so editing a clone never changes the rule it came from.
Why did some rules clone and others fail?
Why did some rules clone and others fail?
A rule fails when it references a provider, payer, or patient that does not exist at the target site. Fix the rule from the progress panel by choosing a replacement at that site, or skip it.
Do cloned rules go live right away?
Do cloned rules go live right away?
No. They arrive as drafts. Promote them together, or submit them one at a time, to put them into effect.