
- Automated Checks — Automated checks run 7 days before the scheduled appointment for insurances supported through the Waystar, Availity, and UHC clearinghouses.
- EHR Data Flow (Insights Only) — Insights uses a one-way extraction to pull appointments, patient demographics, and insurance data from your EHR.
- Live Checks — For patients without a scheduled appointment, use the Live Eligibility Check button to verify coverage in real time.
Reading the eligibility status
Each insurance shown on an appointment displays a badge indicating the result of its eligibility check: The patient has active insurance coverage with this payer.
 The patient does NOT have active insurance coverage with this payer.
 We were unable to get an active or inactive response from the payer.
 We were unable to retrieve an active or inactive response from the payer. This is called an Inconclusive result and is usually caused by incorrect patient information, such as the name, date of birth, or member ID.
Arcade demo: Read an eligibility response and the status badge it produces.
Arcade demo: Re-run an eligibility check and run a live eligibility check.
Types of eligibility rules
To generate an accurate Patient Responsibility suggestion, Insights first parses a patient’s insurance benefits, such as copays, deductibles, and coinsurance. This information comes from Waystar, Availity, and UHC. Patients often have multiple benefits, but not all are relevant to the PR calculation. After parsing the data, Insights applies rules to identify and use only the benefits needed. Before configuring eligibility rules, it’s important to understand the three rule types used by the eligibility engine:- Appointment Rules
- Eligibility Parser Rules
- Suggested PR Rules
Appointment Rules
Appointment Rules map appointment types to the correct Service Type used in the eligibility inquiry. A Service Type identifies the healthcare service being provided and determines which benefits the payer returns. Common service types include Physical Therapy (PT), Physical Medicine (AE), and Professional Office Visit (98). For most sites, all appointment types are mapped to the site’s specialty. For example, a Physical Therapy practice maps all appointment types, such as Initial Evaluation and Follow-up, to PT. For more complex practices, appointment types are mapped individually based on the services provided. Appointment Rules can also apply payer-specific exceptions, such as using a different Service Type or Rendering/Group NPI for certain payers.Accessing Appointment Rules
Step 1: From the Appointments page, open the three-dot menu and select PR Settings.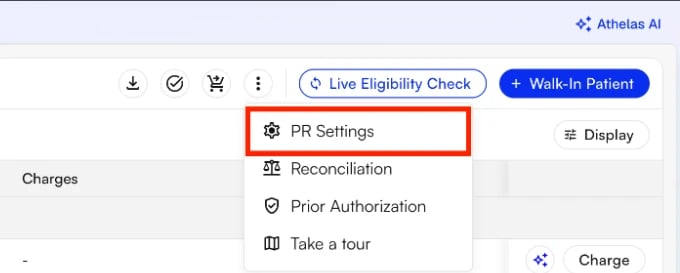
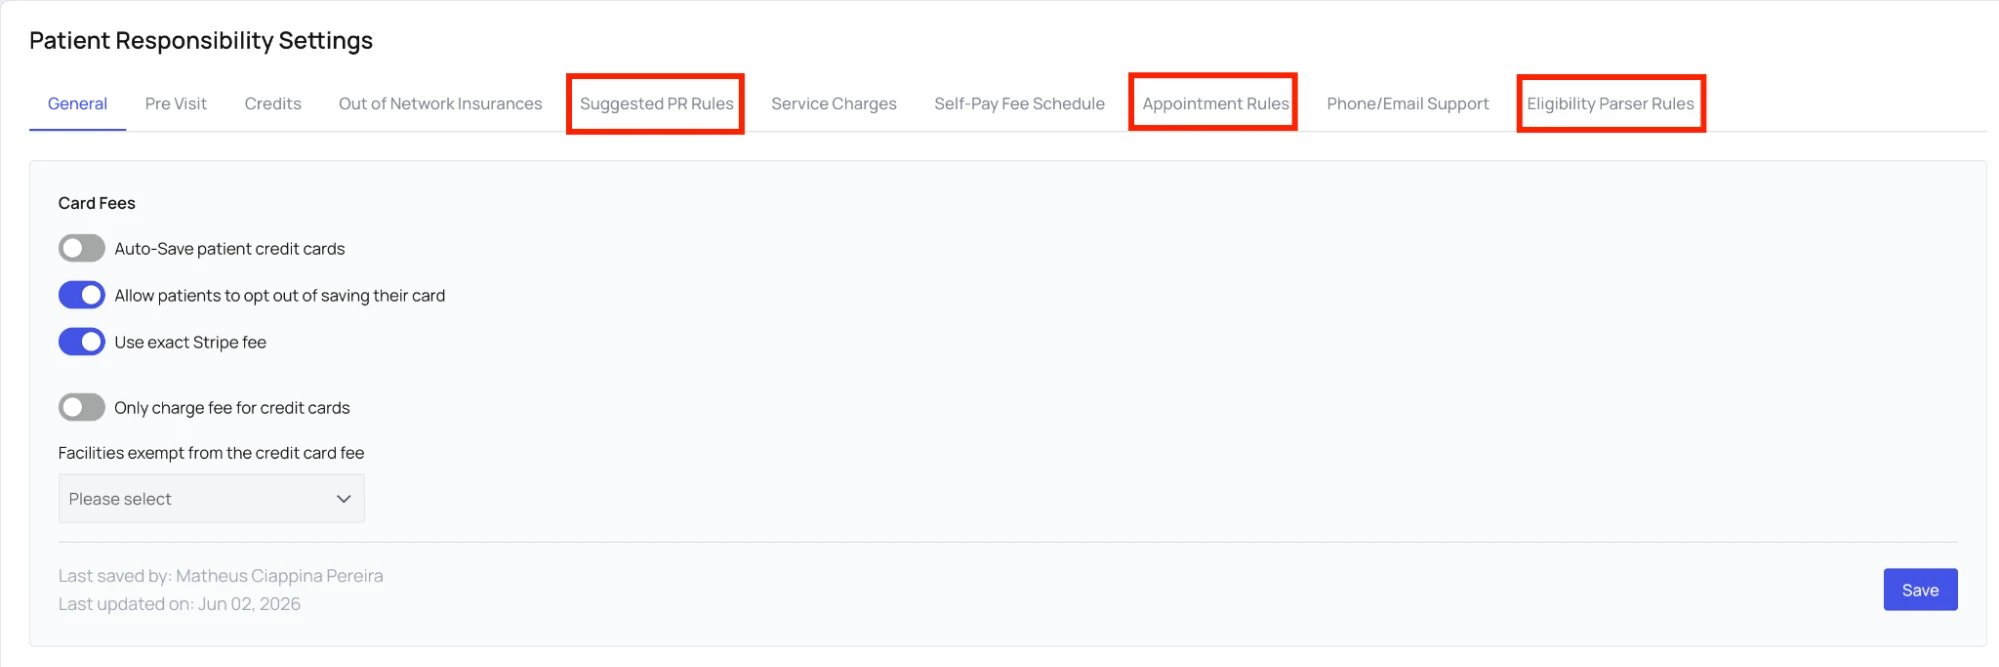
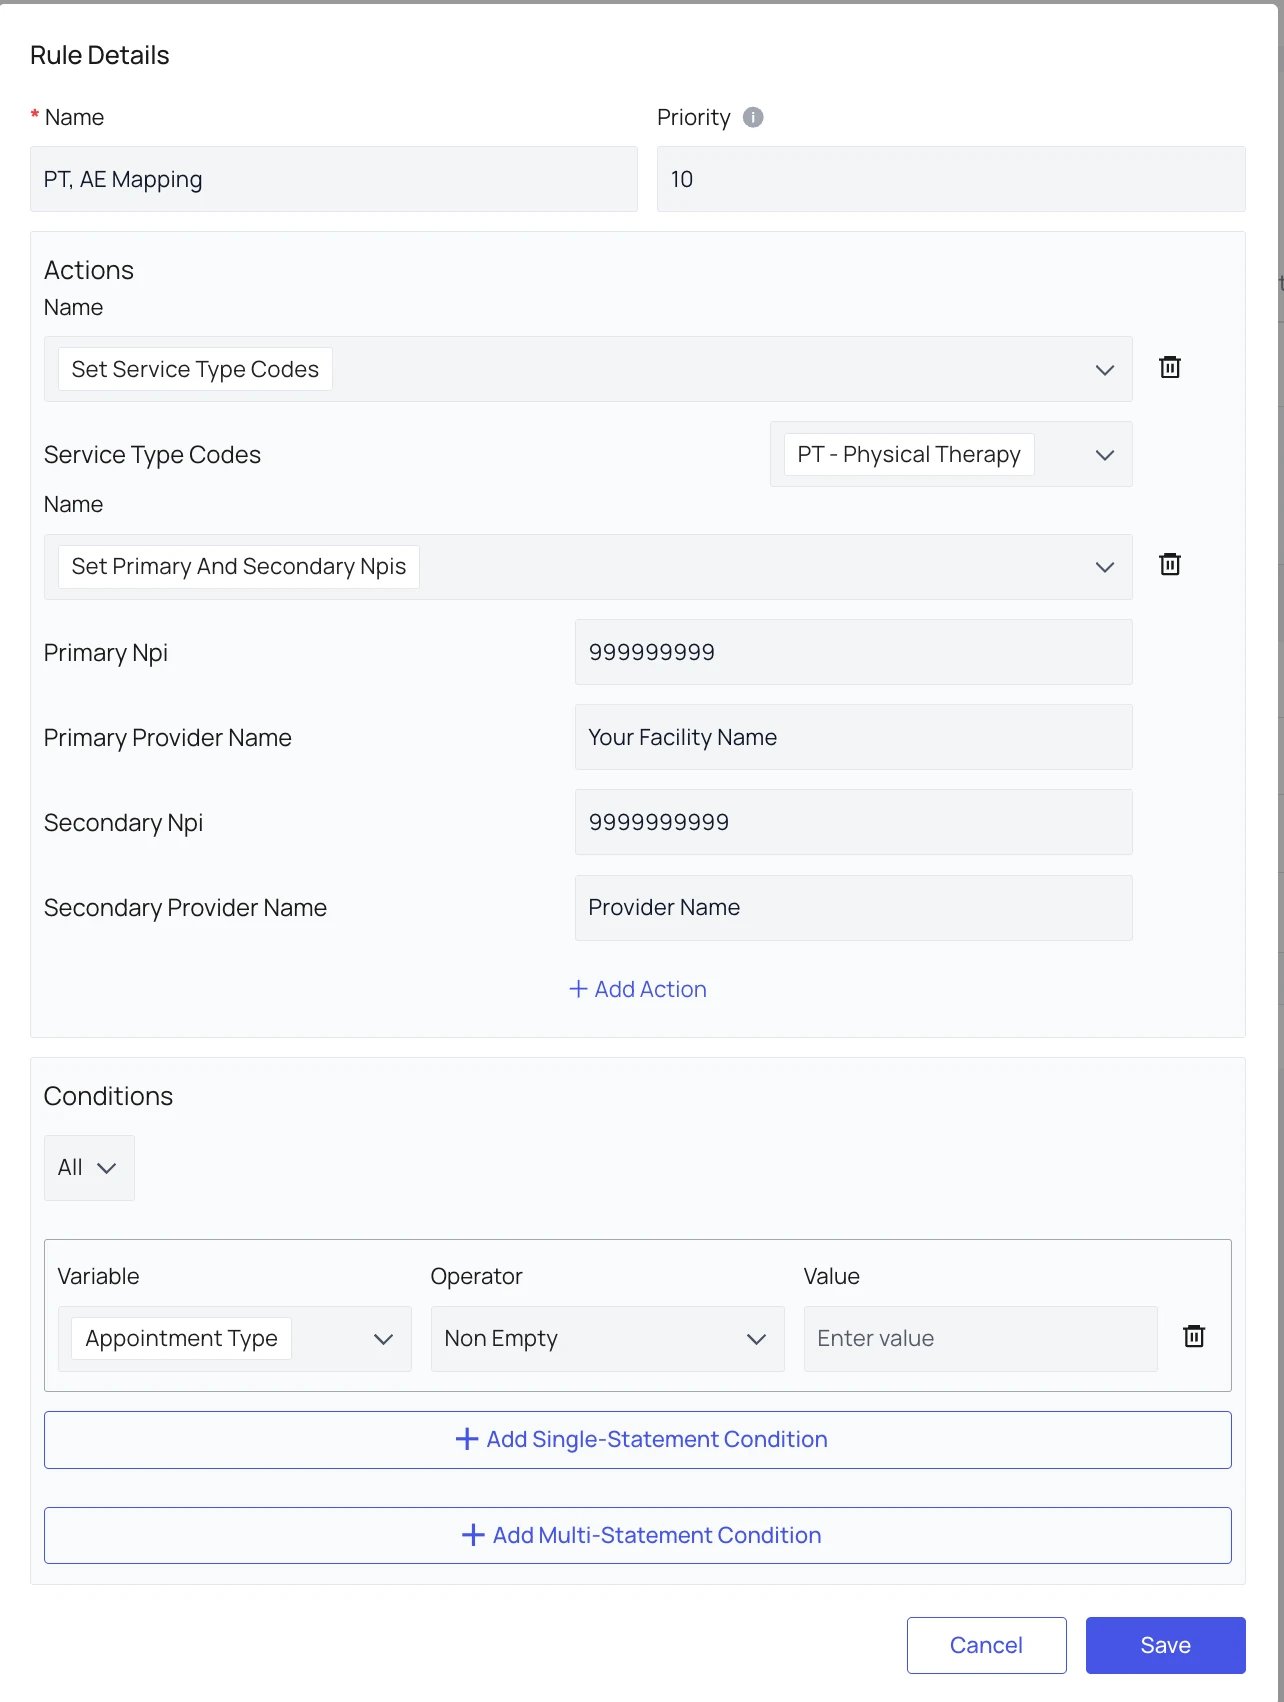
- Name the rule — The rule name is for your reference only and can be named anything.
- Set the priority — Assign a priority value, such as 10, to determine the rule order.
- Set the Service Type Code — Select Set Service Type Codes and choose your facility’s appropriate Service Type.
- Add NPI details — Click Add Action and enter the Primary and Secondary NPIs for your site. We recommend setting the Group NPI as the Primary NPI and a provider’s NPI as the Secondary NPI.
- Select appointment types — Choose which appointment types the rule should apply to. If the rule applies to all appointments, add a fail-safe condition and save the rule.
Eligibility Parser Rules
Eligibility Parser Rules control how benefits returned by Waystar are prioritized when multiple valid benefits are available. Refer to the images above to access PR Settings and Eligibility Parser Rules. The most common use case is ranking one benefit higher than another. For example, if a site wants to recommend the Specialist copay, you can assign additional ranking points to benefits with a payer note containing “Specialist.” If both Specialist and Non-Specialist copays are returned, the system will prefer the Specialist copay. In most cases, ranking is preferred over excluding benefits. If the Specialist copay is unavailable, the system can still fall back to the Non-Specialist copay instead of returning no recommendation. Use Parser Rules only when the eligibility response contains multiple valid benefits and the wrong one is consistently selected. First confirm that the appointment Service Type and payer mapping are configured correctly — a number of rules have likely already been created for your benefit.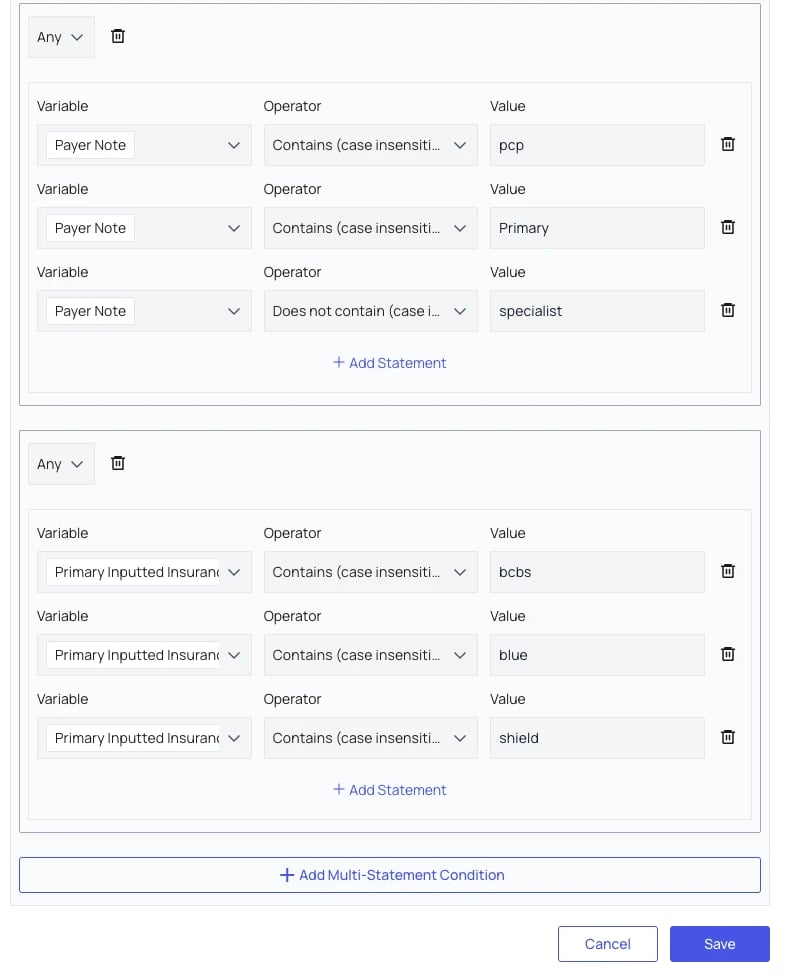
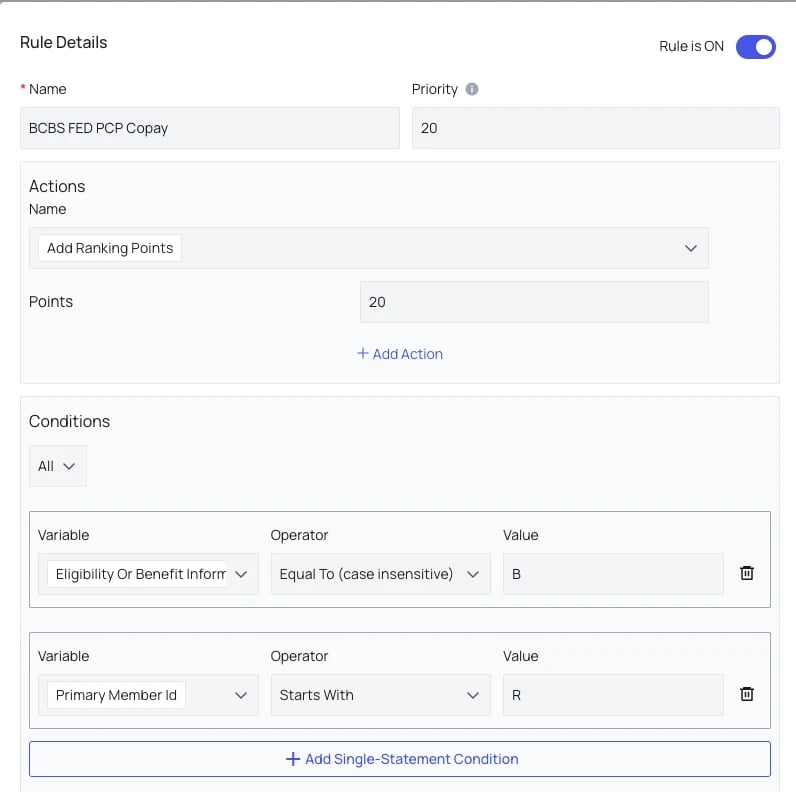
Suggested PR Rules
Once eligibility parser rules have been developed, it’s time to set the PR rules. You can use PR rules to set payer-specific PR recommendations, prioritize copays over others, and set coinsurance as a percentage of the fixed amount which you can set manually. Refer to the images above to access PR Settings and Suggested PR Rules.Creating Suggested PR Rules
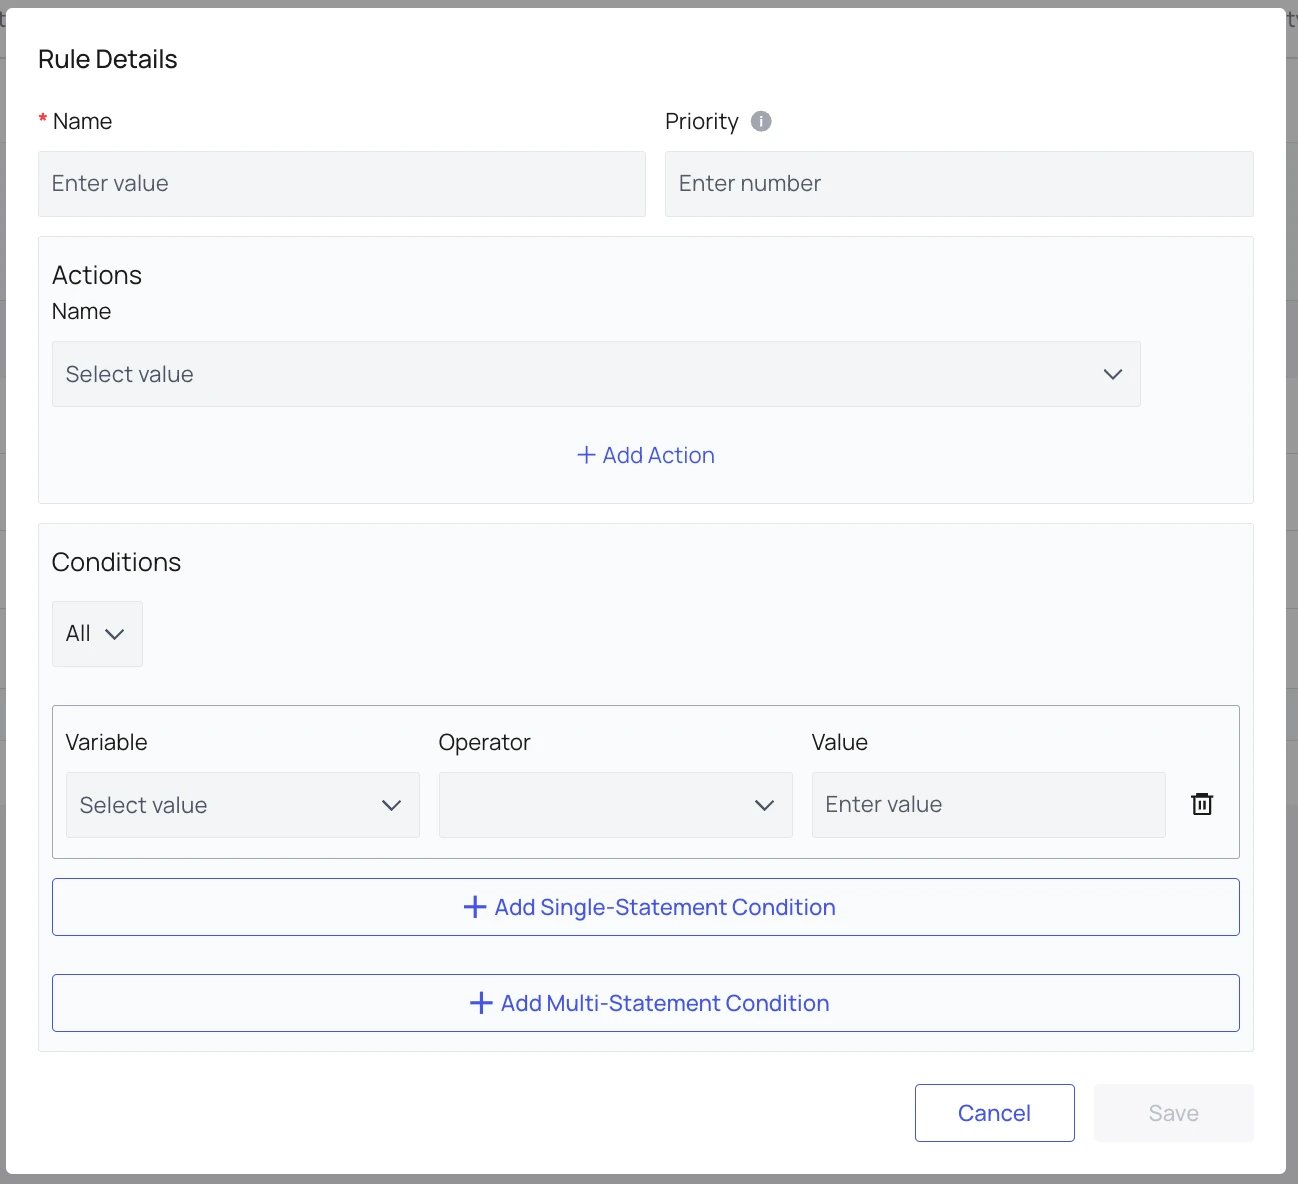
Once you click Add rule, this will pop up: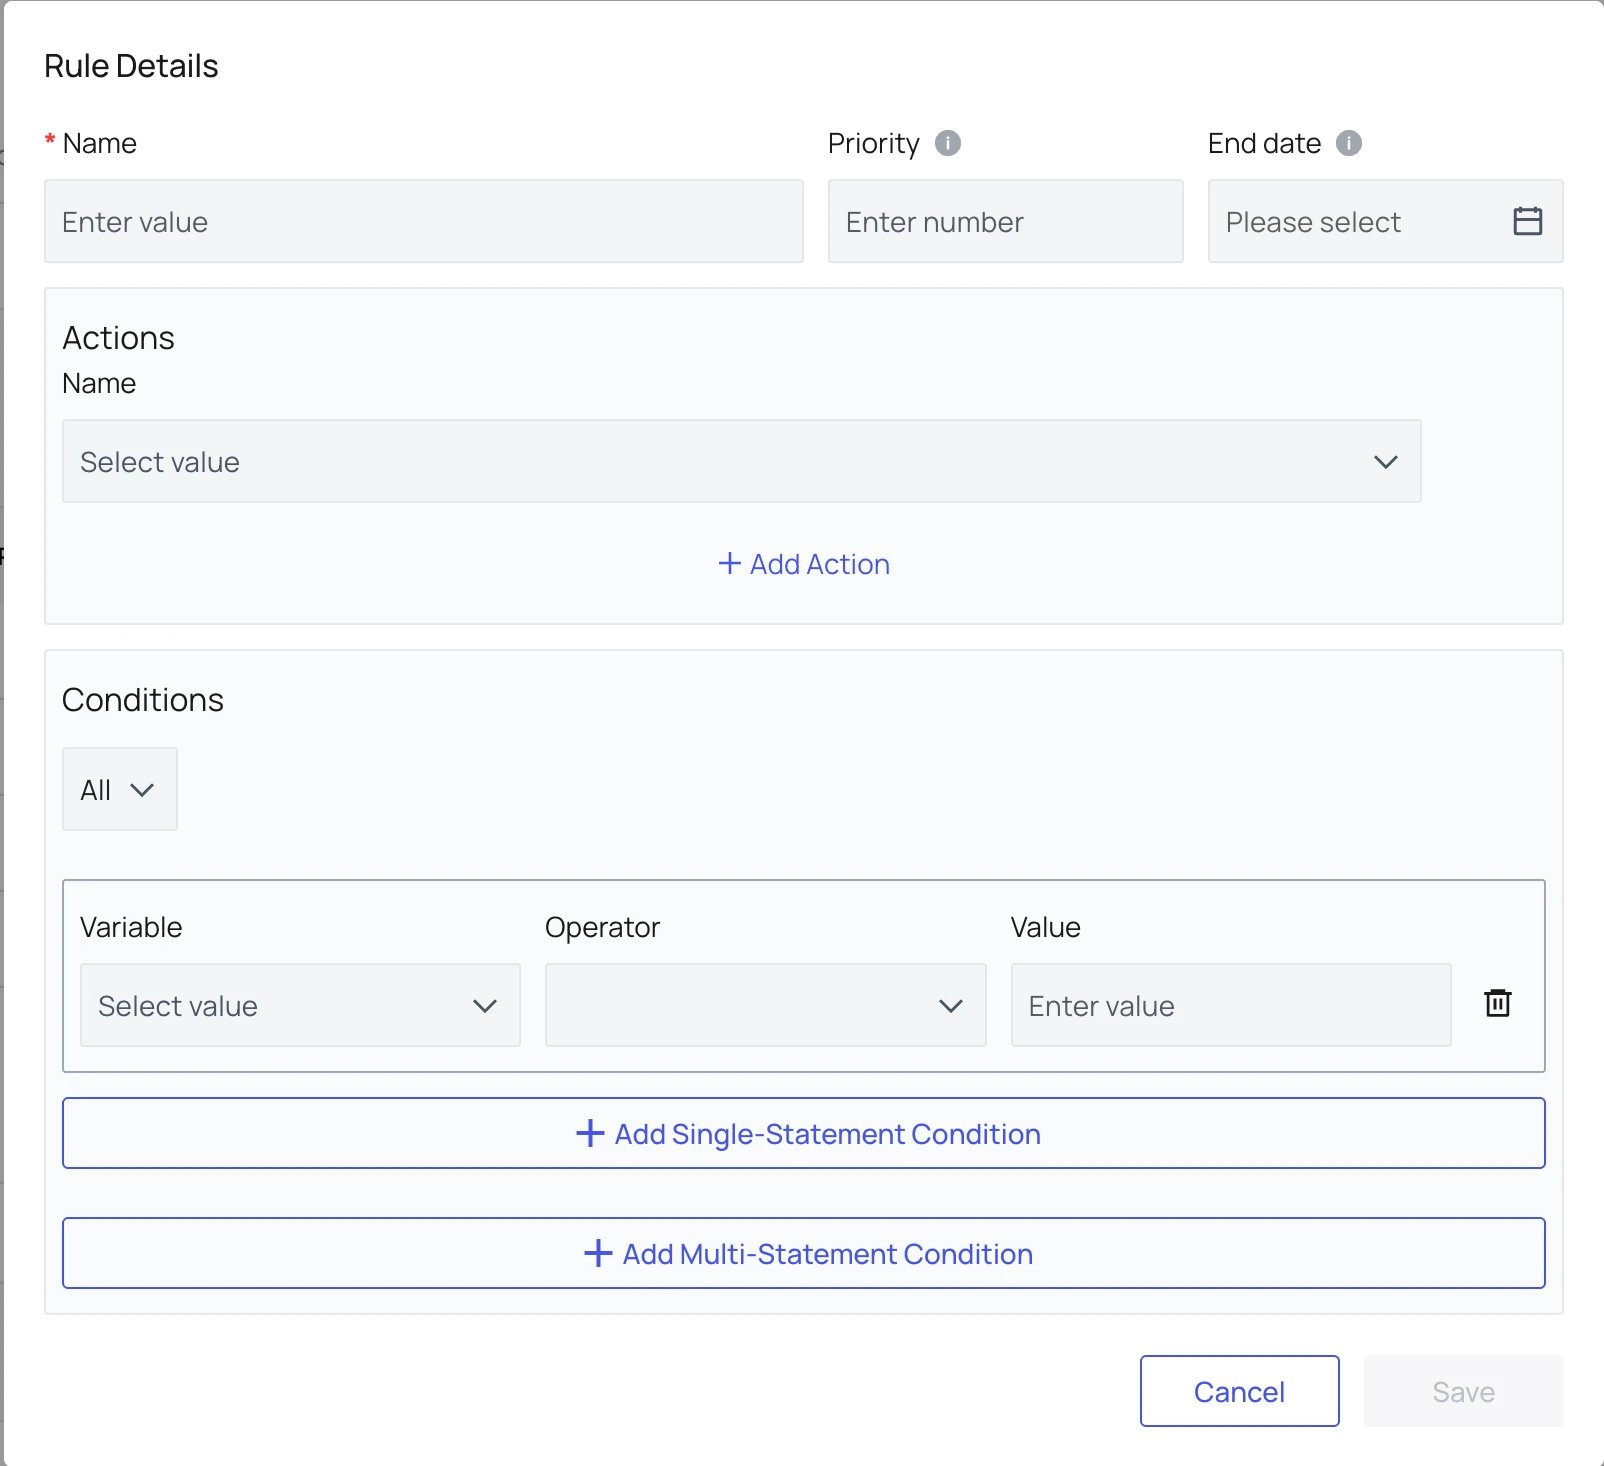
- Rule details — Use a descriptive label for the Name (e.g., “UHC Deductible Rule”), assign a priority where higher numbers win when multiple rules match, and use the End date toggle for temporary or inactive rules.
- Rule logic — Actions define what the rule does (set an amount, prioritize a benefit, set service type, set NPI, or notify), while Conditions determine when the rule applies (payer, appointment type, facility, age, provider, or benefit values). You can choose between All (requires every condition) or Any (requires one condition).
Configure Patient Responsibility Rules
Create four core PR rules. Their relative priority determines which recommendation wins when more than one rule matches the appointment.Overriding a Suggested Recommendation
If the suggested patient responsibility is not correct once your rules are configured, you can override the recommended amount for an individual patient. Step 1: On the Appointments page, click the gray area of the appointment row. Do not click the patient name or the insurance name, as those open different views.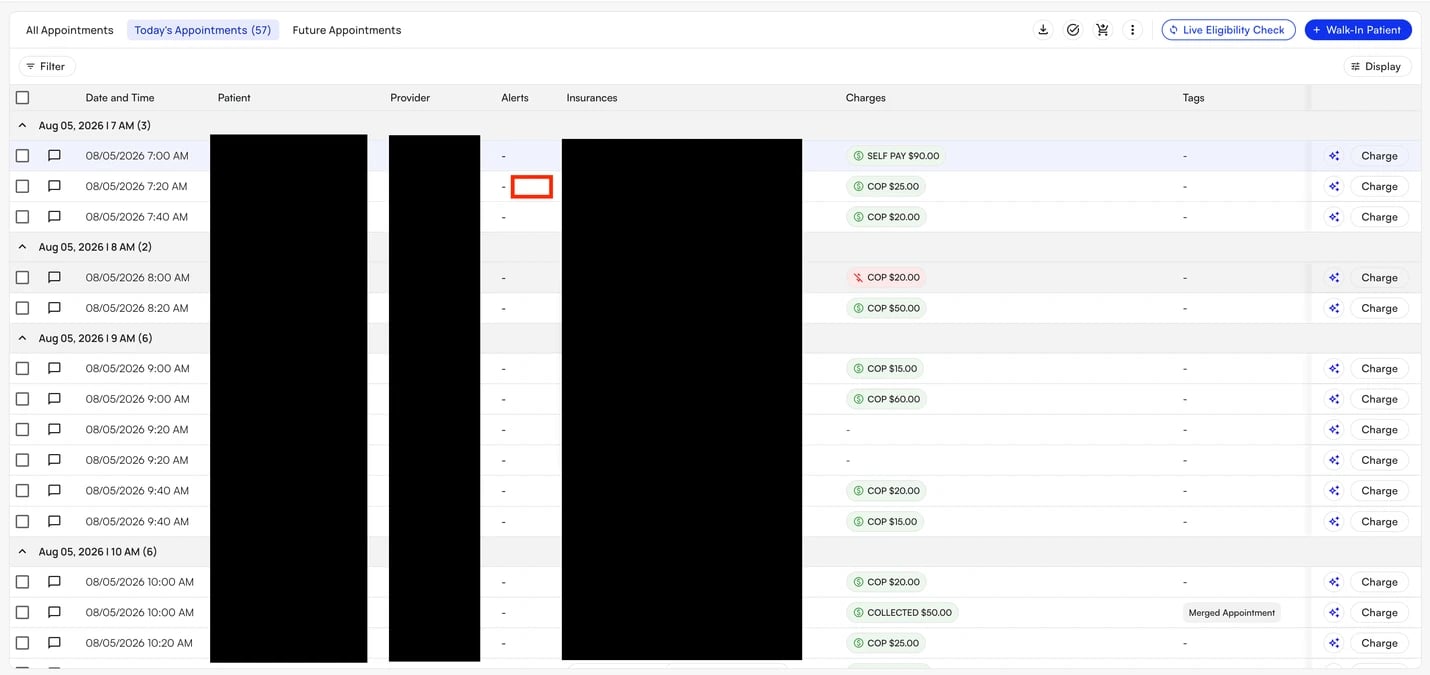
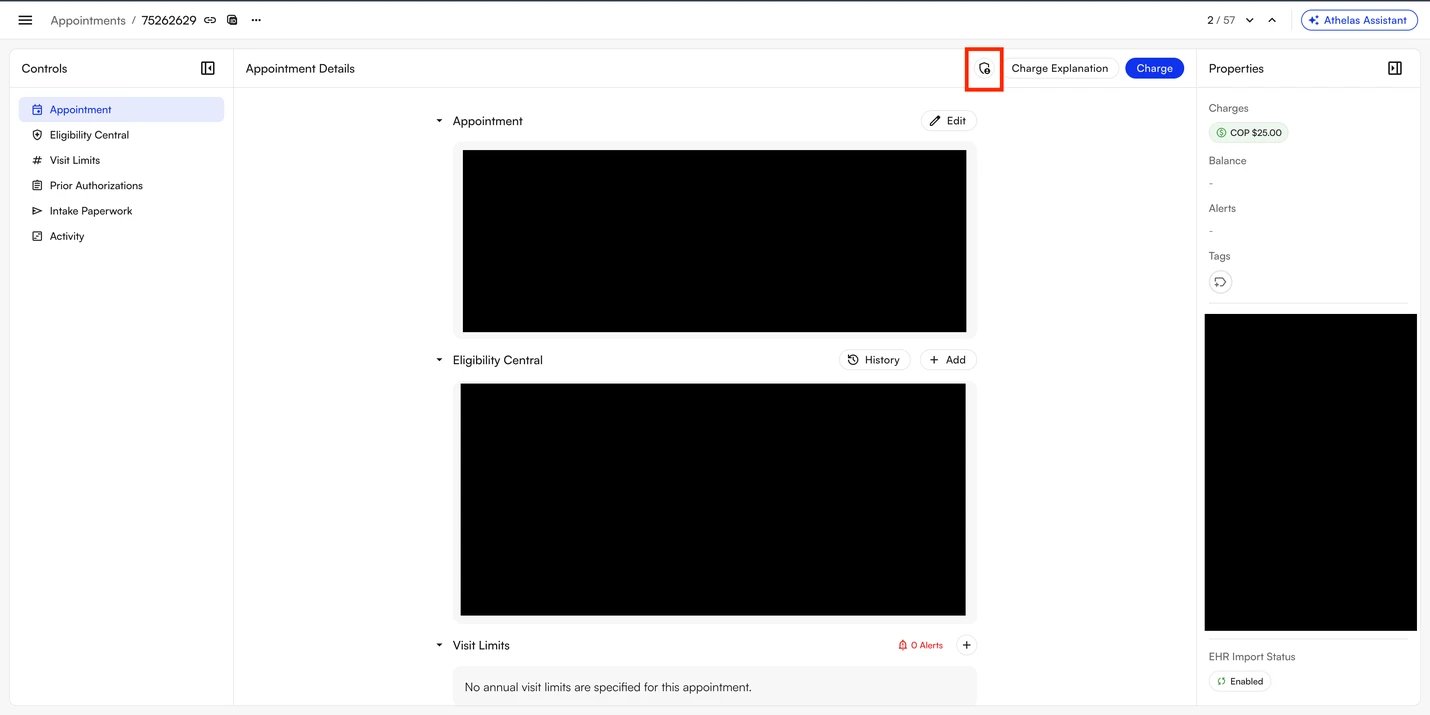
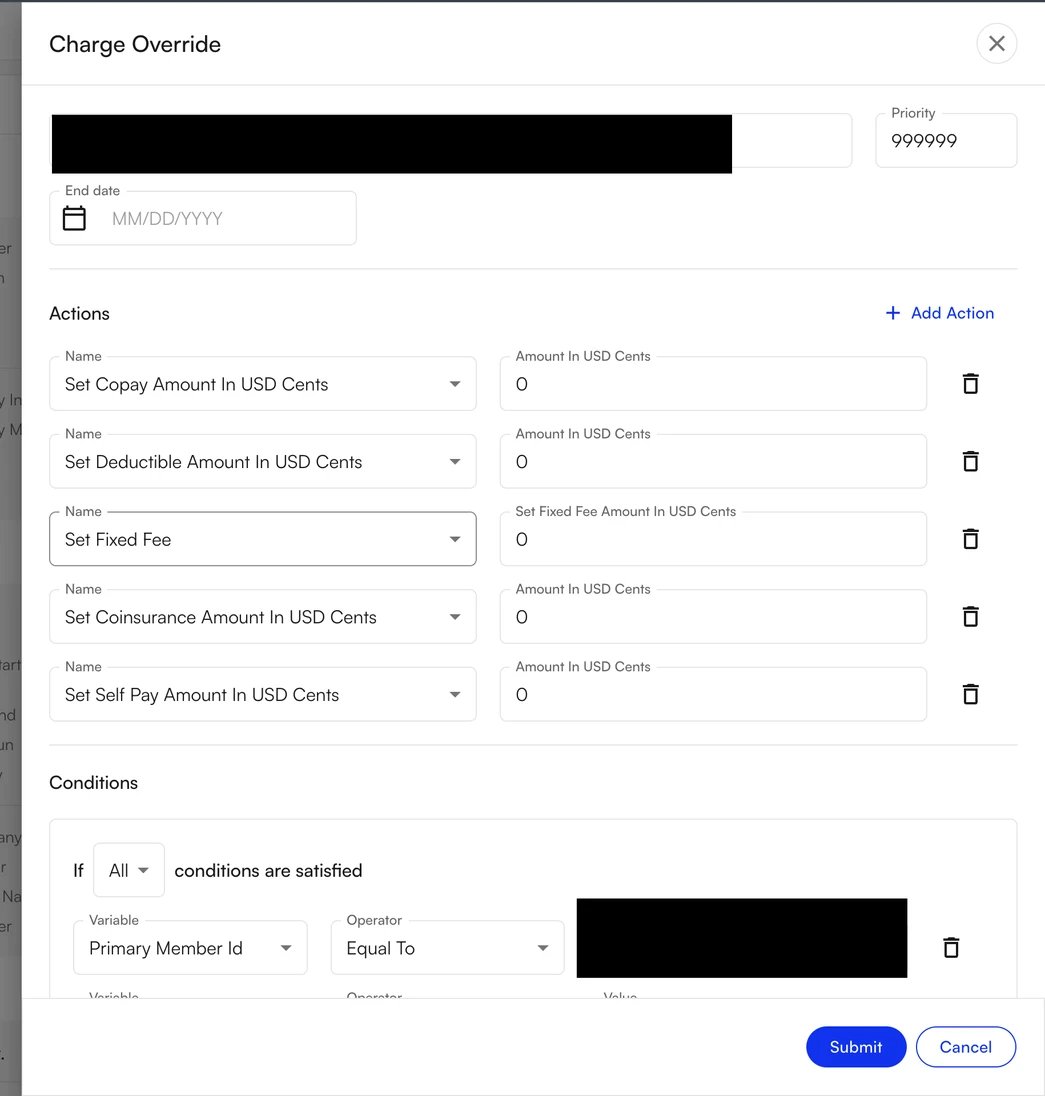
Build rules with the Rule UI
Alongside building rules by hand in PR Settings, you can create them by describing what the rule should do in plain language. The Athelas Assistant converts your description into a working rule and populates the Conditions and Actions for you, so your job is to review the result and save it. This is most useful when a single site-wide mapping is not enough. For example, if Provider A is a physical therapist but Provider B is an occupational therapy specialist, you need OT benefits surfaced for Provider B’s appointments rather than PT benefits. Instead of building that exception by hand, you can describe it and let the Rule UI generate it. Step 1: In the left navigation, open the Automation section and select Automations. Step 2: At the top of the page, select the Rules tab. Step 3: Select the card for the type of rule you want to build.When the appointment type is "Daily Note", set the service type code to 98.For appointments with Provider B, set the service type code to Occupational Therapy.For the Downtown facility only, map all appointment types to PT.For BCBS Federal plans, prioritize the Non-Specialist copay over the Specialist copay.Exclude any copay benefits that are not of POS Office.For all appointments, recommend an \$80 deductible for Medicare patients if they have not met their deductible.
Rules already configured for your site
Some rules are already set up for your site by default, so you do not need to create them. Review them so you understand how they interact with the rules you configure yourself, since their priorities determine which recommendation wins when more than one rule matches an appointment. Prioritize Copay, the Out-of-Pocket rule, and the Secondary Insurance rule are Suggested PR Rules, and the PT mapping rule is an Appointment Rule. All four are already configured for your site.Prioritize Copay
- Actions: Prioritize Copay From Benefits; set deductible and coinsurance amounts to $0.
- Conditions: Copay greater than $0. An appointment-type condition applies only when copay workflows differ by specialty.
- Priority: Set above deductible and coinsurance, but below the OOP rule.
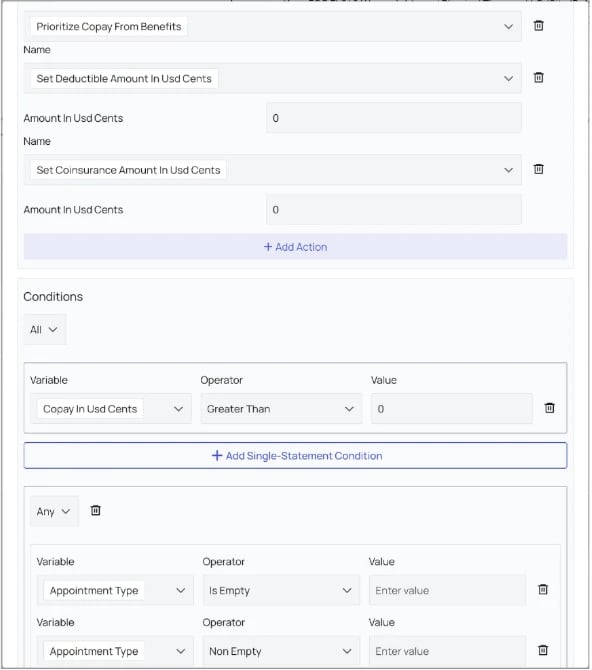
Out-of-Pocket rule
Rule type: Suggested PR Rule.- Actions: Set Copay Amount and Deductible Amount to $0, then add a notification that the patient has met out-of-pocket.
- Conditions: Individual or family out-of-pocket remaining equals $0.
- Priority: Highest of the four PR rules so it suppresses any collection recommendation.
- Result: When OOP remaining is $0, the appointment should show no suggested charge and a notification that the patient has met out-of-pocket.
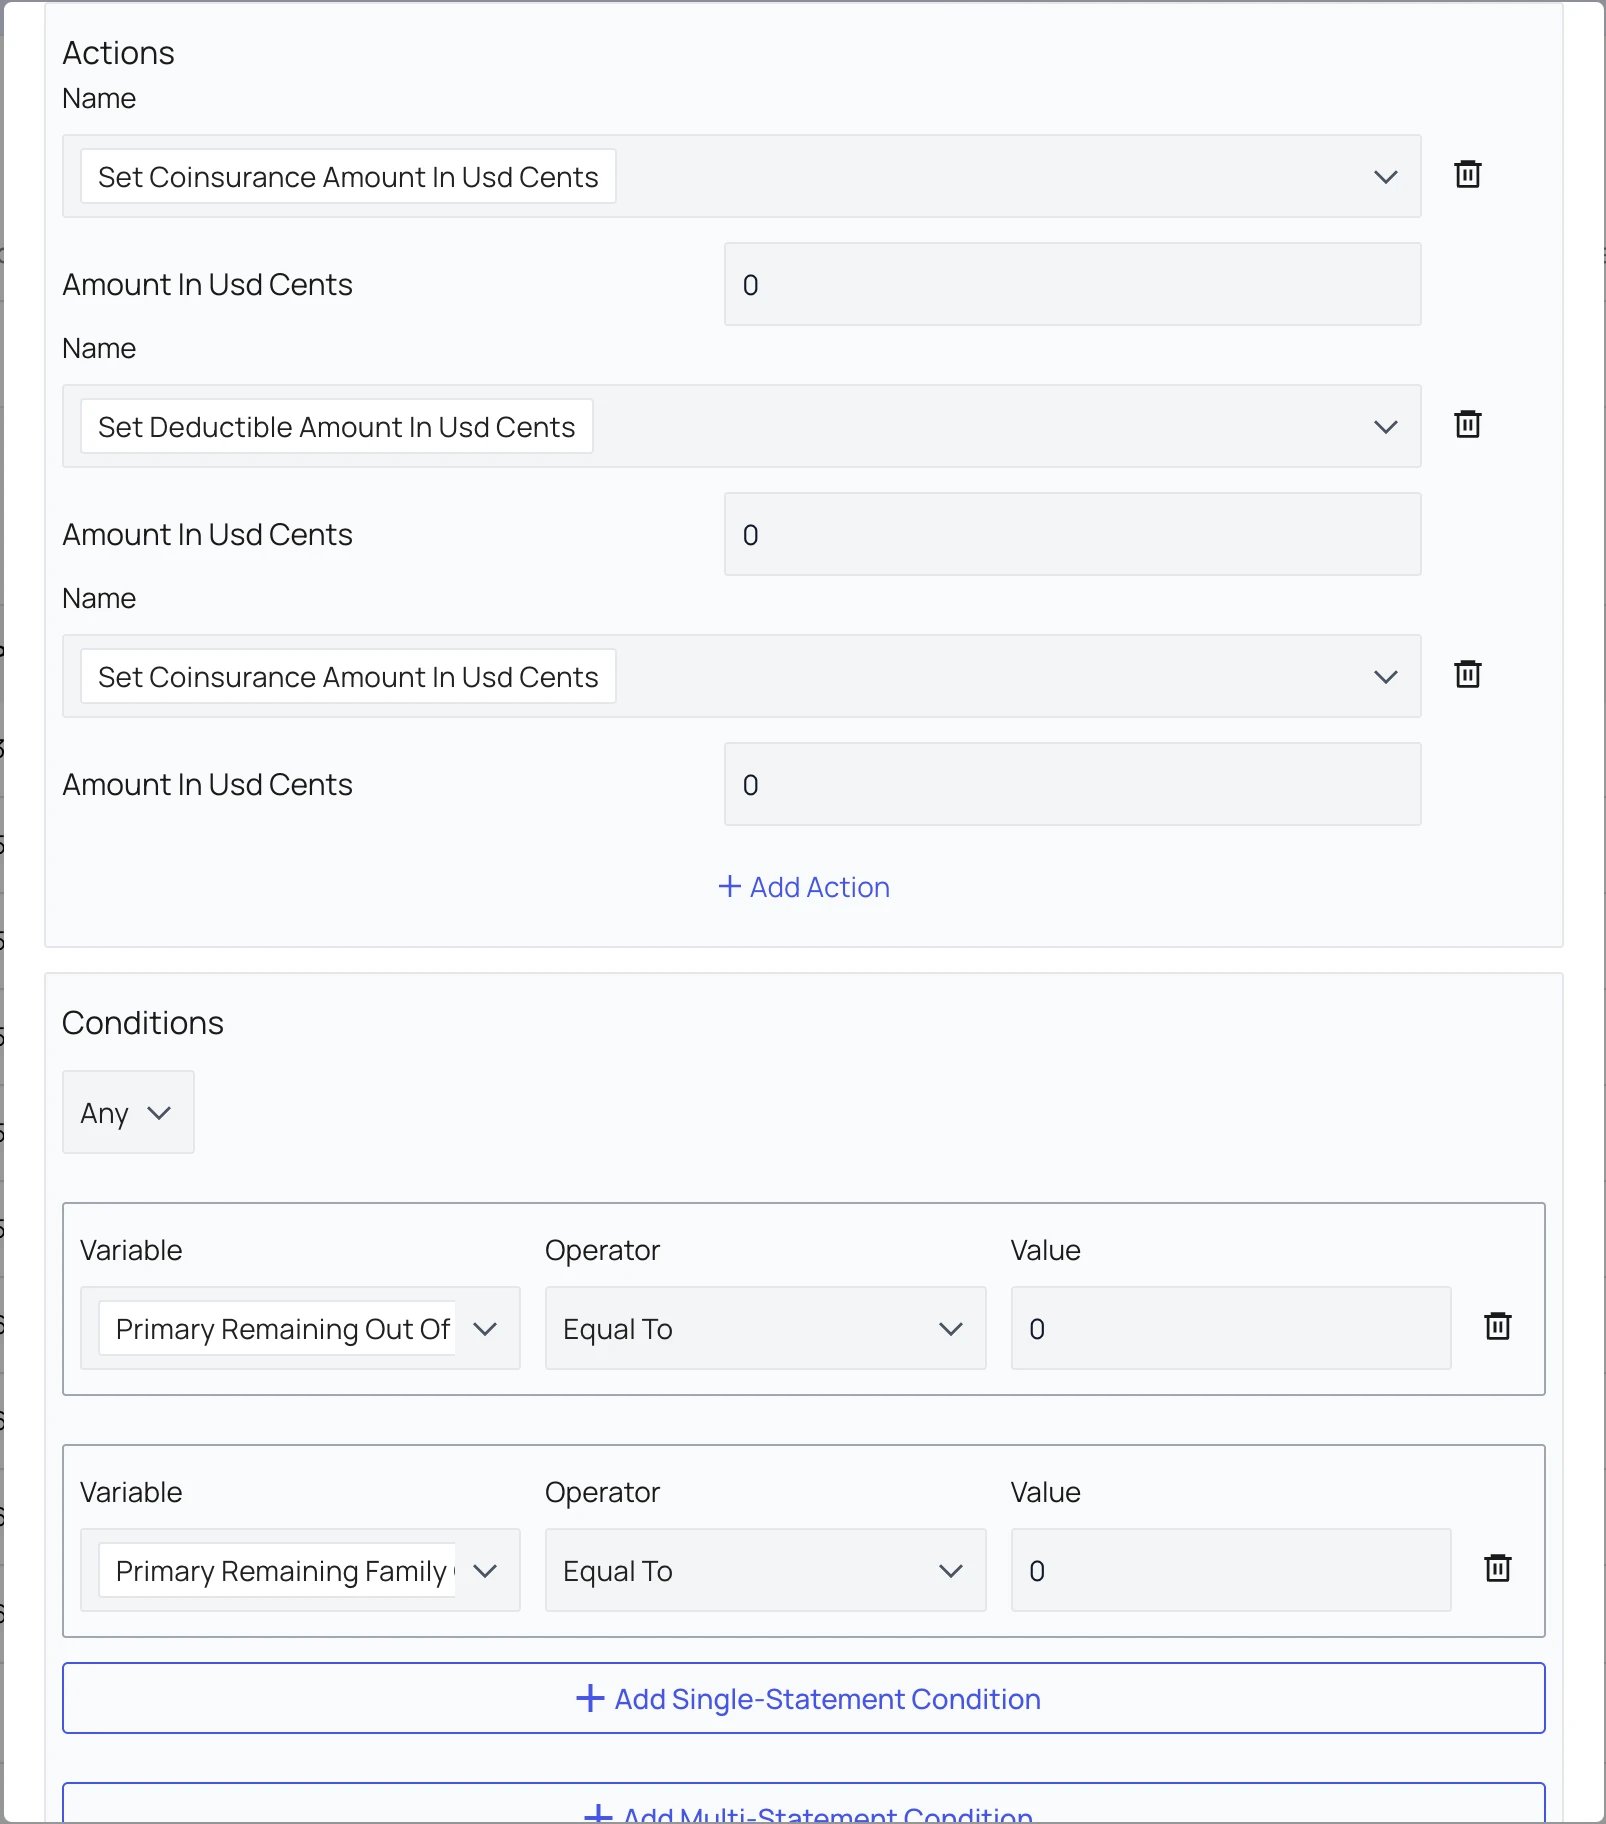
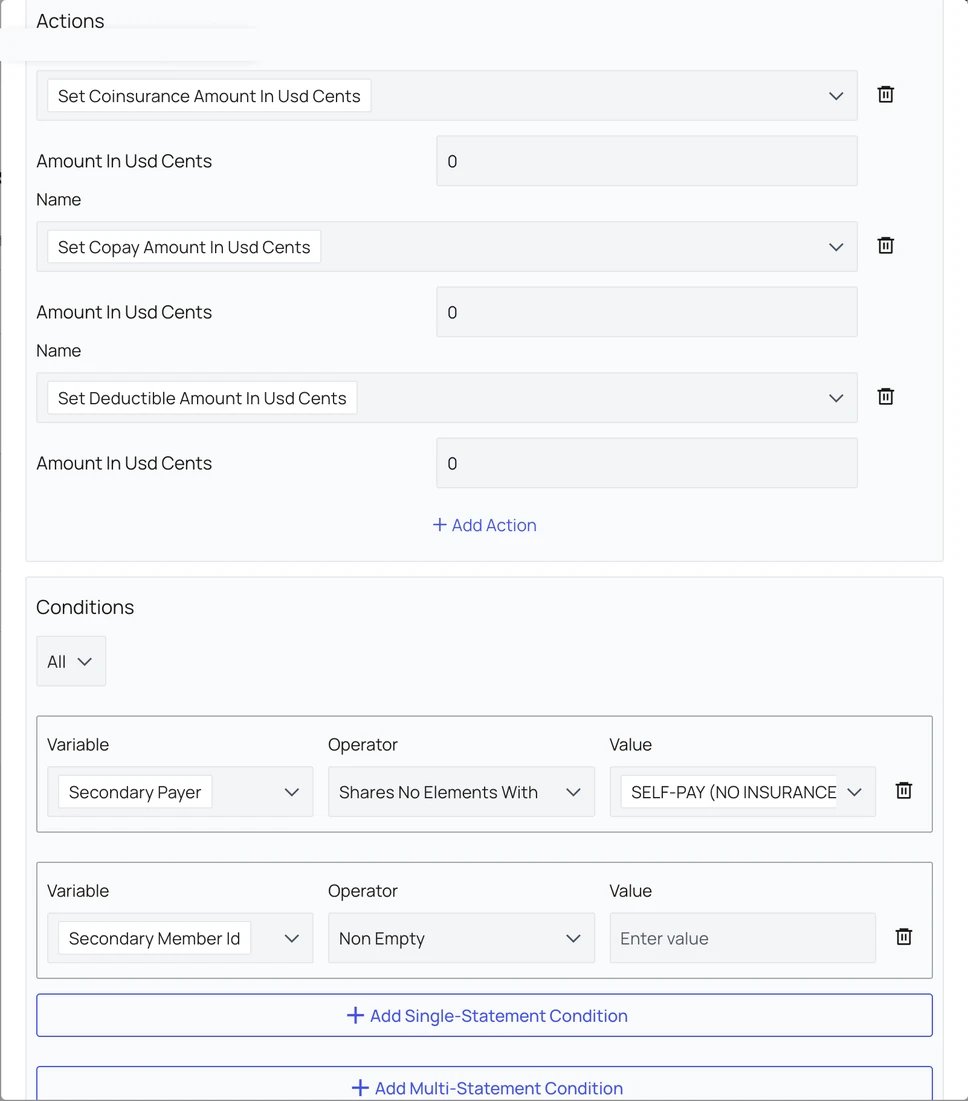
Secondary Insurance rule
Rule type: Suggested PR Rule.- Actions: Set Copay Amount, Coinsurance Amount, and Deductible Amount to $0.
- Conditions: Secondary Payer shares no elements with SELF-PAY (NO INSURANCE); Secondary Member Id is not empty.
- Priority: The same as the Out-of-Pocket rule, so it outranks Prioritize Copay and suppresses the copay recommendation.
- Why: When a patient has both primary and secondary insurance, the patient responsibility passed by the primary payer is usually covered by the secondary payer, so no amount is recommended for upfront collection.
PT mapping rule
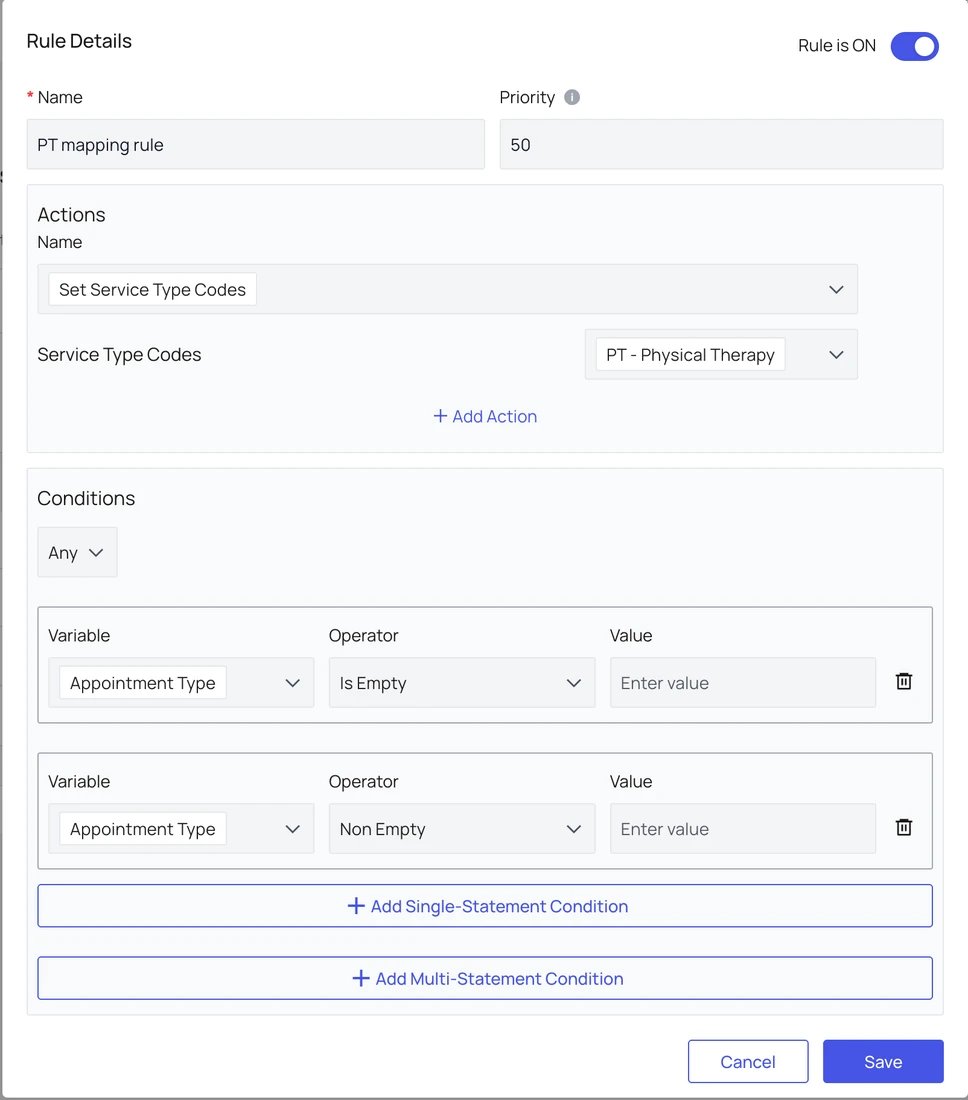
Rule type: Appointment Rule.- Actions: Set Service Type Codes to PT – Physical Therapy.
- Conditions: Set to “Any,” with Appointment Type Is Empty and Appointment Type Non Empty. Together these act as a fail-safe so the rule applies to every appointment type.
- Priority: 50.
- Why: The practice is a Physical Therapy site, so eligibility checks prioritize Physical Therapy benefits, which are the most relevant benefits returned for these appointments.
Adding more PR rules to improve upfront collection
Beyond the rules already configured for your site, you can add more Suggested PR Rules to improve how much patient responsibility is collected upfront. Refer to the images earlier in this guide to access PR Settings and Suggested PR Rules.Deductible rule
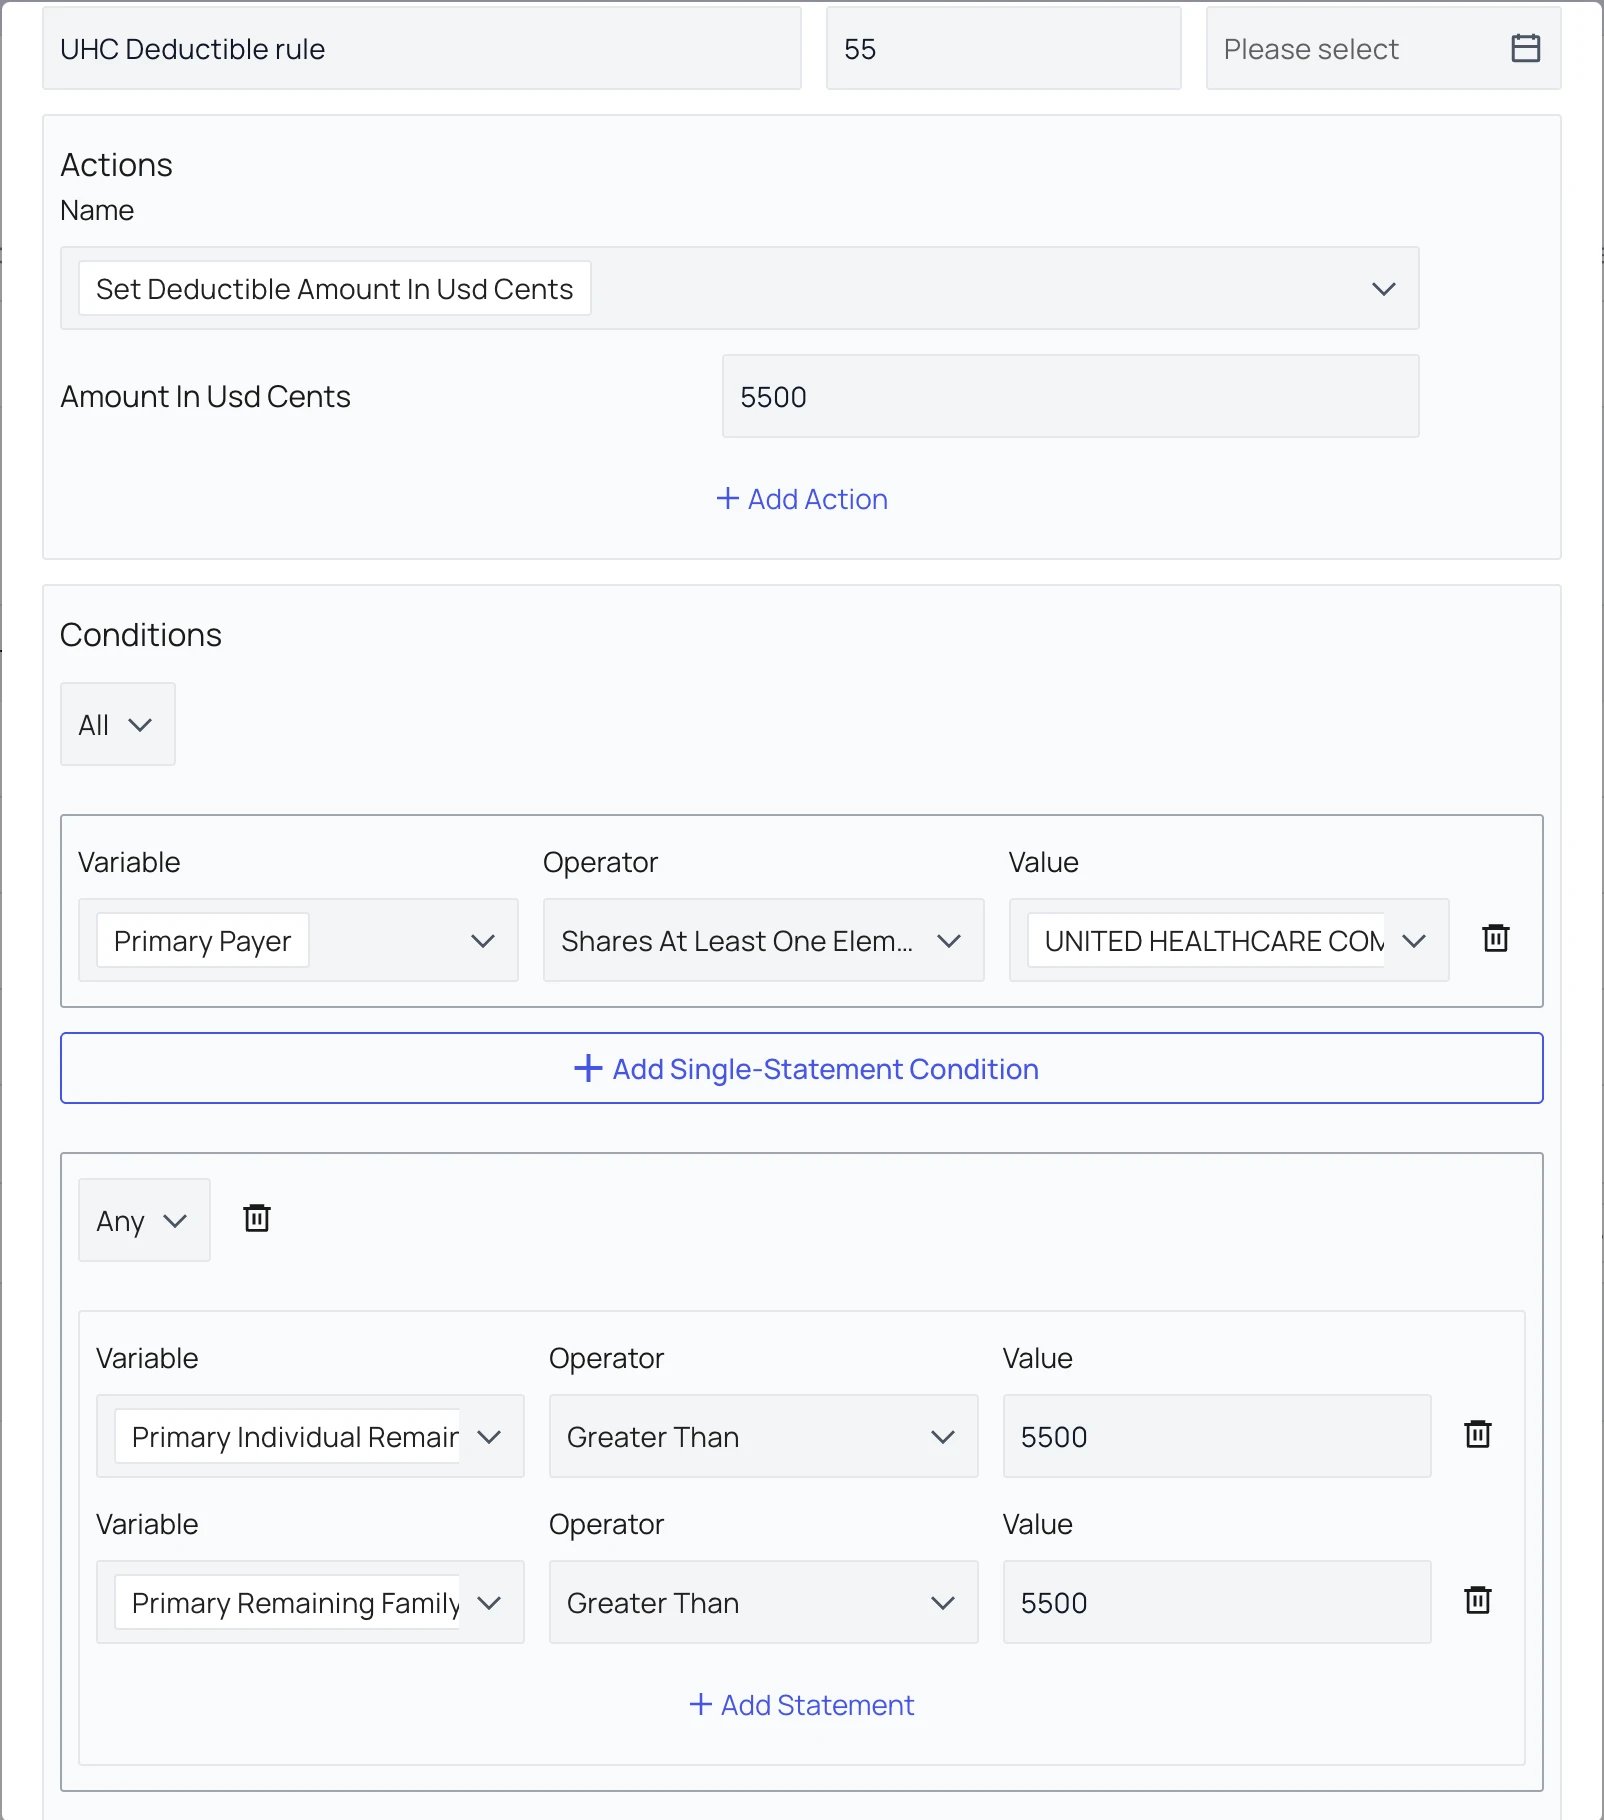
- Action: Select Set Deductible Amount and enter the approved upfront amount in cents.
- Conditions: Scope by payer and/or appointment type. Use an “Any” group when either individual or family remaining deductible can trigger the rule.
- Example: For UHC, if either remaining deductible is greater than $55, recommend $55 (5,500 cents).
Coinsurance rule
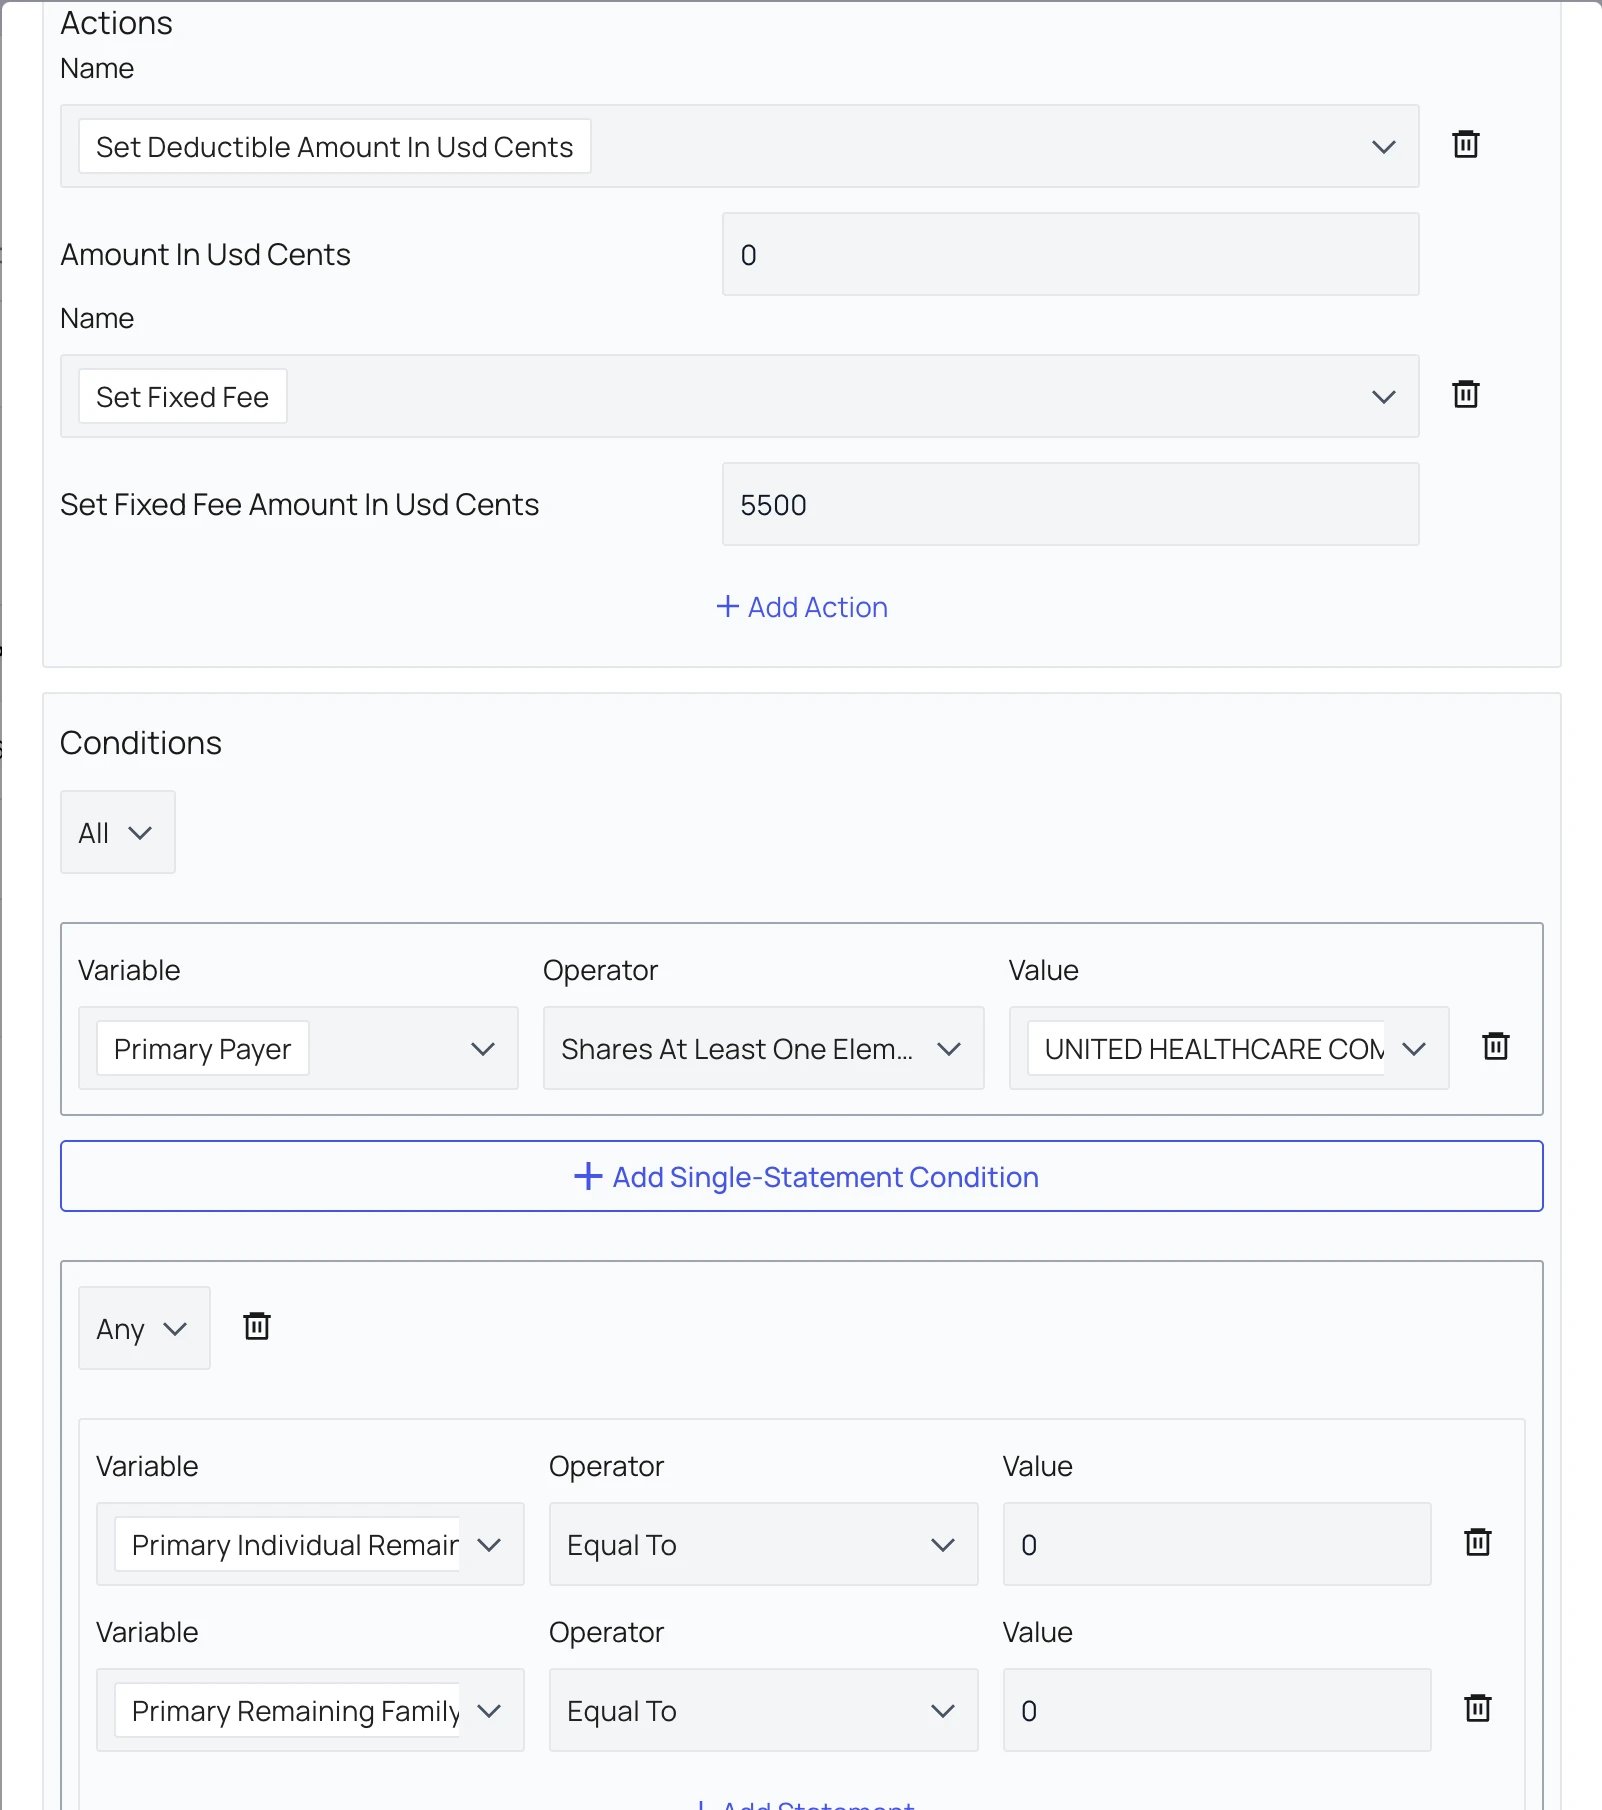
- Actions: Set Deductible Amount to $0 and Set Fixed Fee to the approved base fee.
- Conditions: Payer matches; coinsurance percentage is greater than $0; at least one remaining/calendar-year deductible value equals $0.
- Why priority 30: It should override the deductible rule when the deductible is met.
Out-of-Network (OON) insurances
For insurance plans where you want to retrieve Out-of-Network benefits instead of In-Network benefits, you need to map those plans accordingly. From PR Settings, click Out of Network Insurances.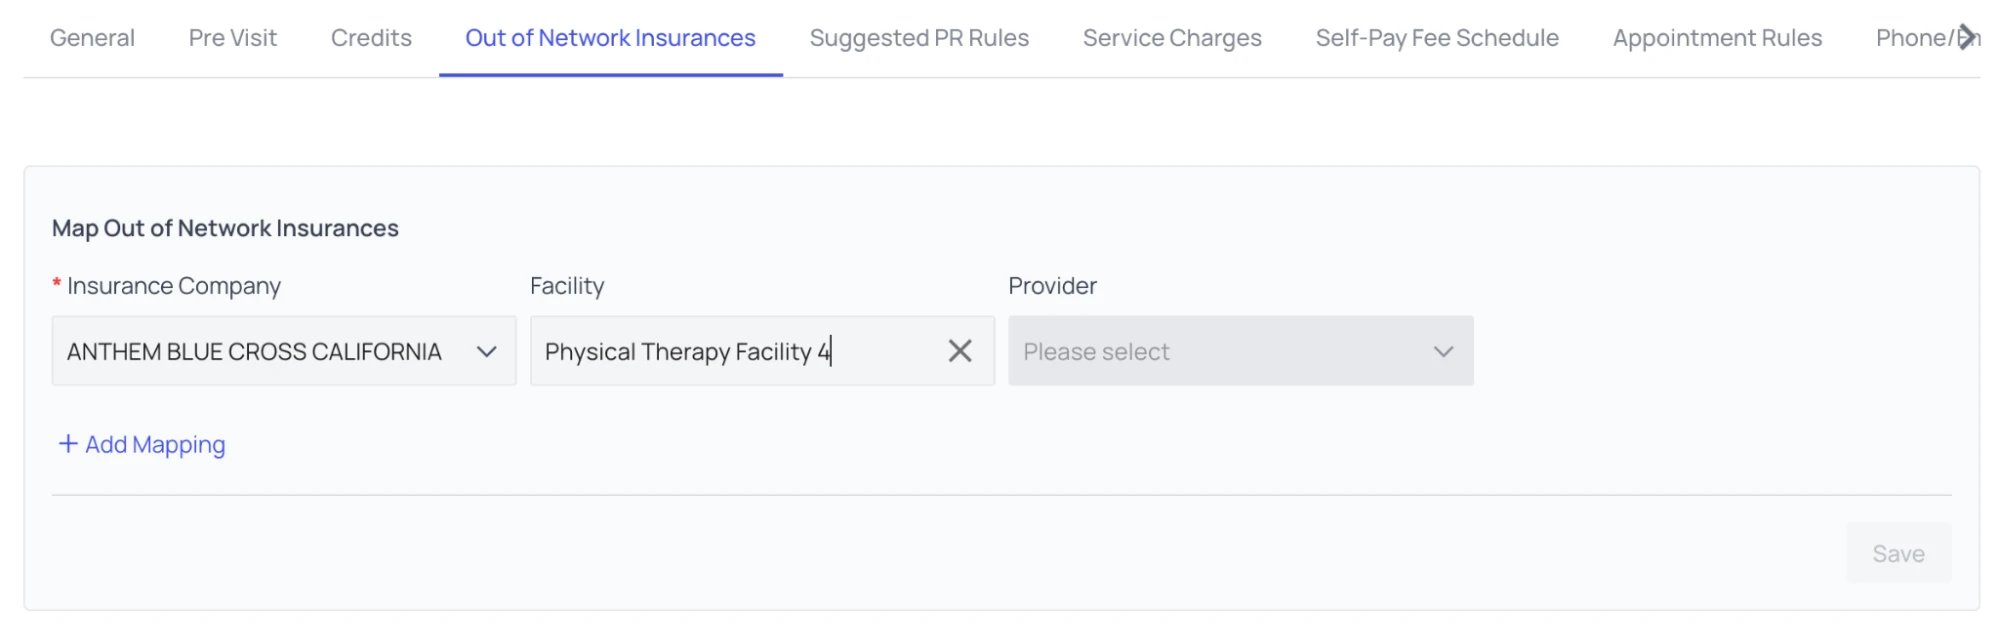
Configure custom payment types
Use custom line items for charges outside copay, coinsurance, and deductible. After configuration, the line items are available in the appointment payment collection workflow.Choose the correct type
Create a custom payment type
- Open PR Settings and scroll to Custom Payment Types.
- Select the plus icon in the upper-right corner.
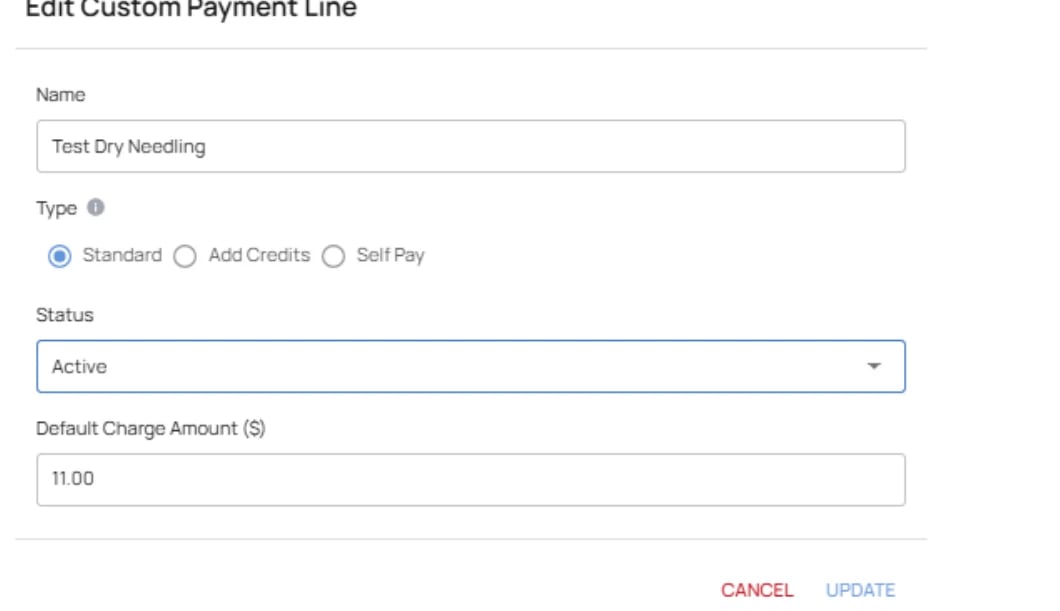
- Enter the Name, choose Type, set Status, and enter the Default Charge Amount in dollars.
- Leave the default amount blank when staff should enter the amount at collection time.
- Select Create.
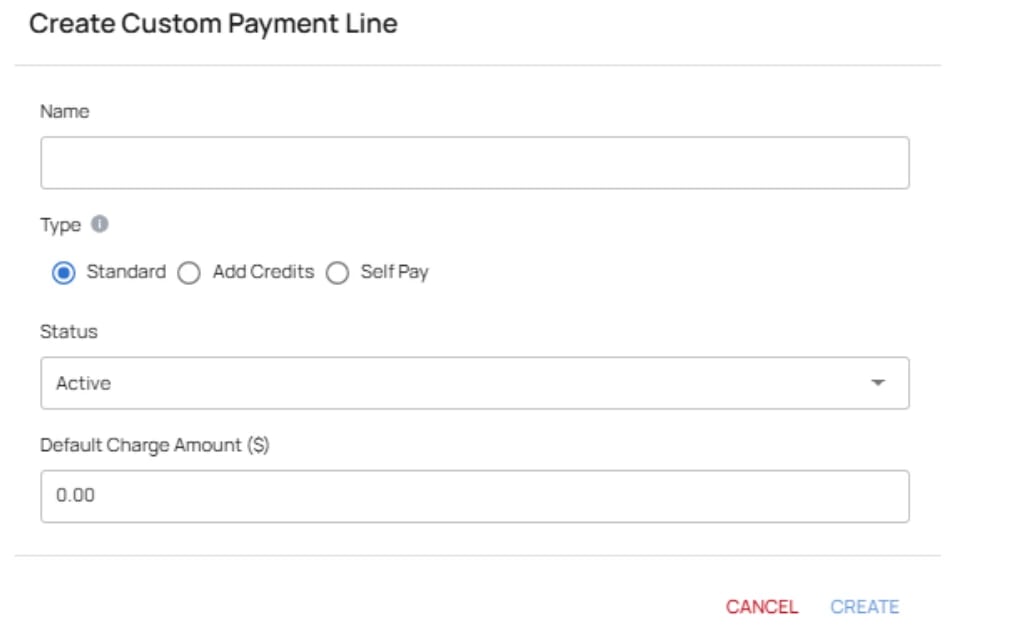
Use custom line items during collection
Add the line item to an appointment:- Open the appointment payment collection flow.
- Open the Type dropdown or search for the line item by name.
- Select the line item. Its configured default amount appears automatically.
- Adjust the amount or quantity when the workflow permits multiple units.
- Choose the payment method and complete collection.
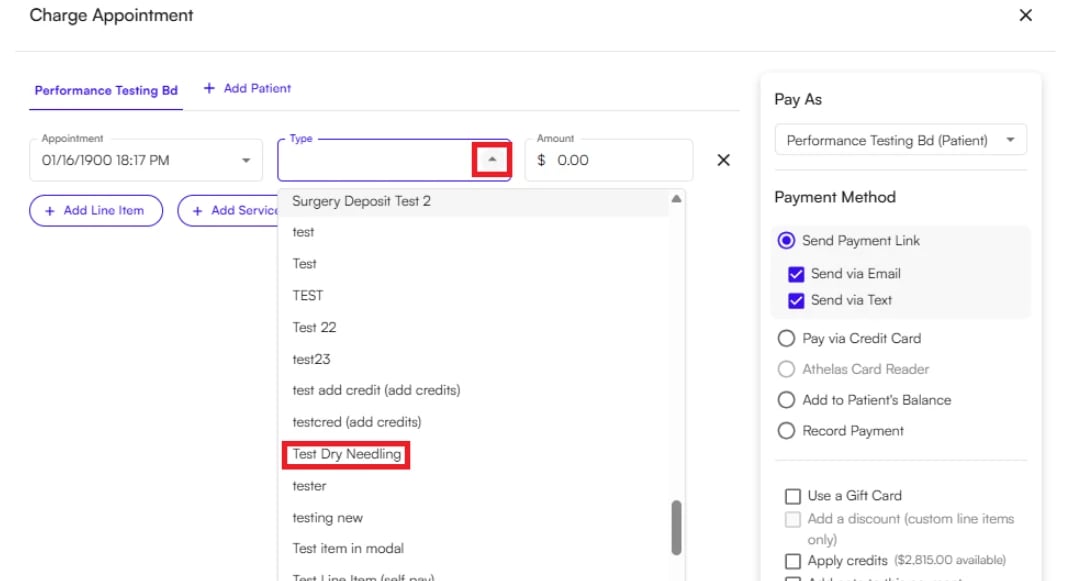
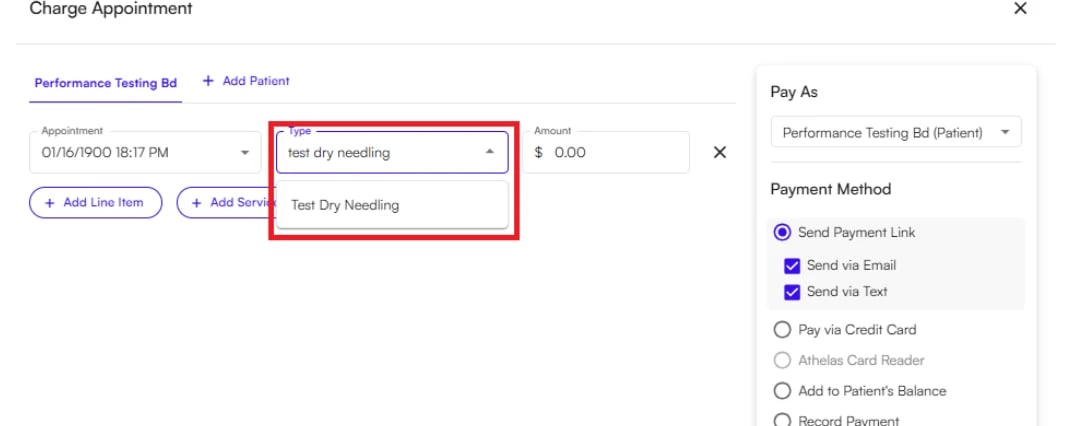
Edit, disable, or replace a custom line item
To edit an existing item:- Return to PR Settings → Custom Payment Types.
- Search for the line item and select the pencil icon.

- Update the Name, Default Charge Amount, or Status.
- Select Disabled to hide the item from the payment collection menu.
- Select Update to save the changes.
Confirm the intended accounting behavior
Set up your self-pay fee schedule
If your facility collects payment from self-pay patients upfront at the time of service, you can skip this step. The self-pay fee schedule is for facilities that charge different amounts for different CPT codes and bill the visit as a self-pay claim after treatment, based on the services actually performed. Once a schedule is in place, Insights prices those encounters from it instead of relying on a single flat self-pay amount. You can add fees one CPT code at a time or upload your whole schedule as a CSV. See Self-pay Fee Schedule for the full walkthrough.Set patient phone and email support
Once patient statements go out, patients will call or email with questions about what they owe. This setting controls which phone number and email address they are directed to. Most sites add a dedicated support line so those calls reach their own staff rather than the default Athelas support contact. Step 1: From the Appointments page, open the three-dot menu and select PR Settings. Step 2: On the Patient Responsibility Settings page, select the Phone/Email Support tab. Three routing options are available:- Athelas Support — the default. Athelas reaches out to patients on your behalf using the Athelas support contact details.
- Office of Patient’s Most Recent Visit — patients are directed to the office they most recently visited.
- Custom Contact Info — patients are directed to a phone number and email address you provide.
Collect payment in the appointment workflow
Once your rules and custom line items are configured, collection happens in the appointment payment flow. The demos below cover the payment methods available and the two cases that come up most at the front desk.Different ways to collect payment
Insights supports several ways to collect an upfront patient responsibility amount, including a payment link, a saved or new credit card, an Athelas card reader, and payments taken outside Insights and recorded after the fact. The demo below walks through choosing between them.Arcade demo: Choose a payment method when collecting upfront patient responsibility.
Collect upfront PR and an outstanding balance
Patients often arrive owing the upfront amount for today’s visit plus a balance from an earlier date of service. The demo below follows that collection process end to end.Arcade demo: Collect upfront patient responsibility together with an outstanding balance.
Collect a partial payment
A patient may want to pay part of an amount now, or split one amount across two payment methods. Whatever is left stays on the patient’s balance to collect later. The demo below shows how that split works.Arcade demo: Split one amount across more than one payment.
FAQ
Can I override a suggested Patient Responsibility amount for a specific patient?
Can I override a suggested Patient Responsibility amount for a specific patient?
1000 for $10). From that point forward, the override applies to that patient and appointment type going forward.Why do all my Suggested PR Rule and Charge Override amounts need to be in cents?
Why do all my Suggested PR Rule and Charge Override amounts need to be in cents?
10 instead of 1000) will apply a recommendation for $0.10, not $10.What happens when a patient has both primary and secondary insurance?
What happens when a patient has both primary and secondary insurance?
What's the difference between the Product, Deposit, Self Pay, and Add Credits custom payment types?
What's the difference between the Product, Deposit, Self Pay, and Add Credits custom payment types?
My Suggested PR Rule isn't applying — what should I check?
My Suggested PR Rule isn't applying — what should I check?
Can I build these rules without filling in Conditions and Actions myself?
Can I build these rules without filling in Conditions and Actions myself?
Patients are calling Athelas instead of my office — how do I change that?
Patients are calling Athelas instead of my office — how do I change that?
How do I run or re-run an eligibility check itself, rather than configure the rules behind it?
How do I run or re-run an eligibility check itself, rather than configure the rules behind it?