Search all docs
Provider Workflows
Chart Notes
Auto-apply KX Modifier
Getting Started with Chart Notes
AI Appt. Summaries
Chart Note Clinical Types
Download Chart Notes as PDFs
Goals on the chart note
How to add Measurements
Import Previous Medical History
Navigating Flowsheets
Navigating Inbox Workflows
Navigating the Chart Note
Set up Custom Chart Note Templates
Setting up Co-signers on Your Note
Sign a Chart Note
Text Snippets For Your Note
Chart Note Features Not Supported
Chart Notes
Claim Details
Claim Details
Front Office Workflows
Appointments
The Insights Appointments Page
Adding Prior Auth and Alerting
Alternate Methods for Scheduling
How to Add a Walk-In Patient
How to Run an Eligibility Check
How to Schedule an Appointment
How to Take Payments
Sending out reminders and forms
Understanding Appointment Details
Updating Appointment Statuses
Appt. Features not supported
Appointments
Daily Operations
Daily Operations
Patient Communications
General Patient Flows Features
Text Blast Page
Insurance Intake Page
Functional Outcome Measurements
Getting Started with Patient Portal
Complete Intake Forms
Navigating Patient Workflows
Manage Patient Appointments
Manage Payments through Patient Portal
Patient Intake Automation
Update Insurance Info
View Home Exercise Programs
Patient Communications
Patient Responsibility
Charge Saved Credit Cards
Manage Credit Cards
Setting up a Payment Plan
How to Cancel PR
How to Send a Patient Payment Link
How to Push to PR
How to Record Payments
How to Refund a Payment
How to Request via Text or Email
How to Set Up Miscellaneous Line Item Charges
How to Take Payment for Families
How to Undo a Write Off
How to Write Off PR
Patient Responsibility Page
PR Overpayment Refunds and Estimated vs. Remittance PR
PR Settings
PR Timeline
Patient Responsibility
Billing Workflows
Front Office Payments
Front Office Payments
Reports
A/R Reports
Building and Running Reports
Claim Adjustments Report
Collections Report
Custom Collections Report
Detailed Charges Report
Export Claim Details
Generate a Transaction Report
Patient Balances Report
Patient Charges Report
Patient Claims One-pagers
Patient Collections Report
Patient Eligibility Report
Posting Log Report
Site Transaction Report
Site Transaction Report Summary
Submitted Claims Report
Upcoming Patient Statements Report
Reports
Owners & Administration
Last updated:
Aug 21, 2025
Self-service Credentialing
Utilities
Provider Workflows
Front Office Workflows
Overview
The Self-Serve Credentialing Matrix is a centralized tool designed to simplify and standardize how providers and insurance companies manage credentialing requirements. It provides an at-a-glance reference for the credentialing status of each provider–payer relationship, ensuring clarity, compliance, and faster decision-making.
Credentialing is a critical process that validates whether providers meet the requirements of insurance companies to deliver care under their plans. Traditionally, this information is fragmented, requiring manual lookups and repeated back-and-forth. The self-serve credentialing matrix eliminates that friction by giving all stakeholders immediate visibility into credentialing statuses.
How would it help?
Efficiency – Cuts down on time spent searching for or verifying credentialing requirements.
Transparency – Provides providers and payers with a shared source of truth.
Scalability – Supports onboarding, cross-coverage, and expanding provider networks with minimal administrative overhead.
Key concepts
Term | Meaning |
|---|---|
Provider | A healthcare professional or organization (e.g., physician, nurse practitioner, clinic) delivering care to patients. |
Insurance company | A payer organization that contracts with providers to cover healthcare services for its members. |
Provider credentials | The qualifications, licenses, certifications, and verifications required for a provider to be approved by an insurance company. |
Credentialing group | A set of providers managed together for credentialing purposes, often by specialty, practice, or organizational affiliation. |
Credentialed | Indicates whether a provider is fully approved and recognized by the insurance company to deliver covered services. |
Cosigner required | Shows whether the provider can deliver services only under supervision, requiring a credentialed provider’s cosignature (e.g., trainees, newly licensed practitioners). |
Credentialing type | Type of credentialing. Includes |
Selecting credentialing type values
You can select either of the 3 values:
Is credentialed?
Cosigner required?
Allowed?
✅
❌
✅
❌
✅
✅
❌
❌
✅
✅
✅
❌
Group to selection of values:
Credentialing type
Can select
Is Credentialed?Can select
Cosigner requiredGroup
✅
❌
Individual
✅
❌
Unknown
✅
✅
Pending
✅
✅
None
✅
✅
Provider credentials
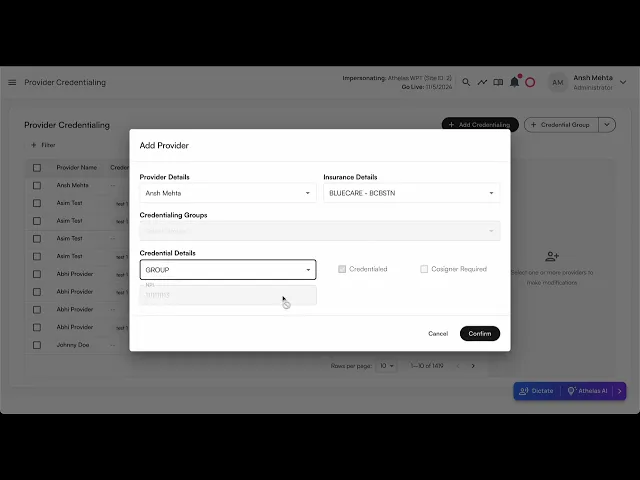
Adding a provider credential
Steps:
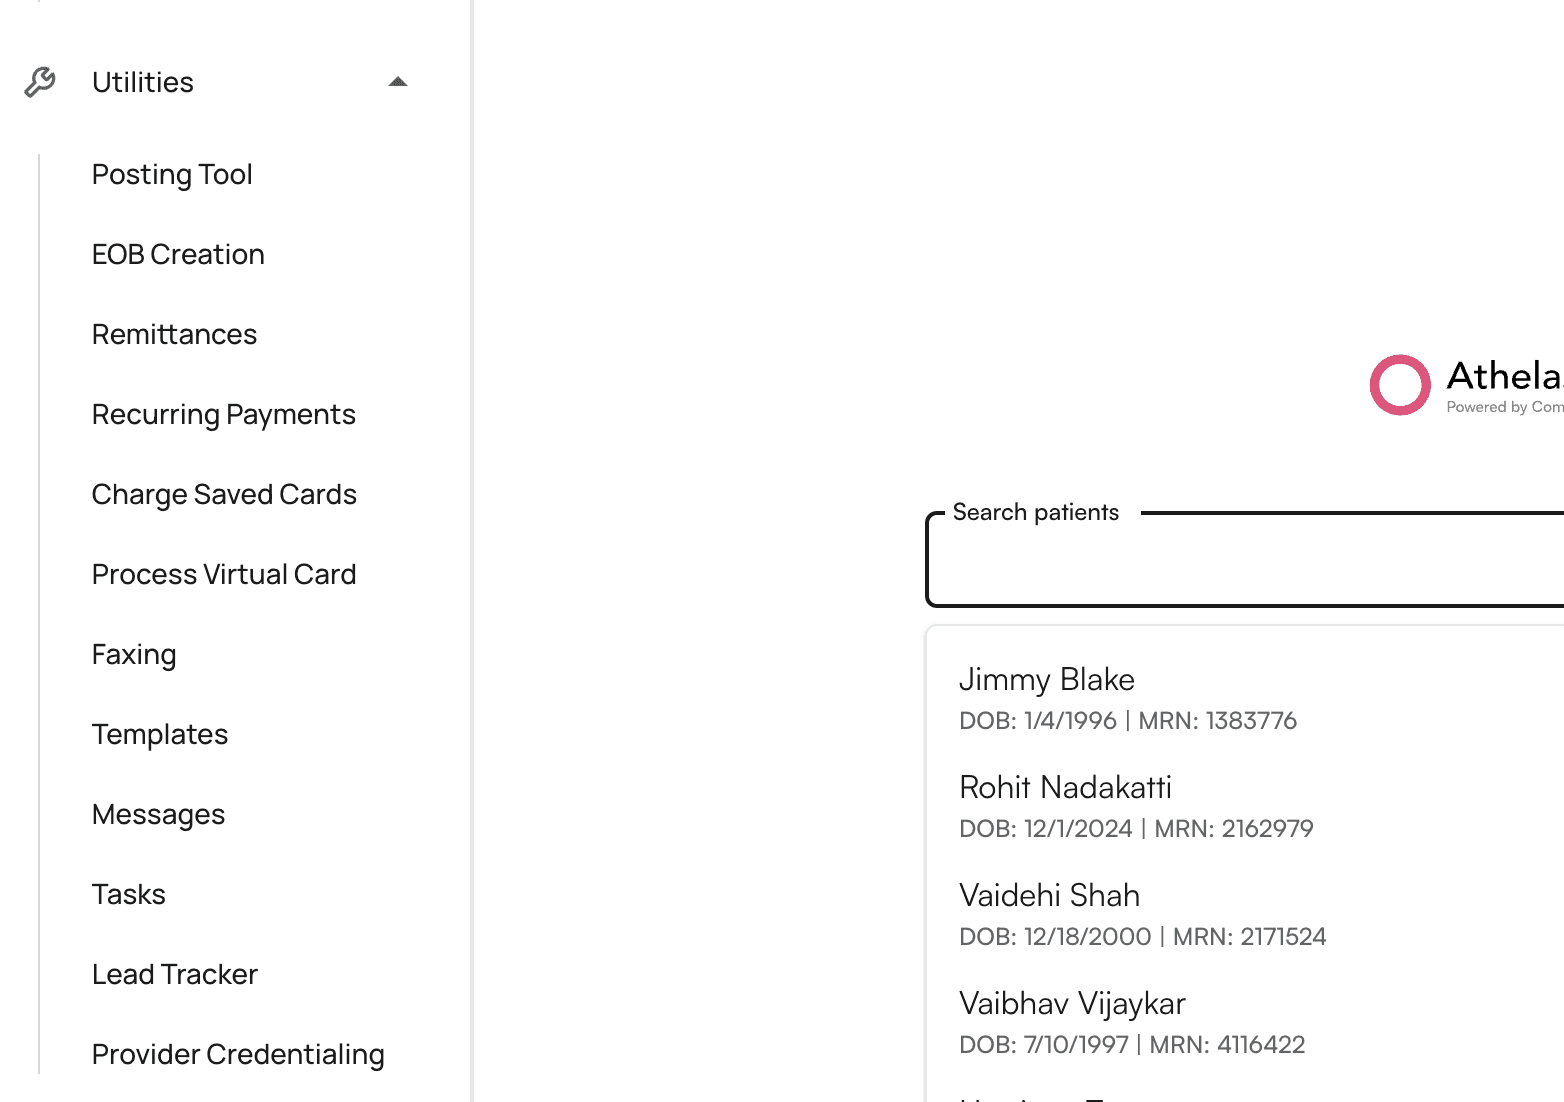
Click on
+ Add Credentialingbutton once navigating to ‘Provider Credentialing’ tab within Utilities
Select the provider name from the list of providers from the site.
Select the insurance company from the list of insurance companies.
Select the credentialing type. Based on the credentialing type, you would get the options to modify
CredentialedandCosigner required.Click on
Submit.The provider credentialing entry would be created.
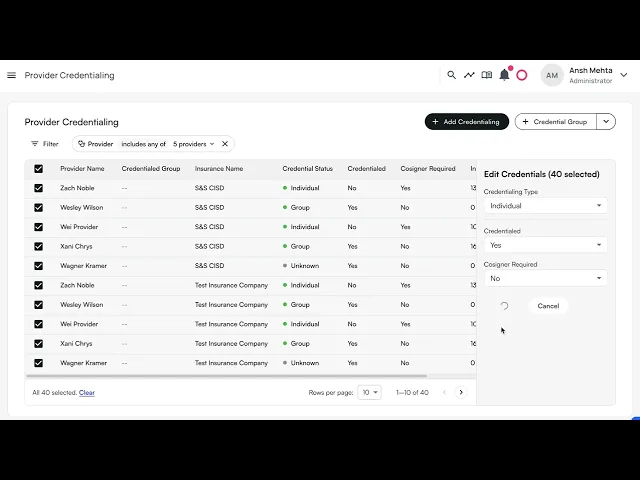
Bulk edit provider credentials
Steps:
In the table, you can select multiple rows by clicking on the empty checkboxes to the left of the row.
You can select multiple rows across different providers, insurance companies, and credentialing groups.
You have the ability to change the:
Credentialing typeCredentialedCosigner Required
You can either keep the existing values for these rows, or apply the same settings to all rows.
Click on
Submitto reflect your changes.
Example video:
Select all results in a filter for bulk editing
When a filter is applied, a prompt to select all the results for bulk editing shows up.
Credentialing Group
Credentialing group allows you to bundle multiple insurance companies under one group, so when you get credentialed for a group, you can apply the same configuration.
💡Important Notes:
An Insurance company can be part of multiple credentialing groups.
Groups are mutually exclusive with individual insurance selection in the Add Credential modal
You can select multiple groups when adding credentials to credential a provider with all insurances across those groups
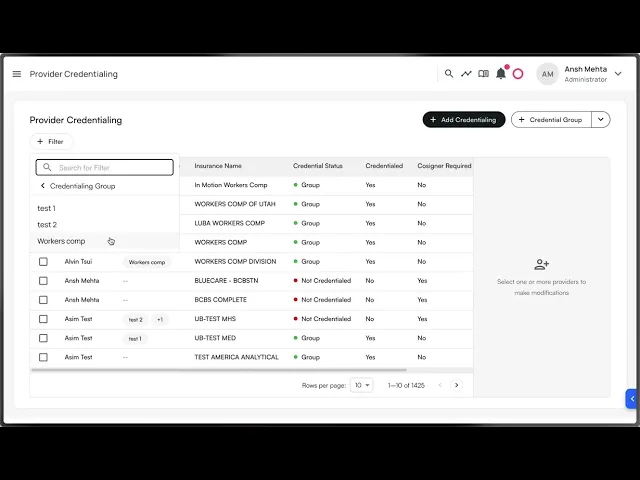
Creating Credentialing Groups
Navigate to Provider Credentialing page
Click the "+ Credential Group" split button in the top right

Fill out the group details:
Enter a group name (e.g., "Optum Group", "Medicaid Plans")
Add an optional description
Select insurance companies to include in the group
Click "Save Group" to create the group
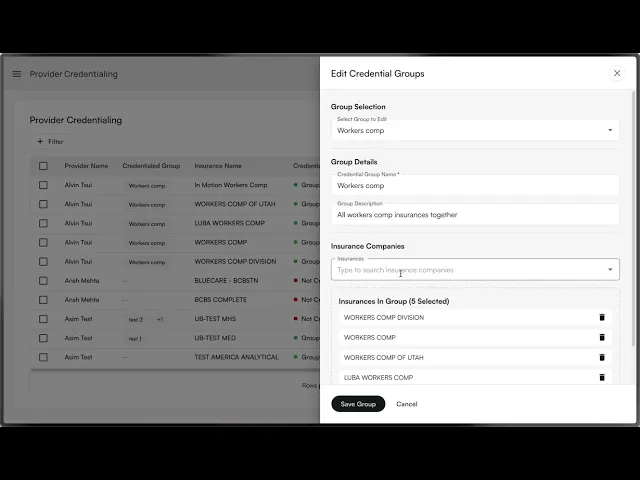
Editing Credentialing Groups
Click the dropdown arrow on the "Credential Group" button
Select "Edit Credential Group"
Choose the group you want to edit from the dropdown
Modify the details as needed (name, description, insurance companies)
Click "Save Group" to update, or "Delete Group" to remove it

Adding Credentials Using Groups
Click "Add Credentialing" to open the credential modal
Select a provider
Choose your credentialing approach:
Individual: Select a specific insurance company, OR
Group: Select one or more credentialing groups
Set credential details (type, status, cosigner requirements)
Click "Confirm" - the system will automatically create individual credentials for each insurance in the selected groups

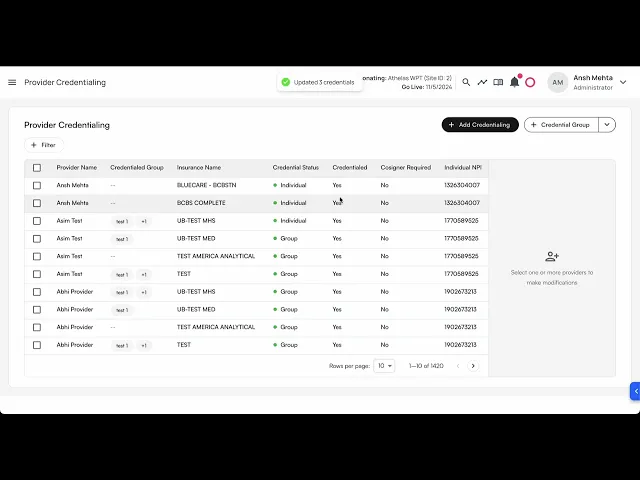
Viewing Group Information
Table Column: The "Credentialed Group" column shows which groups each provider belongs to
Filtering: Use the new "Credentialing Group" filter to view only providers who qualify for specific groups

Group Qualification: Providers only appear in a group if they have credentials for ALL insurance companies in that group
Deleting a credentialing group
You can also delete a credentialing group.
Steps:
Click on the credentialing group → down arrow icon →
Edit Credentialing groupSelect the group to be edited.
On the bottom of the drawer, you can see the
Delete credentialing group.A confirmation modal appears. On click of
Delete Group, the credentialing group would be Permanently deleted!
Using credentialing group as filters
Steps:
Click the
+ Filterbutton above the table. This will show various filters. SelectCredentialing GroupYou can search for various groups.
Click on each row to select/deselect the credentialing group.
On click, the table would load the filtered rows.
Using credentialing groups to add credentials
Steps:
Click on
+ Add CredentialingbuttonSelect the provider name from the list of providers from the site.
Select the credentialing group from the existing list of credentialing groups.
Select the credentialing type. Based on the credentialing type, you would get the options to modify
CredentialedandCosigner required.Click on
Submit.The provider credentialing entries for provider + insurance companies under the credentialing group would be created.
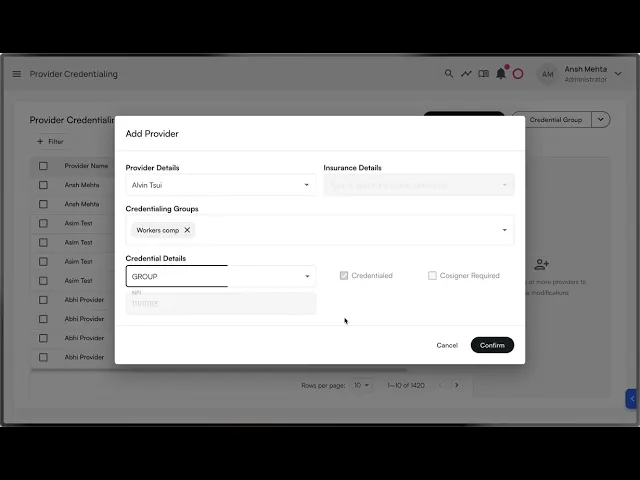
Table of Contents
Search all docs
Provider Workflows
Chart Notes
Auto-apply KX Modifier
Getting Started with Chart Notes
AI Appt. Summaries
Chart Note Clinical Types
Download Chart Notes as PDFs
Goals on the chart note
How to add Measurements
Import Previous Medical History
Navigating Flowsheets
Navigating Inbox Workflows
Navigating the Chart Note
Set up Custom Chart Note Templates
Setting up Co-signers on Your Note
Sign a Chart Note
Text Snippets For Your Note
Chart Note Features Not Supported
Chart Notes
Claim Details
Claim Details
Front Office Workflows
Appointments
The Insights Appointments Page
Adding Prior Auth and Alerting
Alternate Methods for Scheduling
How to Add a Walk-In Patient
How to Run an Eligibility Check
How to Schedule an Appointment
How to Take Payments
Sending out reminders and forms
Understanding Appointment Details
Updating Appointment Statuses
Appt. Features not supported
Appointments
Daily Operations
Daily Operations
Patient Communications
General Patient Flows Features
Text Blast Page
Insurance Intake Page
Functional Outcome Measurements
Getting Started with Patient Portal
Complete Intake Forms
Navigating Patient Workflows
Manage Patient Appointments
Manage Payments through Patient Portal
Patient Intake Automation
Update Insurance Info
View Home Exercise Programs
Patient Communications
Patient Responsibility
Charge Saved Credit Cards
Manage Credit Cards
Setting up a Payment Plan
How to Cancel PR
How to Send a Patient Payment Link
How to Push to PR
How to Record Payments
How to Refund a Payment
How to Request via Text or Email
How to Set Up Miscellaneous Line Item Charges
How to Take Payment for Families
How to Undo a Write Off
How to Write Off PR
Patient Responsibility Page
PR Overpayment Refunds and Estimated vs. Remittance PR
PR Settings
PR Timeline
Patient Responsibility
Billing Workflows
Front Office Payments
Front Office Payments
Reports
A/R Reports
Building and Running Reports
Claim Adjustments Report
Collections Report
Custom Collections Report
Detailed Charges Report
Export Claim Details
Generate a Transaction Report
Patient Balances Report
Patient Charges Report
Patient Claims One-pagers
Patient Collections Report
Patient Eligibility Report
Posting Log Report
Site Transaction Report
Site Transaction Report Summary
Submitted Claims Report
Upcoming Patient Statements Report
Reports
Owners & Administration
Last updated:
Aug 21, 2025
Self-service Credentialing
Utilities
Provider Workflows
Front Office Workflows
Overview
The Self-Serve Credentialing Matrix is a centralized tool designed to simplify and standardize how providers and insurance companies manage credentialing requirements. It provides an at-a-glance reference for the credentialing status of each provider–payer relationship, ensuring clarity, compliance, and faster decision-making.
Credentialing is a critical process that validates whether providers meet the requirements of insurance companies to deliver care under their plans. Traditionally, this information is fragmented, requiring manual lookups and repeated back-and-forth. The self-serve credentialing matrix eliminates that friction by giving all stakeholders immediate visibility into credentialing statuses.
How would it help?
Efficiency – Cuts down on time spent searching for or verifying credentialing requirements.
Transparency – Provides providers and payers with a shared source of truth.
Scalability – Supports onboarding, cross-coverage, and expanding provider networks with minimal administrative overhead.
Key concepts
Term | Meaning |
|---|---|
Provider | A healthcare professional or organization (e.g., physician, nurse practitioner, clinic) delivering care to patients. |
Insurance company | A payer organization that contracts with providers to cover healthcare services for its members. |
Provider credentials | The qualifications, licenses, certifications, and verifications required for a provider to be approved by an insurance company. |
Credentialing group | A set of providers managed together for credentialing purposes, often by specialty, practice, or organizational affiliation. |
Credentialed | Indicates whether a provider is fully approved and recognized by the insurance company to deliver covered services. |
Cosigner required | Shows whether the provider can deliver services only under supervision, requiring a credentialed provider’s cosignature (e.g., trainees, newly licensed practitioners). |
Credentialing type | Type of credentialing. Includes |
Selecting credentialing type values
You can select either of the 3 values:
Is credentialed?
Cosigner required?
Allowed?
✅
❌
✅
❌
✅
✅
❌
❌
✅
✅
✅
❌
Group to selection of values:
Credentialing type
Can select
Is Credentialed?Can select
Cosigner requiredGroup
✅
❌
Individual
✅
❌
Unknown
✅
✅
Pending
✅
✅
None
✅
✅
Provider credentials
Adding a provider credential
Steps:
Click on
+ Add Credentialingbutton once navigating to ‘Provider Credentialing’ tab within Utilities
Select the provider name from the list of providers from the site.
Select the insurance company from the list of insurance companies.
Select the credentialing type. Based on the credentialing type, you would get the options to modify
CredentialedandCosigner required.Click on
Submit.The provider credentialing entry would be created.
Bulk edit provider credentials
Steps:
In the table, you can select multiple rows by clicking on the empty checkboxes to the left of the row.
You can select multiple rows across different providers, insurance companies, and credentialing groups.
You have the ability to change the:
Credentialing typeCredentialedCosigner Required
You can either keep the existing values for these rows, or apply the same settings to all rows.
Click on
Submitto reflect your changes.
Example video:
Select all results in a filter for bulk editing
When a filter is applied, a prompt to select all the results for bulk editing shows up.
Credentialing Group
Credentialing group allows you to bundle multiple insurance companies under one group, so when you get credentialed for a group, you can apply the same configuration.
💡Important Notes:
An Insurance company can be part of multiple credentialing groups.
Groups are mutually exclusive with individual insurance selection in the Add Credential modal
You can select multiple groups when adding credentials to credential a provider with all insurances across those groups
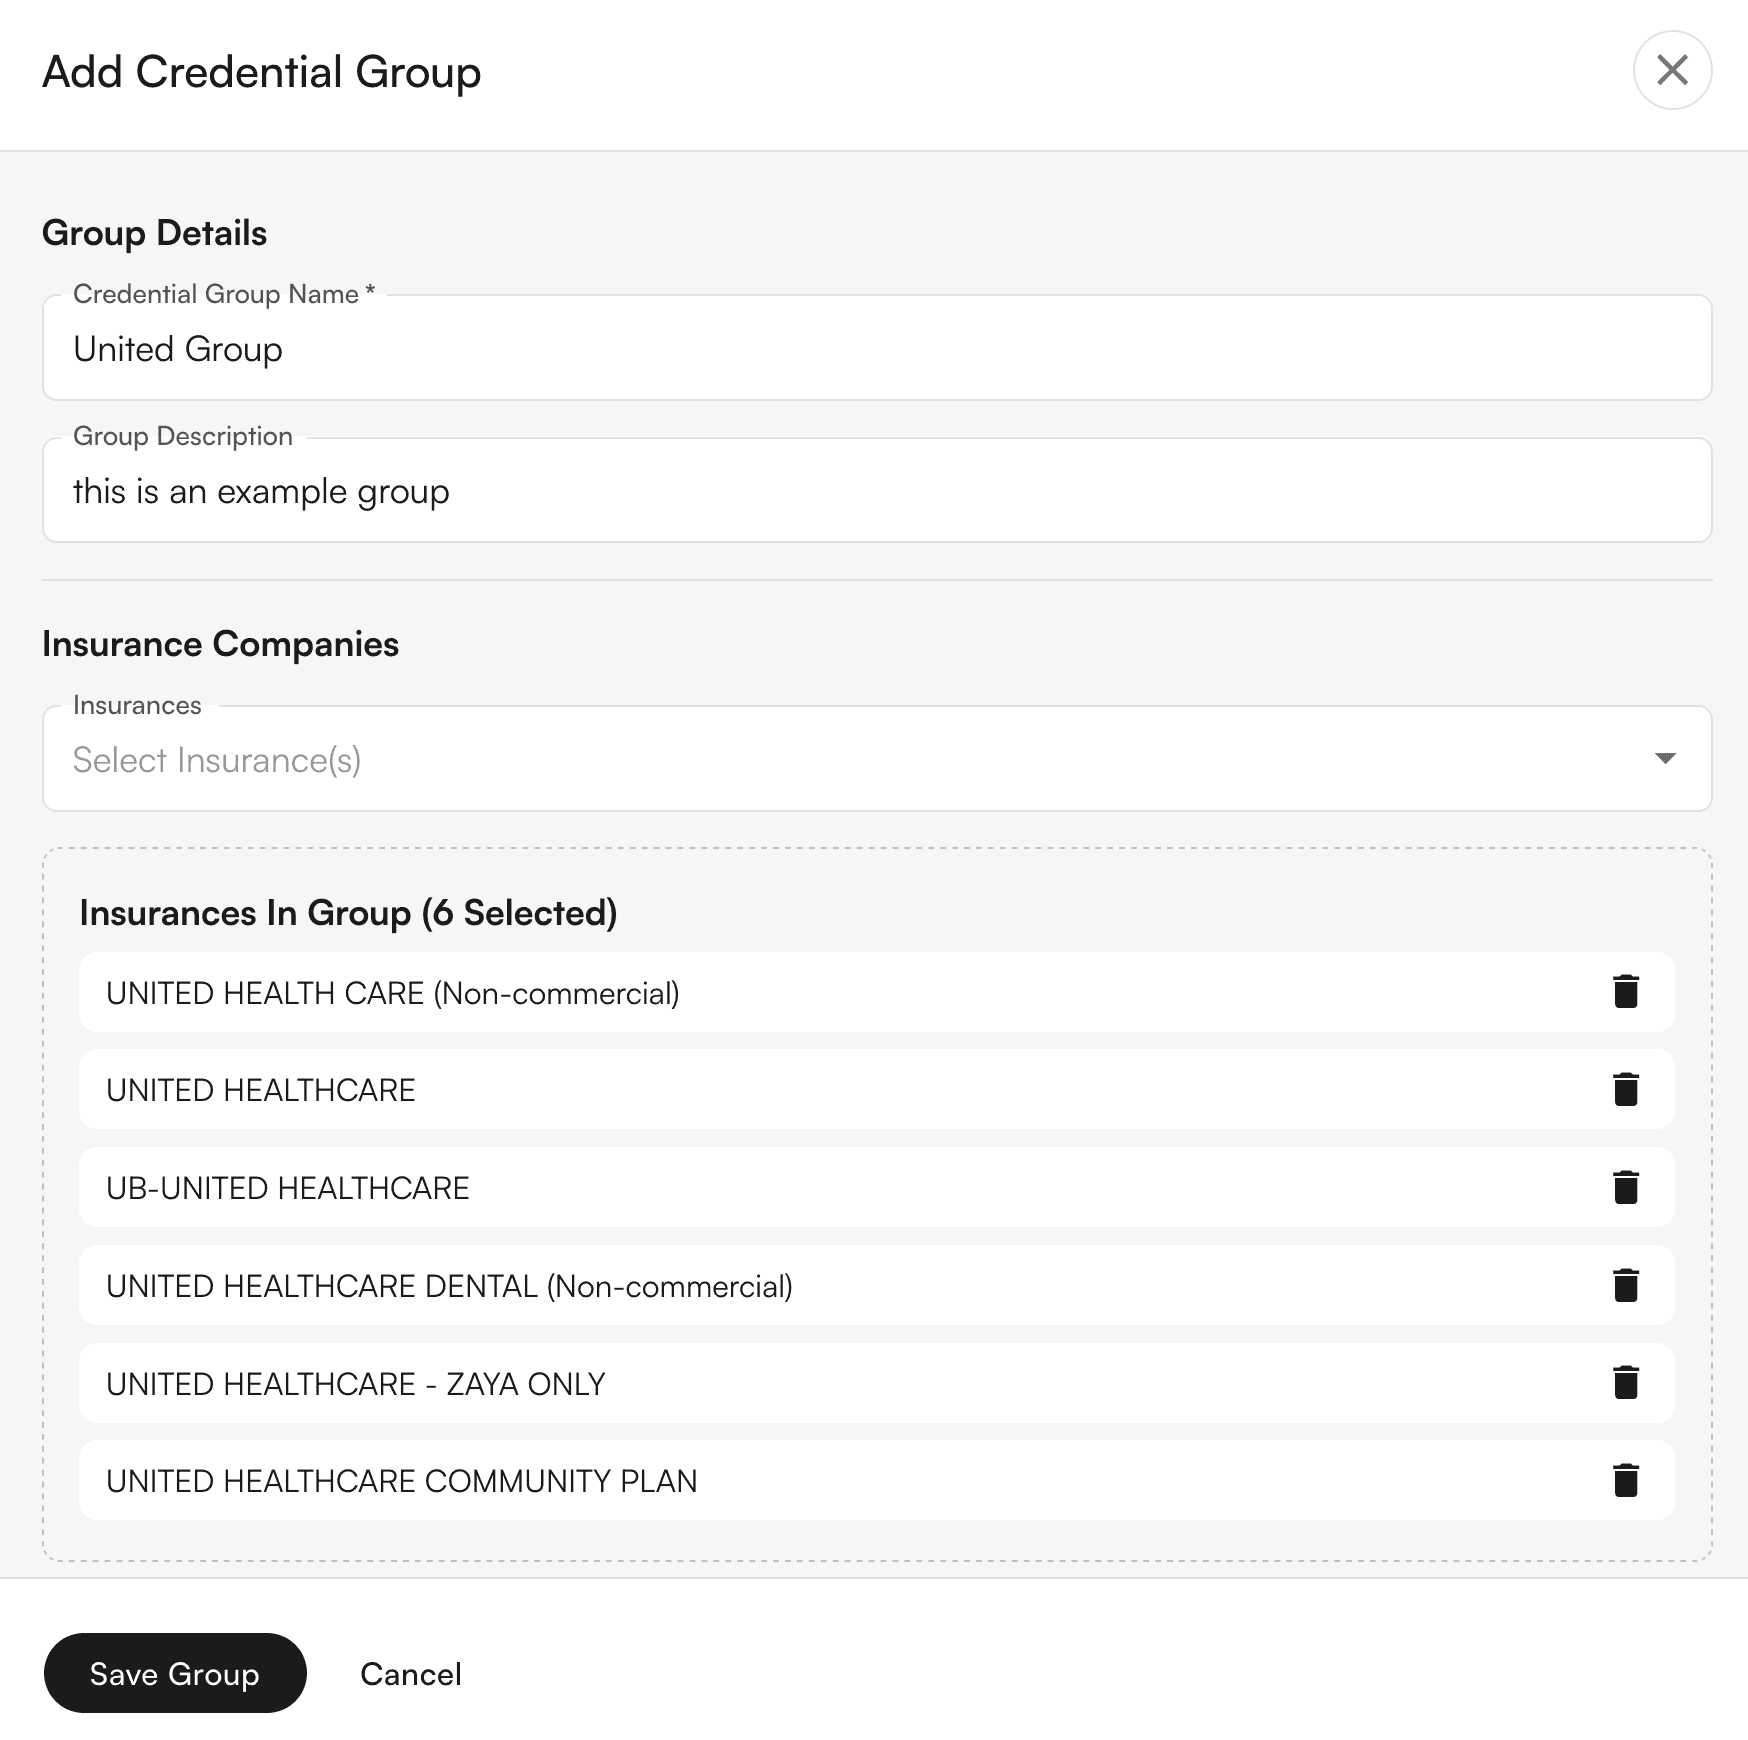
Creating Credentialing Groups
Navigate to Provider Credentialing page
Click the "+ Credential Group" split button in the top right
Fill out the group details:
Enter a group name (e.g., "Optum Group", "Medicaid Plans")
Add an optional description
Select insurance companies to include in the group
Click "Save Group" to create the group
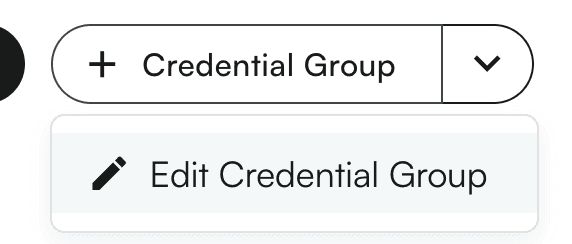
Editing Credentialing Groups
Click the dropdown arrow on the "Credential Group" button
Select "Edit Credential Group"
Choose the group you want to edit from the dropdown
Modify the details as needed (name, description, insurance companies)
Click "Save Group" to update, or "Delete Group" to remove it
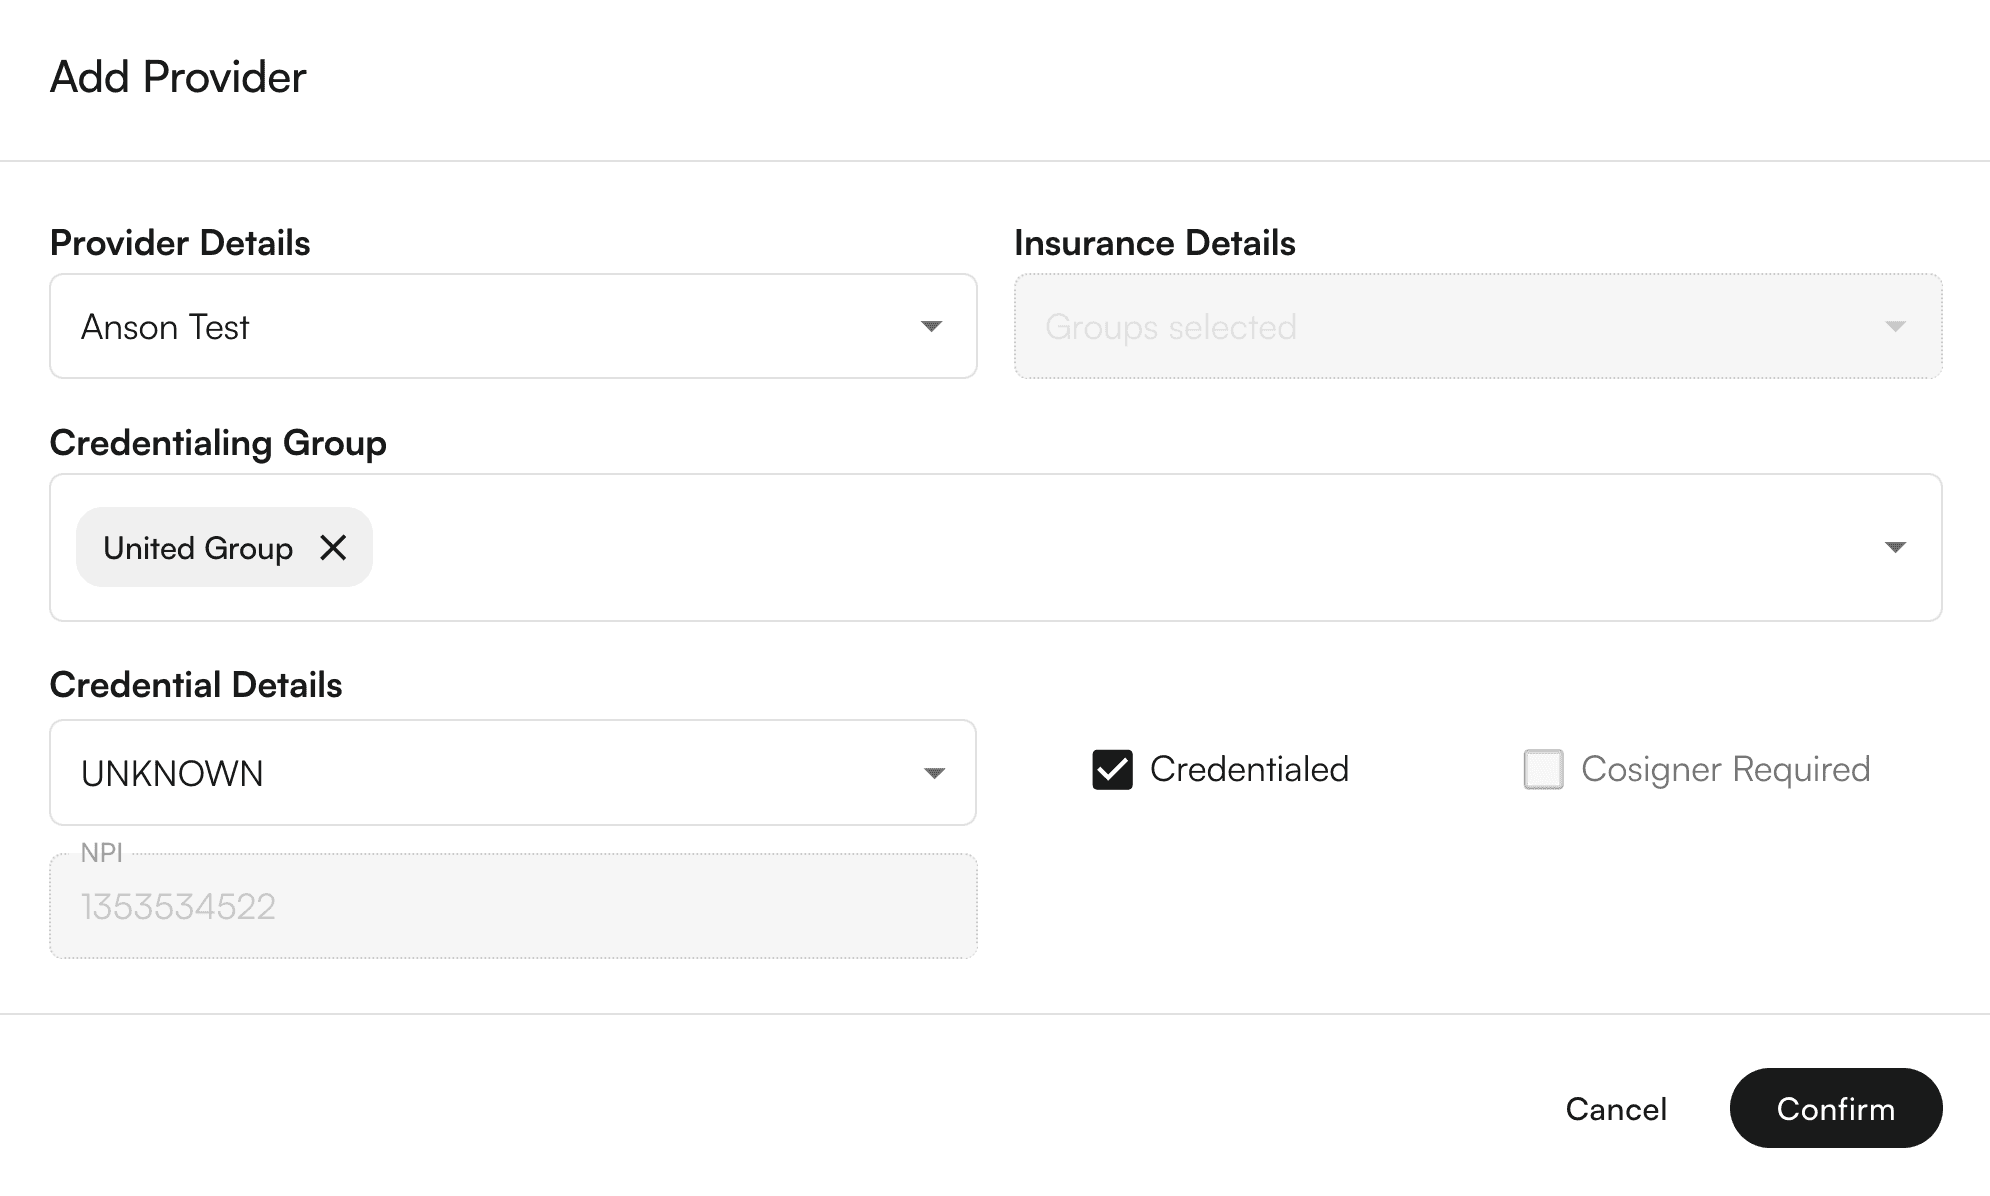
Adding Credentials Using Groups
Click "Add Credentialing" to open the credential modal
Select a provider
Choose your credentialing approach:
Individual: Select a specific insurance company, OR
Group: Select one or more credentialing groups
Set credential details (type, status, cosigner requirements)
Click "Confirm" - the system will automatically create individual credentials for each insurance in the selected groups
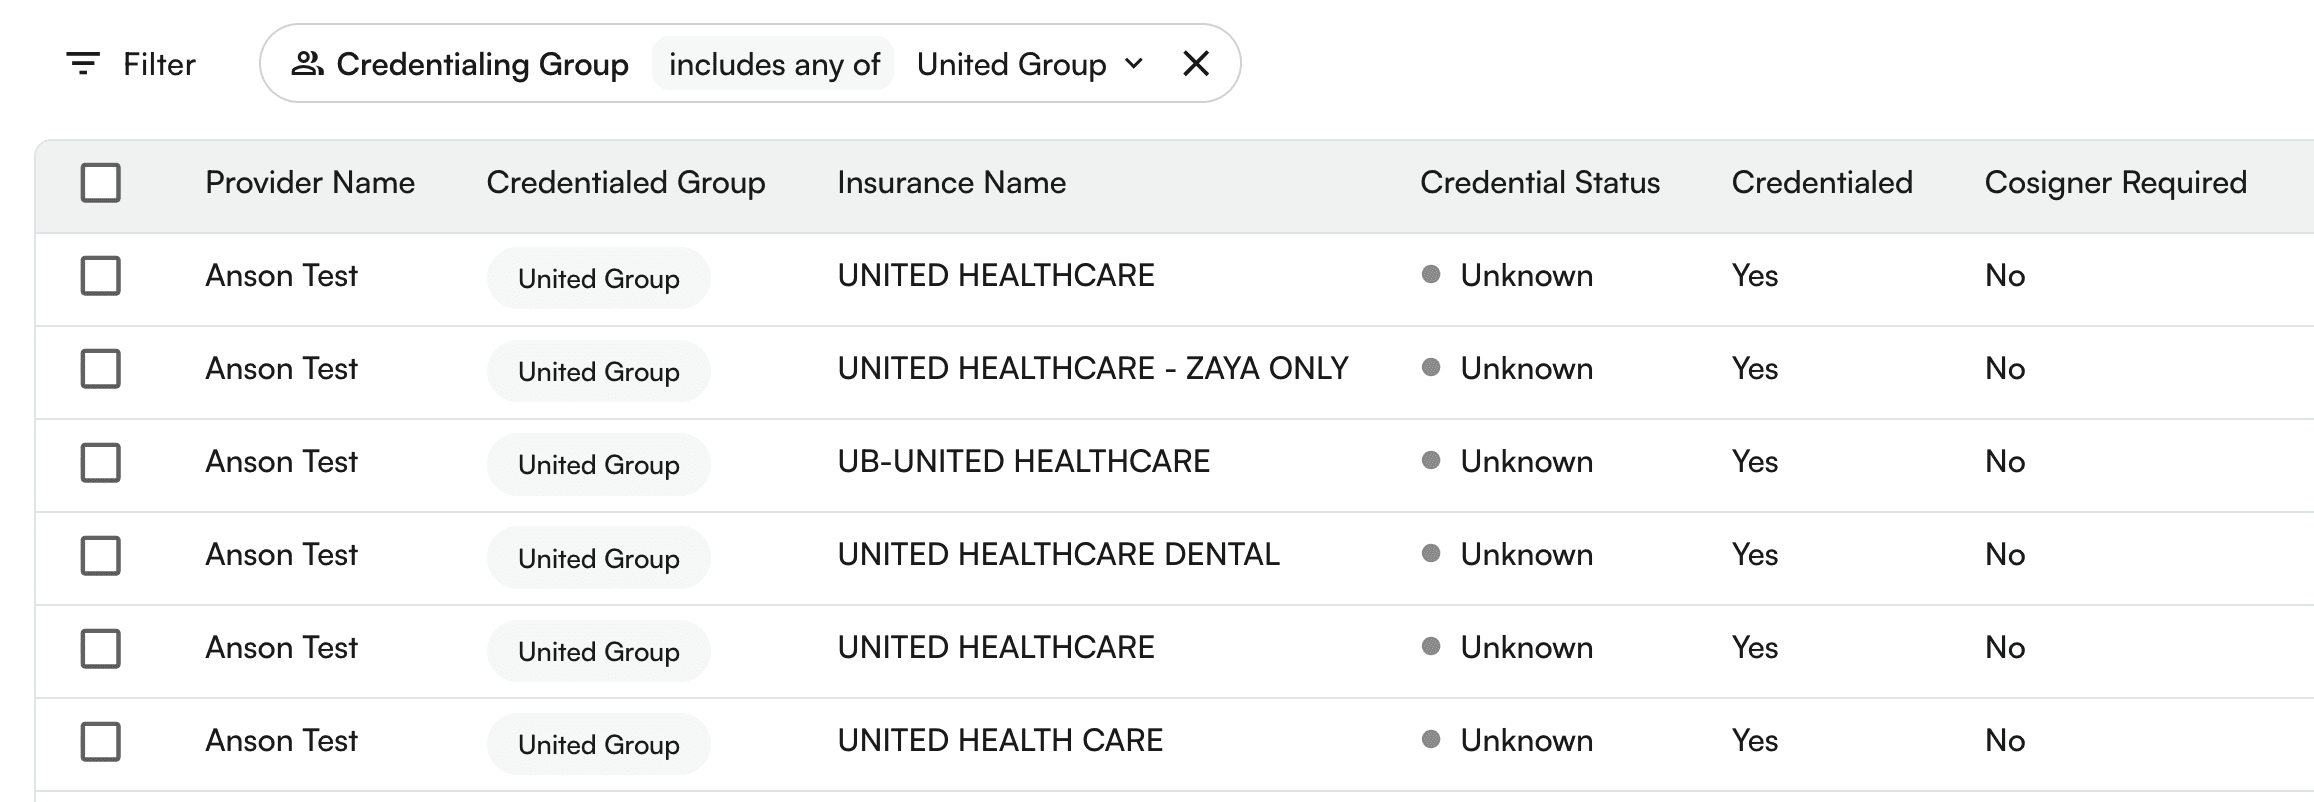
Viewing Group Information
Table Column: The "Credentialed Group" column shows which groups each provider belongs to
Filtering: Use the new "Credentialing Group" filter to view only providers who qualify for specific groups
Group Qualification: Providers only appear in a group if they have credentials for ALL insurance companies in that group
Deleting a credentialing group
You can also delete a credentialing group.
Steps:
Click on the credentialing group → down arrow icon →
Edit Credentialing groupSelect the group to be edited.
On the bottom of the drawer, you can see the
Delete credentialing group.A confirmation modal appears. On click of
Delete Group, the credentialing group would be Permanently deleted!
Using credentialing group as filters
Steps:
Click the
+ Filterbutton above the table. This will show various filters. SelectCredentialing GroupYou can search for various groups.
Click on each row to select/deselect the credentialing group.
On click, the table would load the filtered rows.
Using credentialing groups to add credentials
Steps:
Click on
+ Add CredentialingbuttonSelect the provider name from the list of providers from the site.
Select the credentialing group from the existing list of credentialing groups.
Select the credentialing type. Based on the credentialing type, you would get the options to modify
CredentialedandCosigner required.Click on
Submit.The provider credentialing entries for provider + insurance companies under the credentialing group would be created.
Last updated:
Aug 21, 2025
Self-service Credentialing
Utilities
Provider Workflows
Front Office Workflows
Overview
The Self-Serve Credentialing Matrix is a centralized tool designed to simplify and standardize how providers and insurance companies manage credentialing requirements. It provides an at-a-glance reference for the credentialing status of each provider–payer relationship, ensuring clarity, compliance, and faster decision-making.
Credentialing is a critical process that validates whether providers meet the requirements of insurance companies to deliver care under their plans. Traditionally, this information is fragmented, requiring manual lookups and repeated back-and-forth. The self-serve credentialing matrix eliminates that friction by giving all stakeholders immediate visibility into credentialing statuses.
How would it help?
Efficiency – Cuts down on time spent searching for or verifying credentialing requirements.
Transparency – Provides providers and payers with a shared source of truth.
Scalability – Supports onboarding, cross-coverage, and expanding provider networks with minimal administrative overhead.
Key concepts
Term | Meaning |
|---|---|
Provider | A healthcare professional or organization (e.g., physician, nurse practitioner, clinic) delivering care to patients. |
Insurance company | A payer organization that contracts with providers to cover healthcare services for its members. |
Provider credentials | The qualifications, licenses, certifications, and verifications required for a provider to be approved by an insurance company. |
Credentialing group | A set of providers managed together for credentialing purposes, often by specialty, practice, or organizational affiliation. |
Credentialed | Indicates whether a provider is fully approved and recognized by the insurance company to deliver covered services. |
Cosigner required | Shows whether the provider can deliver services only under supervision, requiring a credentialed provider’s cosignature (e.g., trainees, newly licensed practitioners). |
Credentialing type | Type of credentialing. Includes |
Selecting credentialing type values
You can select either of the 3 values:
Is credentialed?
Cosigner required?
Allowed?
✅
❌
✅
❌
✅
✅
❌
❌
✅
✅
✅
❌
Group to selection of values:
Credentialing type
Can select
Is Credentialed?Can select
Cosigner requiredGroup
✅
❌
Individual
✅
❌
Unknown
✅
✅
Pending
✅
✅
None
✅
✅
Provider credentials
Adding a provider credential
Steps:
Click on
+ Add Credentialingbutton once navigating to ‘Provider Credentialing’ tab within Utilities
Select the provider name from the list of providers from the site.
Select the insurance company from the list of insurance companies.
Select the credentialing type. Based on the credentialing type, you would get the options to modify
CredentialedandCosigner required.Click on
Submit.The provider credentialing entry would be created.
Bulk edit provider credentials
Steps:
In the table, you can select multiple rows by clicking on the empty checkboxes to the left of the row.
You can select multiple rows across different providers, insurance companies, and credentialing groups.
You have the ability to change the:
Credentialing typeCredentialedCosigner Required
You can either keep the existing values for these rows, or apply the same settings to all rows.
Click on
Submitto reflect your changes.
Example video:
Select all results in a filter for bulk editing
When a filter is applied, a prompt to select all the results for bulk editing shows up.
Credentialing Group
Credentialing group allows you to bundle multiple insurance companies under one group, so when you get credentialed for a group, you can apply the same configuration.
💡Important Notes:
An Insurance company can be part of multiple credentialing groups.
Groups are mutually exclusive with individual insurance selection in the Add Credential modal
You can select multiple groups when adding credentials to credential a provider with all insurances across those groups
Creating Credentialing Groups
Navigate to Provider Credentialing page
Click the "+ Credential Group" split button in the top right
Fill out the group details:
Enter a group name (e.g., "Optum Group", "Medicaid Plans")
Add an optional description
Select insurance companies to include in the group
Click "Save Group" to create the group
Editing Credentialing Groups
Click the dropdown arrow on the "Credential Group" button
Select "Edit Credential Group"
Choose the group you want to edit from the dropdown
Modify the details as needed (name, description, insurance companies)
Click "Save Group" to update, or "Delete Group" to remove it
Adding Credentials Using Groups
Click "Add Credentialing" to open the credential modal
Select a provider
Choose your credentialing approach:
Individual: Select a specific insurance company, OR
Group: Select one or more credentialing groups
Set credential details (type, status, cosigner requirements)
Click "Confirm" - the system will automatically create individual credentials for each insurance in the selected groups
Viewing Group Information
Table Column: The "Credentialed Group" column shows which groups each provider belongs to
Filtering: Use the new "Credentialing Group" filter to view only providers who qualify for specific groups
Group Qualification: Providers only appear in a group if they have credentials for ALL insurance companies in that group
Deleting a credentialing group
You can also delete a credentialing group.
Steps:
Click on the credentialing group → down arrow icon →
Edit Credentialing groupSelect the group to be edited.
On the bottom of the drawer, you can see the
Delete credentialing group.A confirmation modal appears. On click of
Delete Group, the credentialing group would be Permanently deleted!
Using credentialing group as filters
Steps:
Click the
+ Filterbutton above the table. This will show various filters. SelectCredentialing GroupYou can search for various groups.
Click on each row to select/deselect the credentialing group.
On click, the table would load the filtered rows.
Using credentialing groups to add credentials
Steps:
Click on
+ Add CredentialingbuttonSelect the provider name from the list of providers from the site.
Select the credentialing group from the existing list of credentialing groups.
Select the credentialing type. Based on the credentialing type, you would get the options to modify
CredentialedandCosigner required.Click on
Submit.The provider credentialing entries for provider + insurance companies under the credentialing group would be created.