Search all docs
Provider Workflows
Chart Notes
Auto-apply KX Modifier
Getting Started with Chart Notes
AI Appt. Summaries
Chart Note Clinical Types
Download Chart Notes as PDFs
Goals on the chart note
How to add Measurements
Import Previous Medical History
Navigating Flowsheets
Navigating Inbox Workflows
Navigating the Chart Note
Set up Custom Chart Note Templates
Setting up Co-signers on Your Note
Sign a Chart Note
Text Snippets For Your Note
Chart Note Features Not Supported
Chart Notes
Claim Details
Claim Details
Front Office Workflows
Appointments
The Insights Appointments Page
Adding Prior Auth and Alerting
Alternate Methods for Scheduling
How to Add a Walk-In Patient
How to Run an Eligibility Check
How to Schedule an Appointment
How to Take Payments
Sending out reminders and forms
Understanding Appointment Details
Updating Appointment Statuses
Appt. Features not supported
Appointments
Daily Operations
Daily Operations
Patient Communications
General Patient Flows Features
Text Blast Page
Insurance Intake Page
Functional Outcome Measurements
Getting Started with Patient Portal
Complete Intake Forms
Navigating Patient Workflows
Manage Patient Appointments
Manage Payments through Patient Portal
Patient Intake Automation
Update Insurance Info
View Home Exercise Programs
Patient Communications
Patient Responsibility
Charge Saved Credit Cards
Manage Credit Cards
Setting up a Payment Plan
How to Cancel PR
How to Send a Patient Payment Link
How to Push to PR
How to Record Payments
How to Refund a Payment
How to Request via Text or Email
How to Set Up Miscellaneous Line Item Charges
How to Take Payment for Families
How to Undo a Write Off
How to Write Off PR
Patient Responsibility Page
PR Overpayment Refunds and Estimated vs. Remittance PR
PR Settings
PR Timeline
Patient Responsibility
Billing Workflows
Front Office Payments
Front Office Payments
Reports
A/R Reports
Building and Running Reports
Claim Adjustments Report
Collections Report
Custom Collections Report
Detailed Charges Report
Export Claim Details
Generate a Transaction Report
Patient Balances Report
Patient Charges Report
Patient Claims One-pagers
Patient Collections Report
Patient Eligibility Report
Posting Log Report
Site Transaction Report
Site Transaction Report Summary
Submitted Claims Report
Upcoming Patient Statements Report
Reports
Owners & Administration
Last updated:
Jul 30, 2025
How to Set Block PR Rules
General Billing
Billing Workflows
At a Glance
Setting default rules for blocking PR is a powerful tool in Insights that will save your staff lots of time from needing to individually adjust PR after it’s been generated.
Here’s How to Do It
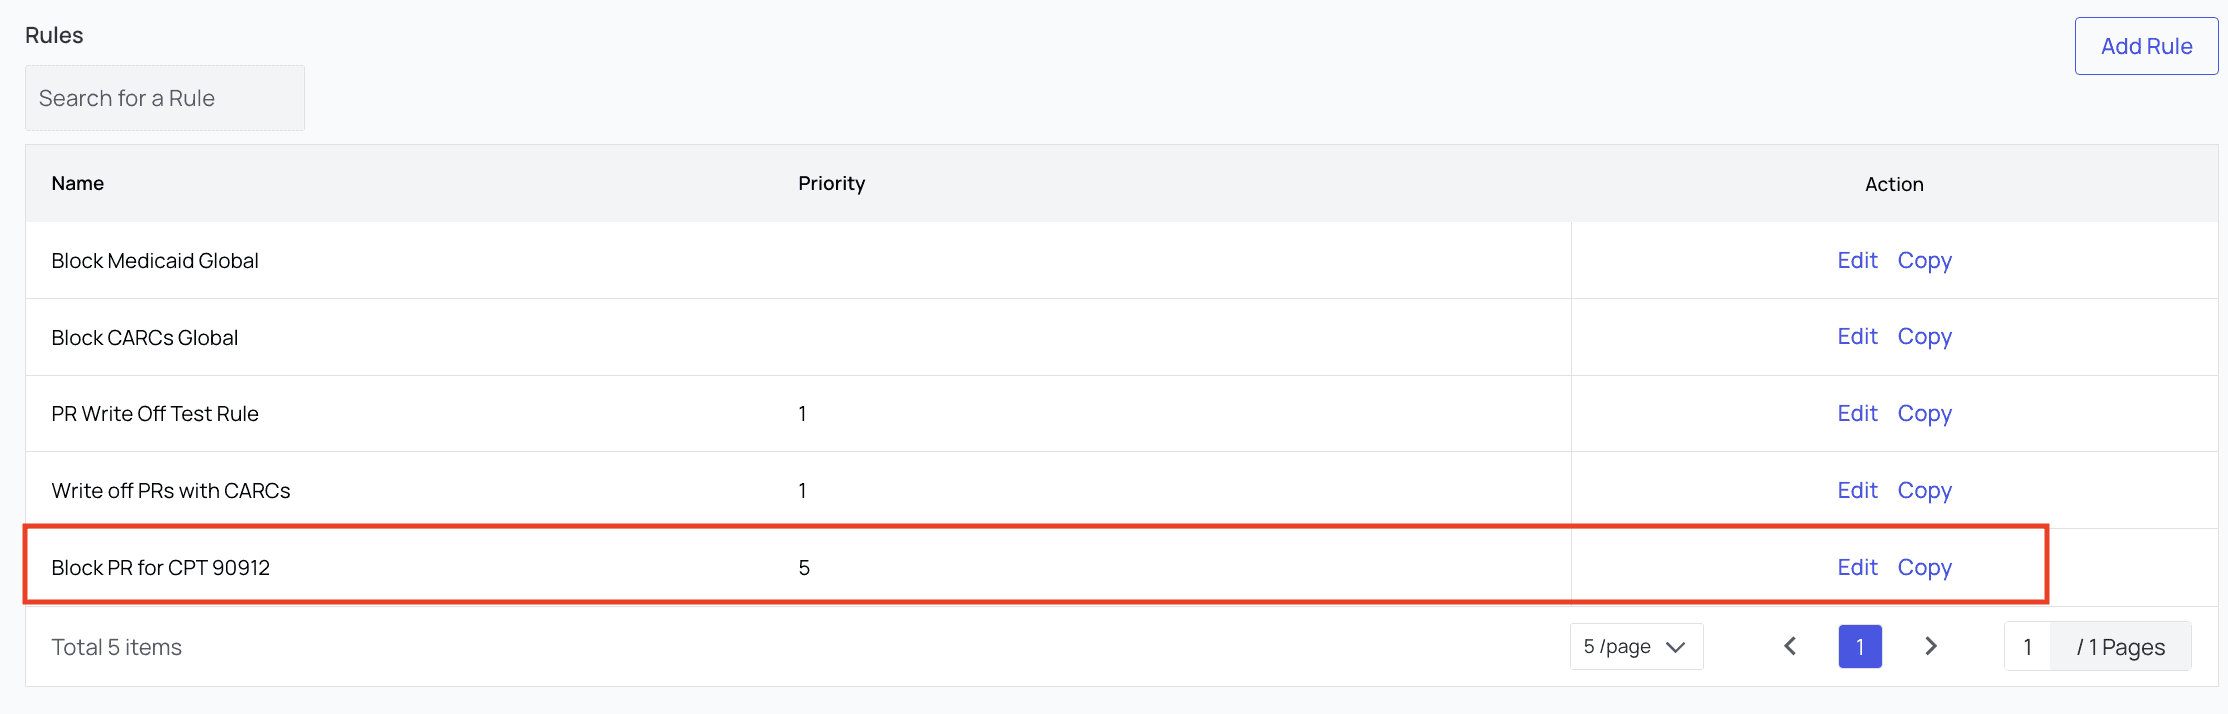
Go to the Blocked PR Rules tab in PR Settings.
Here, you will see all existing rules listed. To edit these rules, or copy their settings to create a new rule, you can click the buttons in the Action column.
For this example, we’ll click ‘Add Rule,’ and the new rule modal will appear.
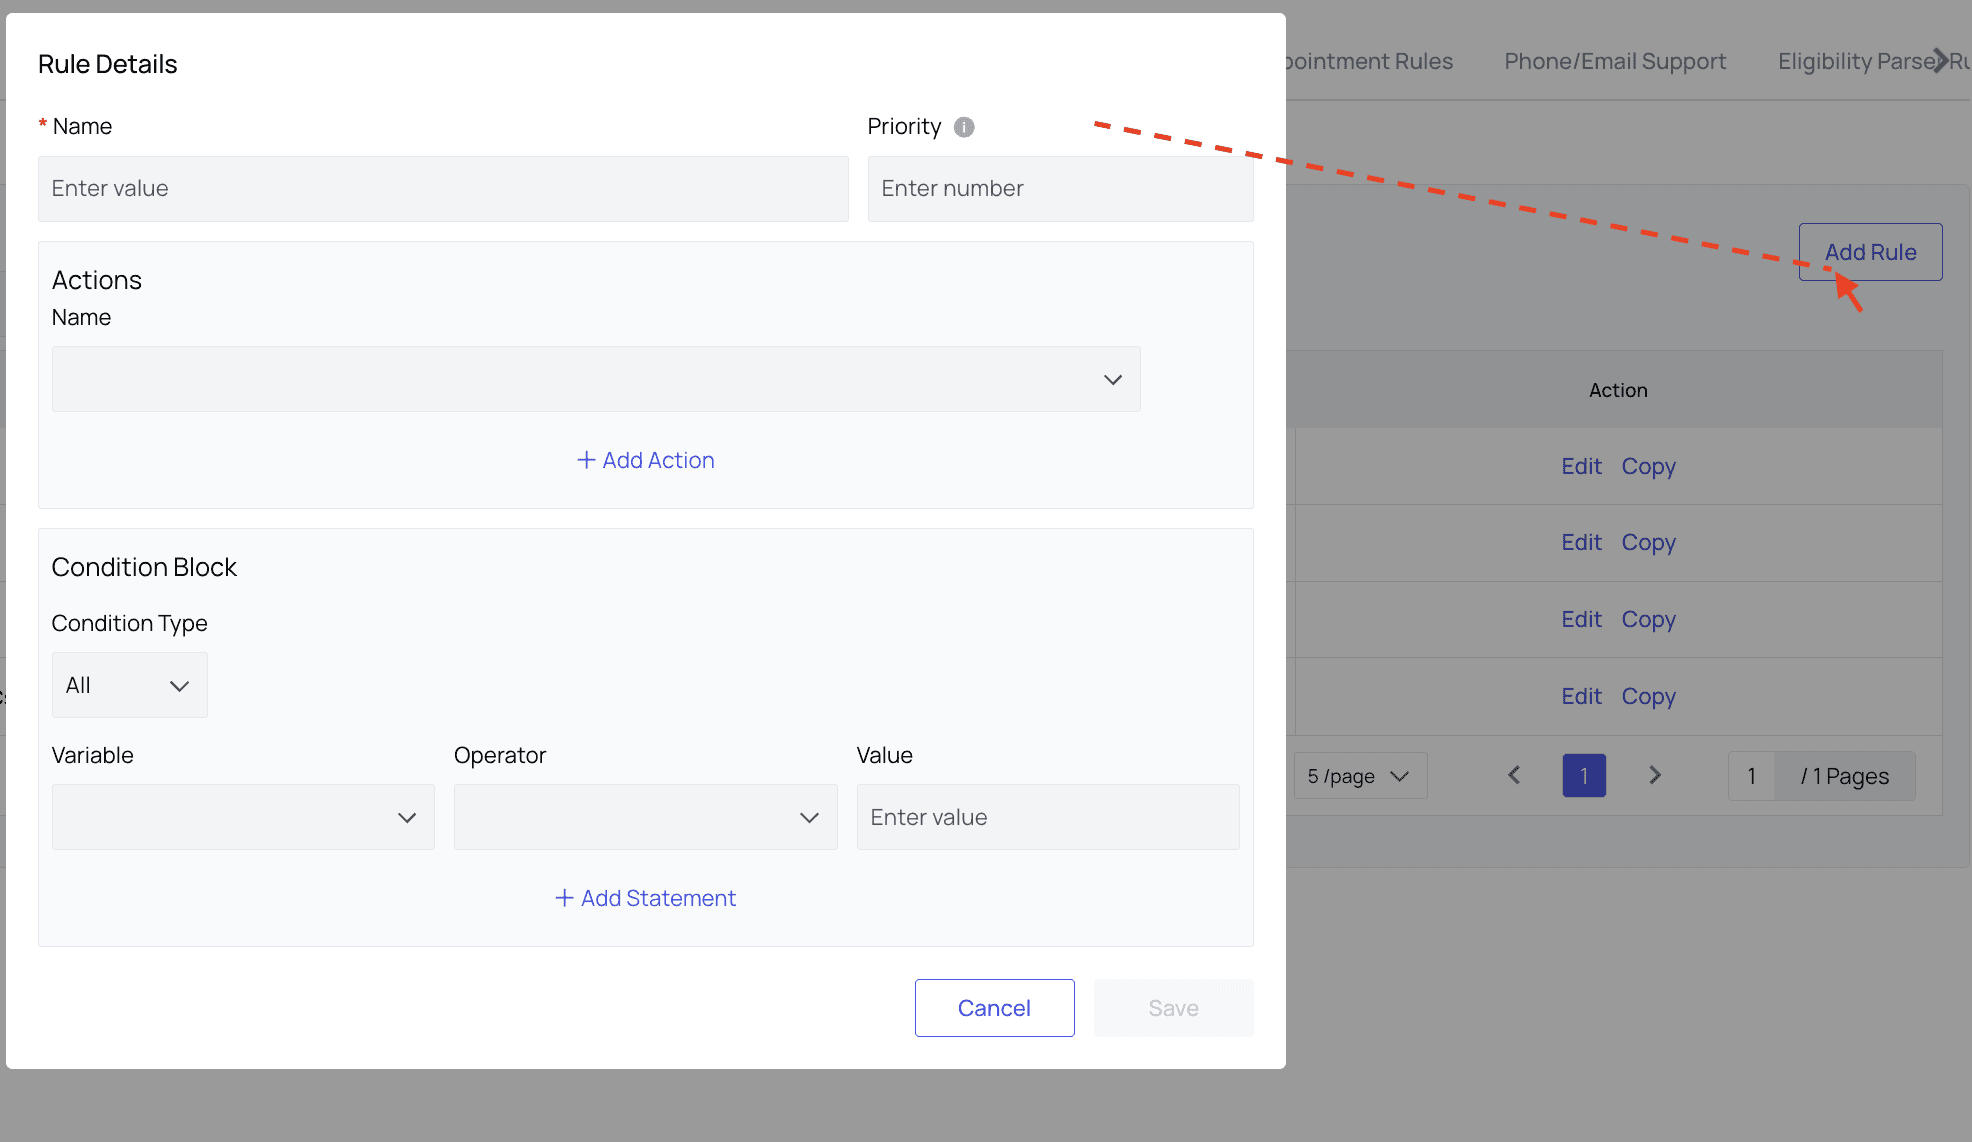
Let’s say we want a rule to block PR from appointments with the CPT code 90912. We’ll give the rule an appropriate name, then enter its priority.
Note that higher numbers indicate higher priority. Higher priority rules override lower priority rules when applicable. If no priority is set, the rule becomes global and cannot be edited. If needed, create a specific rule with higher priority to negate its behavior.
This rule will have a priority of 5. If a contradictory rule were written later with a priority of 6, for example, it would override this rule.

In the Actions block, we selected ‘Block post visit PRs.’
Then, in the Conditions block, we indicated that an encounter needed to meet All of the following statement criteria (for rules like this one with only a single statement, it doesn’t really matter if we select ‘All’ or ‘Any’).
Then we created the statement. The Variable is set to CPT Code, which must contain all of the value 90912.
Note that the Value menu will populate with information (in this case, CPT codes) that already exists in Athelas’ records for your organization. Contact your account manager if information you need is missing.
Click ‘Save.’
The rule is now available in the list of rules in the Blocked PR Rules tab and can be edited or copied.
Further Assistance
We’re here to help! Please get in touch with support@getathelas.com if you’d like some hands-on assistance.
Table of Contents
Search all docs
Provider Workflows
Chart Notes
Auto-apply KX Modifier
Getting Started with Chart Notes
AI Appt. Summaries
Chart Note Clinical Types
Download Chart Notes as PDFs
Goals on the chart note
How to add Measurements
Import Previous Medical History
Navigating Flowsheets
Navigating Inbox Workflows
Navigating the Chart Note
Set up Custom Chart Note Templates
Setting up Co-signers on Your Note
Sign a Chart Note
Text Snippets For Your Note
Chart Note Features Not Supported
Chart Notes
Claim Details
Claim Details
Front Office Workflows
Appointments
The Insights Appointments Page
Adding Prior Auth and Alerting
Alternate Methods for Scheduling
How to Add a Walk-In Patient
How to Run an Eligibility Check
How to Schedule an Appointment
How to Take Payments
Sending out reminders and forms
Understanding Appointment Details
Updating Appointment Statuses
Appt. Features not supported
Appointments
Daily Operations
Daily Operations
Patient Communications
General Patient Flows Features
Text Blast Page
Insurance Intake Page
Functional Outcome Measurements
Getting Started with Patient Portal
Complete Intake Forms
Navigating Patient Workflows
Manage Patient Appointments
Manage Payments through Patient Portal
Patient Intake Automation
Update Insurance Info
View Home Exercise Programs
Patient Communications
Patient Responsibility
Charge Saved Credit Cards
Manage Credit Cards
Setting up a Payment Plan
How to Cancel PR
How to Send a Patient Payment Link
How to Push to PR
How to Record Payments
How to Refund a Payment
How to Request via Text or Email
How to Set Up Miscellaneous Line Item Charges
How to Take Payment for Families
How to Undo a Write Off
How to Write Off PR
Patient Responsibility Page
PR Overpayment Refunds and Estimated vs. Remittance PR
PR Settings
PR Timeline
Patient Responsibility
Billing Workflows
Front Office Payments
Front Office Payments
Reports
A/R Reports
Building and Running Reports
Claim Adjustments Report
Collections Report
Custom Collections Report
Detailed Charges Report
Export Claim Details
Generate a Transaction Report
Patient Balances Report
Patient Charges Report
Patient Claims One-pagers
Patient Collections Report
Patient Eligibility Report
Posting Log Report
Site Transaction Report
Site Transaction Report Summary
Submitted Claims Report
Upcoming Patient Statements Report
Reports
Owners & Administration
Last updated:
Jul 30, 2025
How to Set Block PR Rules
General Billing
Billing Workflows
At a Glance
Setting default rules for blocking PR is a powerful tool in Insights that will save your staff lots of time from needing to individually adjust PR after it’s been generated.
Here’s How to Do It
Go to the Blocked PR Rules tab in PR Settings.
Here, you will see all existing rules listed. To edit these rules, or copy their settings to create a new rule, you can click the buttons in the Action column.
For this example, we’ll click ‘Add Rule,’ and the new rule modal will appear.
Let’s say we want a rule to block PR from appointments with the CPT code 90912. We’ll give the rule an appropriate name, then enter its priority.
Note that higher numbers indicate higher priority. Higher priority rules override lower priority rules when applicable. If no priority is set, the rule becomes global and cannot be edited. If needed, create a specific rule with higher priority to negate its behavior.
This rule will have a priority of 5. If a contradictory rule were written later with a priority of 6, for example, it would override this rule.
In the Actions block, we selected ‘Block post visit PRs.’
Then, in the Conditions block, we indicated that an encounter needed to meet All of the following statement criteria (for rules like this one with only a single statement, it doesn’t really matter if we select ‘All’ or ‘Any’).
Then we created the statement. The Variable is set to CPT Code, which must contain all of the value 90912.
Note that the Value menu will populate with information (in this case, CPT codes) that already exists in Athelas’ records for your organization. Contact your account manager if information you need is missing.
Click ‘Save.’
The rule is now available in the list of rules in the Blocked PR Rules tab and can be edited or copied.
Further Assistance
We’re here to help! Please get in touch with support@getathelas.com if you’d like some hands-on assistance.