Search all docs
Provider Workflows
Chart Notes
Auto-apply KX Modifier
Getting Started with Chart Notes
AI Appt. Summaries
Chart Note Clinical Types
Download Chart Notes as PDFs
Goals on the chart note
How to add Measurements
Import Previous Medical History
Navigating Flowsheets
Navigating Inbox Workflows
Navigating the Chart Note
Set up Custom Chart Note Templates
Setting up Co-signers on Your Note
Sign a Chart Note
Text Snippets For Your Note
Chart Note Features Not Supported
Chart Notes
Claim Details
Claim Details
Front Office Workflows
Appointments
The Insights Appointments Page
Adding Prior Auth and Alerting
Alternate Methods for Scheduling
How to Add a Walk-In Patient
How to Run an Eligibility Check
How to Schedule an Appointment
How to Take Payments
Sending out reminders and forms
Understanding Appointment Details
Updating Appointment Statuses
Appt. Features not supported
Appointments
Daily Operations
Daily Operations
Patient Communications
General Patient Flows Features
Text Blast Page
Insurance Intake Page
Functional Outcome Measurements
Getting Started with Patient Portal
Complete Intake Forms
Navigating Patient Workflows
Manage Patient Appointments
Manage Payments through Patient Portal
Patient Intake Automation
Update Insurance Info
View Home Exercise Programs
Patient Communications
Patient Responsibility
Charge Saved Credit Cards
Manage Credit Cards
Setting up a Payment Plan
How to Cancel PR
How to Send a Patient Payment Link
How to Push to PR
How to Record Payments
How to Refund a Payment
How to Request via Text or Email
How to Set Up Miscellaneous Line Item Charges
How to Take Payment for Families
How to Undo a Write Off
How to Write Off PR
Patient Responsibility Page
PR Overpayment Refunds and Estimated vs. Remittance PR
PR Settings
PR Timeline
Patient Responsibility
Billing Workflows
Front Office Payments
Front Office Payments
Reports
A/R Reports
Building and Running Reports
Claim Adjustments Report
Collections Report
Custom Collections Report
Detailed Charges Report
Export Claim Details
Generate a Transaction Report
Patient Balances Report
Patient Charges Report
Patient Claims One-pagers
Patient Collections Report
Patient Eligibility Report
Posting Log Report
Site Transaction Report
Site Transaction Report Summary
Submitted Claims Report
Upcoming Patient Statements Report
Reports
Owners & Administration
Last updated:
Aug 20, 2025
Bank Deposit Verification
Utilities
Front Office Workflows
At a Glance
In the world of medical billing, perhaps the two most important questions you can answer are:
How much have payers told us we’ve been reimbursed?
How much of that has actually arrived in our bank account?
Getting a clear answer to #1 can be challenging enough, but some practices are forced to spend tremendous amounts of time manually matching up bank deposits with EOBs in order to make sense of what they’ve been paid and find out what payments are missing.
It’s important work, but it’s also a slog.
That’s why Athelas has a Remittances page, with built-in deposit verification.
In this tab you’ll be able to view a list of every remittance a payer has sent you. Once you plug in your bank account via our secure Plaid integration we’ll attempt to automatically match those remittances up with deposits, reducing the burden of deposit verification by as much as 80%.
Read on, and we’ll dig into the details.
Best Practices
1. While Athelas will be able to automatically match the majority of your remits/deposits, some portion will still need to be manually matched. For this reason it’s worth reviewing your unmatched remittances/deposits at least every 2 weeks to keep the volume of unmatched pairs manageable.
2. Often remittances will arrive a few days before payments hit the bank, so for any remittances younger than 5 days old, don’t be too worried if there’s no corresponding deposit in your bank account just yet.
3. When you deposit multiple checks at once, your bank will usually sum them all up into a single deposit which makes it hard to match them against individual remittances. When you’re looking for payments that correspond to orphaned remittances, this is often a good place to start.
We can reconcile paper check bulk deposits and virtual card transactions
🌐 Core Feature Walkthrough
View All Remittances
Even before you connect your bank account, you’ll be able to view a list of all your recent remittances in chronological order (or a different order if you care to re-sort them).

There can be a lot of data in this view, so we’ve provided tools to help you zoom in on precisely what you’re trying to examine:
Download CSV — for some folks, there’s no place like Excel. If you happen to be a spreadsheet jockey, you’ve got the option to download all the data in this tab. That way you can work in your data manipulation tool of choice.
Filter Remittances — we’ve also provided a wide variety of filters to help you narrow down to just the subset of remittances you’re looking for. This is particularly helpful when investigating missing deposits.

Explore Remittance Details — once you’ve found a remittance you want to examine, clicking on it will take you into a detail view for the remittance. Here you can see each Athelas claim that was a component of the remittance.

Quicklink to Athelas Claim — and to close the loop, clicking any of the specific claims listed in the ERA will open up the Athelas Claim Detail view so you can see remittance info in the context of the rest of the claim details.

Connect Your Bank Account
Once you’re ready to start automatically matching remittances and deposits we’ll need to connect to your bank account via the Athelas/Plaid integration. Here’s how to do it:
From the main Remittances tab, click the Connect Bank Accounts button. This will take you to the linked accounts screen.

From the linked accounts screen you can view any currently associated bank accounts, then click ‘Connect a new Bank Account’ to add a new one.

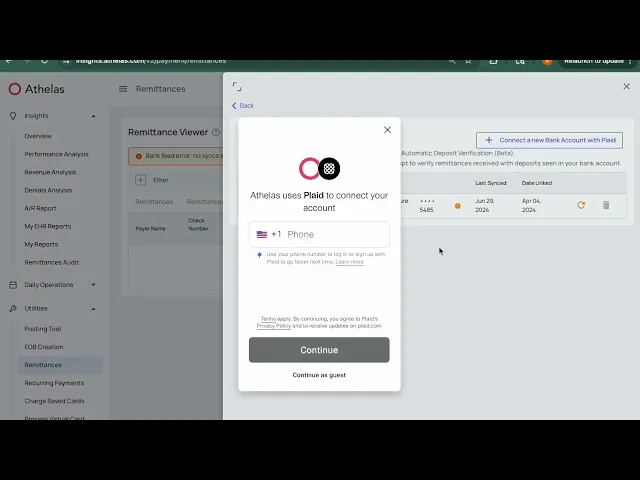
This will launch the Plaid integration screen which will guide you through the process of authenticating with your bank. Once you’re done, read-only access will be delivered to Athelas for analysis.

Once you’ve completed the connection it may take as much as an hour for data to be fully imported and matching to occur. Once an hour has passed, you can move on to analyzing your matches and mismatches.
Note: If you have more than one bank account you’d like to match against remittances, just repeat the process from the top. You can link as many bank accounts as you like.
Refresh or Delete a Bank Account
To refresh or remove an account, simply click ‘Manage Bank Accounts’ on the Remittances page, then click either the Refresh or Delete icon for that account.

Now that your bank account is hooked up and Athelas has had time to run our algorithmic matching protocol, the fun really begins. You now have 5 different ways to segment your data, depending on your objective:
Analyze Matches / Missing Deposits
Now that your bank account is hooked up and Athelas has had time to run our algorithmic matching protocol, the fun really begins. You now have 5 different ways to segment your data, depending on your objective:

View All — in this view you’ll see a combination of both remittances and deposits. Any that have been matched will appear combined into a single line item, but you’ll also see rows for unmatched remittances and unmatched deposits.
Missing ERAs — here you’ll see any deposit for which Athelas couldn’t find a corresponding remittance to match it to.
Missing Payment — on the flip side, this view shows remittances with no payments that could be directly matched to them
Inconsistencies — here Athelas was able to match a remittance to a deposit, but there’s some discrepancy between the two.
Generally this a difference in payment amount (often only a few cents), but each row will specify that the inconsistency in the match is.
Matched Deposits — as you might expect, this view holds all our unproblematic matches where a remittance clearly belongs with a given deposit and the numbers all line up nicely.
In Conclusion
With these tools in hand, the process of tracking down missing payments and missing remittances becomes a lot simpler. As Athelas continues to refine our matching algorithm there will be more and more matches generated automatically.
98%+ ACH deposits matched to a check
💬 FAQs
What should I do if my bank doesn’t integrate with Plaid?
Reach out to support@getathelas.com and we’ll see if we can manage an alternate method of importing your deposit list. Occasionally this isn’t possible, but often we’re able to find a suitable workaround.
Features In Development
Lockbox integrations
Enhanced deposit matching reporting in Insights
Features Not Supported
Local regional banks not on Plaid
Integrations With:
Plaid
Stripe
Table of Contents
Search all docs
Provider Workflows
Chart Notes
Auto-apply KX Modifier
Getting Started with Chart Notes
AI Appt. Summaries
Chart Note Clinical Types
Download Chart Notes as PDFs
Goals on the chart note
How to add Measurements
Import Previous Medical History
Navigating Flowsheets
Navigating Inbox Workflows
Navigating the Chart Note
Set up Custom Chart Note Templates
Setting up Co-signers on Your Note
Sign a Chart Note
Text Snippets For Your Note
Chart Note Features Not Supported
Chart Notes
Claim Details
Claim Details
Front Office Workflows
Appointments
The Insights Appointments Page
Adding Prior Auth and Alerting
Alternate Methods for Scheduling
How to Add a Walk-In Patient
How to Run an Eligibility Check
How to Schedule an Appointment
How to Take Payments
Sending out reminders and forms
Understanding Appointment Details
Updating Appointment Statuses
Appt. Features not supported
Appointments
Daily Operations
Daily Operations
Patient Communications
General Patient Flows Features
Text Blast Page
Insurance Intake Page
Functional Outcome Measurements
Getting Started with Patient Portal
Complete Intake Forms
Navigating Patient Workflows
Manage Patient Appointments
Manage Payments through Patient Portal
Patient Intake Automation
Update Insurance Info
View Home Exercise Programs
Patient Communications
Patient Responsibility
Charge Saved Credit Cards
Manage Credit Cards
Setting up a Payment Plan
How to Cancel PR
How to Send a Patient Payment Link
How to Push to PR
How to Record Payments
How to Refund a Payment
How to Request via Text or Email
How to Set Up Miscellaneous Line Item Charges
How to Take Payment for Families
How to Undo a Write Off
How to Write Off PR
Patient Responsibility Page
PR Overpayment Refunds and Estimated vs. Remittance PR
PR Settings
PR Timeline
Patient Responsibility
Billing Workflows
Front Office Payments
Front Office Payments
Reports
A/R Reports
Building and Running Reports
Claim Adjustments Report
Collections Report
Custom Collections Report
Detailed Charges Report
Export Claim Details
Generate a Transaction Report
Patient Balances Report
Patient Charges Report
Patient Claims One-pagers
Patient Collections Report
Patient Eligibility Report
Posting Log Report
Site Transaction Report
Site Transaction Report Summary
Submitted Claims Report
Upcoming Patient Statements Report
Reports
Owners & Administration
Last updated:
Aug 20, 2025
Bank Deposit Verification
Utilities
Front Office Workflows
At a Glance
In the world of medical billing, perhaps the two most important questions you can answer are:
How much have payers told us we’ve been reimbursed?
How much of that has actually arrived in our bank account?
Getting a clear answer to #1 can be challenging enough, but some practices are forced to spend tremendous amounts of time manually matching up bank deposits with EOBs in order to make sense of what they’ve been paid and find out what payments are missing.
It’s important work, but it’s also a slog.
That’s why Athelas has a Remittances page, with built-in deposit verification.
In this tab you’ll be able to view a list of every remittance a payer has sent you. Once you plug in your bank account via our secure Plaid integration we’ll attempt to automatically match those remittances up with deposits, reducing the burden of deposit verification by as much as 80%.
Read on, and we’ll dig into the details.
Best Practices
1. While Athelas will be able to automatically match the majority of your remits/deposits, some portion will still need to be manually matched. For this reason it’s worth reviewing your unmatched remittances/deposits at least every 2 weeks to keep the volume of unmatched pairs manageable.
2. Often remittances will arrive a few days before payments hit the bank, so for any remittances younger than 5 days old, don’t be too worried if there’s no corresponding deposit in your bank account just yet.
3. When you deposit multiple checks at once, your bank will usually sum them all up into a single deposit which makes it hard to match them against individual remittances. When you’re looking for payments that correspond to orphaned remittances, this is often a good place to start.
We can reconcile paper check bulk deposits and virtual card transactions
🌐 Core Feature Walkthrough
View All Remittances
Even before you connect your bank account, you’ll be able to view a list of all your recent remittances in chronological order (or a different order if you care to re-sort them).
There can be a lot of data in this view, so we’ve provided tools to help you zoom in on precisely what you’re trying to examine:
Download CSV — for some folks, there’s no place like Excel. If you happen to be a spreadsheet jockey, you’ve got the option to download all the data in this tab. That way you can work in your data manipulation tool of choice.
Filter Remittances — we’ve also provided a wide variety of filters to help you narrow down to just the subset of remittances you’re looking for. This is particularly helpful when investigating missing deposits.
Explore Remittance Details — once you’ve found a remittance you want to examine, clicking on it will take you into a detail view for the remittance. Here you can see each Athelas claim that was a component of the remittance.
Quicklink to Athelas Claim — and to close the loop, clicking any of the specific claims listed in the ERA will open up the Athelas Claim Detail view so you can see remittance info in the context of the rest of the claim details.
Connect Your Bank Account
Once you’re ready to start automatically matching remittances and deposits we’ll need to connect to your bank account via the Athelas/Plaid integration. Here’s how to do it:
From the main Remittances tab, click the Connect Bank Accounts button. This will take you to the linked accounts screen.
From the linked accounts screen you can view any currently associated bank accounts, then click ‘Connect a new Bank Account’ to add a new one.
This will launch the Plaid integration screen which will guide you through the process of authenticating with your bank. Once you’re done, read-only access will be delivered to Athelas for analysis.
Once you’ve completed the connection it may take as much as an hour for data to be fully imported and matching to occur. Once an hour has passed, you can move on to analyzing your matches and mismatches.
Note: If you have more than one bank account you’d like to match against remittances, just repeat the process from the top. You can link as many bank accounts as you like.
Refresh or Delete a Bank Account
To refresh or remove an account, simply click ‘Manage Bank Accounts’ on the Remittances page, then click either the Refresh or Delete icon for that account.
Now that your bank account is hooked up and Athelas has had time to run our algorithmic matching protocol, the fun really begins. You now have 5 different ways to segment your data, depending on your objective:
Analyze Matches / Missing Deposits
Now that your bank account is hooked up and Athelas has had time to run our algorithmic matching protocol, the fun really begins. You now have 5 different ways to segment your data, depending on your objective:
View All — in this view you’ll see a combination of both remittances and deposits. Any that have been matched will appear combined into a single line item, but you’ll also see rows for unmatched remittances and unmatched deposits.
Missing ERAs — here you’ll see any deposit for which Athelas couldn’t find a corresponding remittance to match it to.
Missing Payment — on the flip side, this view shows remittances with no payments that could be directly matched to them
Inconsistencies — here Athelas was able to match a remittance to a deposit, but there’s some discrepancy between the two.
Generally this a difference in payment amount (often only a few cents), but each row will specify that the inconsistency in the match is.
Matched Deposits — as you might expect, this view holds all our unproblematic matches where a remittance clearly belongs with a given deposit and the numbers all line up nicely.
In Conclusion
With these tools in hand, the process of tracking down missing payments and missing remittances becomes a lot simpler. As Athelas continues to refine our matching algorithm there will be more and more matches generated automatically.
98%+ ACH deposits matched to a check
💬 FAQs
What should I do if my bank doesn’t integrate with Plaid?
Reach out to support@getathelas.com and we’ll see if we can manage an alternate method of importing your deposit list. Occasionally this isn’t possible, but often we’re able to find a suitable workaround.
Features In Development
Lockbox integrations
Enhanced deposit matching reporting in Insights
Features Not Supported
Local regional banks not on Plaid
Integrations With:
Plaid
Stripe