Search all docs
Provider Workflows
Chart Notes
Auto-apply KX Modifier
Getting Started with Chart Notes
AI Appt. Summaries
Chart Note Clinical Types
Download Chart Notes as PDFs
Goals on the chart note
How to add Measurements
Import Previous Medical History
Navigating Flowsheets
Navigating Inbox Workflows
Navigating the Chart Note
Set up Custom Chart Note Templates
Setting up Co-signers on Your Note
Sign a Chart Note
Text Snippets For Your Note
Chart Note Features Not Supported
Chart Notes
Claim Details
Claim Details
Front Office Workflows
Appointments
The Insights Appointments Page
Adding Prior Auth and Alerting
Alternate Methods for Scheduling
How to Add a Walk-In Patient
How to Run an Eligibility Check
How to Schedule an Appointment
How to Take Payments
Sending out reminders and forms
Understanding Appointment Details
Updating Appointment Statuses
Appt. Features not supported
Appointments
Daily Operations
Daily Operations
Patient Communications
General Patient Flows Features
Text Blast Page
Insurance Intake Page
Functional Outcome Measurements
Getting Started with Patient Portal
Complete Intake Forms
Navigating Patient Workflows
Manage Patient Appointments
Manage Payments through Patient Portal
Patient Intake Automation
Update Insurance Info
View Home Exercise Programs
Patient Communications
Patient Responsibility
Charge Saved Credit Cards
Manage Credit Cards
Setting up a Payment Plan
How to Cancel PR
How to Send a Patient Payment Link
How to Push to PR
How to Record Payments
How to Refund a Payment
How to Request via Text or Email
How to Set Up Miscellaneous Line Item Charges
How to Take Payment for Families
How to Undo a Write Off
How to Write Off PR
Patient Responsibility Page
PR Overpayment Refunds and Estimated vs. Remittance PR
PR Settings
PR Timeline
Patient Responsibility
Billing Workflows
Front Office Payments
Front Office Payments
Reports
A/R Reports
Building and Running Reports
Claim Adjustments Report
Collections Report
Custom Collections Report
Detailed Charges Report
Export Claim Details
Generate a Transaction Report
Patient Balances Report
Patient Charges Report
Patient Claims One-pagers
Patient Collections Report
Patient Eligibility Report
Posting Log Report
Site Transaction Report
Site Transaction Report Summary
Submitted Claims Report
Upcoming Patient Statements Report
Reports
Owners & Administration
Last updated:
Aug 5, 2025
How to Use the Posting Tool Page
Posting
Front Office Workflows
Overview
When it comes to remittances, the vast majority of posting can be handled by Athelas' automated posting systems. However, payers occasionally send malformed, duplicate, or conflicting data in their remittances. Athelas’ systems will flag these cases for manual review, either by our operations team or your practice’s staff. The Athelas Posting Tool is designed to give you more flexibility and control over remittances that are either marked for manual review or that you want to adjust manually.
Here's a short demo:
How It Helps?
The Athelas Posting Tool is designed to simplify and streamline manual posting, giving your team the tools to handle exceptions and adjustments quickly, accurately, and with full visibility. Here’s how it helps:
Reduces Manual Errors: Preview Mode lets you see the impact of every action before it’s posted, helping prevent mistakes.
Centralizes Financial Activity: Procedure-level and claim-level payments are displayed in one place, providing a complete view of an encounter’s financials.
Supports Complex Adjustments: Actions like Negations, Write Offs, Write Off PR, Push to PR, and Custom Adjustments let you manage exceptions efficiently.
Audit-Friendly: Every action is tracked separately, preserving a clear history of postings for internal reviews and compliance.
Improves Productivity: Encounter and payer-level rollups highlight totals and discrepancies, so your team can focus on the items that need attention most.
By providing visibility, control, and safety checks, the Posting Tool helps your team post remittances confidently while maintaining accurate financial records.
Key Concepts
Term | Description |
|---|---|
Encounter / Claim | A single patient visit or claim that may include multiple procedures. The Posting Tool supports both procedure-level and encounter-level posting. |
Procedure | A specific service provided during an encounter (e.g., a lab test or office visit). Each procedure has its own financial details. |
Payment Item | A record of a posted payment, adjustment, or other financial activity applied to a procedure or encounter. |
Unposted Remittance | A payment or adjustment received from a payer but not yet applied to the ledger. These often posted automatically by our system, but sometimes require manual review. |
Patient Responsibility (PR) | The portion of a charge the patient is responsible for, including copays, coinsurance, or deductibles. |
Denied Amount | A portion of a charge that the payer will not cover. Denied amounts can be written off or pushed to patient responsibility. |
Write Off | A ledger action that removes a balance that is no longer collectible from the payer or patient. |
Negation | A ledger action that reverses a previously posted payment or adjustment. |
Push to PR | A ledger action that reclassifies denied payer amounts to patient responsibility. |
Custom Adjustment | A manually entered adjustment for any financial field that is not captured by standard actions. |
Preview Mode | A temporary, reversible view that shows the impact of any action on balances before it is permanently posted. |
CARC / RARC | Claim Adjustment Reason Codes (CARC) and Remittance Advice Remark Codes (RARC) explain why a payer partially or fully denied a charge. |
Encounter Rollup / Summary | Summary totals of all procedures for a single encounter, showing charges, payments, adjustments, PR, and balances. |
Payer Rollup / Summary | Summary totals broken down by payer for a single encounter, showing progress before posting. |
Navigation & Summaries
Navigating To Posting Tool
There are three ways to open an encounter in the Posting Tool:
From a Claim
Open the desired claim in claim details.
Open the Actions menu.
Select Posting Tool.

From Search (Command + K / Search Icon)
Click the search icon in the header (or press Command + k).

Search for the Encounter ID.
The Posting Tool option for that encounter will appear — click it to navigate.

From the Posting Tool Page
Open the Posting Tool page (/posting-tool). You can also get here via Sidebar → Utilities → Posting Tool.

Use the filters to find the encounter you need.

Click the row in the table to open the Posting Tool for that encounter.
Understanding Encounter & Payer Summaries

At the top of the Posting Tool, you’ll see two types of summaries (rollups):
Encounter Rollup – Totals for the entire encounter across all procedures and payers. This gives you a complete overall overview of charges, payments, adjustments, PR, and balance.
Payer Rollup – A breakdown by payer (Primary, Secondary, Patient etc.), showing progress with each payer before posting.
Both update live as you preview posting actions (e.g. negations, write offs, etc.). More on previews later.

Note: A pulsing animation indicates that the previews are loading
Data Workspaces
Understanding the tables and work areas
Understanding the Procedures Table

The Procedures Table is the central workspace for reviewing and acting on all procedures associated with an encounter. Each row represents a single procedure, giving you insight into its charges, payments, adjustments, and balances. This table is where most posting actions will be performed.
Key features of the Procedures Table:
Procedure Details: Each procedure row displays identifying data such as CPT codes, modifiers, and service dates.
Financial Metrics: Each procedure row shows important financial fields calculated from the payment ledger for that procedure (more on this later), including:
Charges – The billed amount for the procedure.
Ins. Paid – Total amount paid by insurance.
Adjustments – Contractual adjustments, write-offs, or other reductions.
PR Amount – Patient responsibility as determined by insurance.
PR Paid – Amount already collected from the patient.
Balance – Remaining amount owed, calculated as Charges – (Ins. Paid + Adjustments + PR Paid).
Preview Mode: Any posting actions you take will appear as a live preview in to let you see the impact on the encounter before confirming. (more on this later)
Expanding a Procedure Row

Clicking on a procedure row opens a subsection containing two important tables for that procedure:
Payment Items Table – Shows all payments and adjustments that have already been applied to the procedure.
Unposted Remittances Table – Shows remittances received from payers that have not yet been posted.
Procedure-Level Payment Items Table (Procedure Payment Ledger)

The Payment Items Table provides full visibility into all financial activity that has been recorded for a specific procedure.
Key Features:
Rows: Each row represents a posted payment or adjustment.
Columns include:
Type – Identifies the ledger item (remittance, adjustment, patient payment, etc.). Preview rows will display their action type (Negation, Write Off, Write Off PR, Push to PR).
Paid Amount – Amount paid by the payer.
Patient Responsibility Breakdown – Copay, coinsurance, deductible, and other PR.
Adjustments – Contractual, other adjustments, or denied amounts.
Notes – Any supporting context or comments.
Other Identifiers – Additional metadata for auditing and tracking.
Available Actions (more on this later):
Negate – Reverse a previously posted payment or adjustment.
Write Off – Apply a write-off to reduce the procedure balance.
Write Off PR – Apply a write-off specifically to patient responsibility.
Push to PR – Move denied or uncollectible payer amounts to the patient responsibility bucket.
Procedure-Level Unposted Remittances Table

The Unposted Remittances Table shows all remittances for a procedure that have been received but not yet posted. These items typically require manual review before they can be posted.
Purpose: Surfaces remittances that could not be auto-posted.
Tip: Hover over the Posting Status column to see details on why a remittance was not posted automatically.

Key Features:
Rows: Each row represents a distinct unposted remittance.
Columns include: Charges, Paid, Patient Responsibility Breakdown, Adjustments.
Available Actions:
Post Remittance (Add to preview) – Adds a preview item onto the procedure’s payment ledger.
Archive/Unarchive – Classify remittances that are duplicates or incorrect without posting them.
Understanding Claim Level Payments

Not all payments and adjustments apply to a single procedure — some are made at the encounter (claim) level. The Claim-Level Payments section provides visibility into these items so you can review and manage them alongside procedure-level activity.
💡Note: This section will only display if the encounter has claim level payment items or remittances.
This section appears directly below the Procedures Table and mirrors its structure. It shows 2 familiar views:
Payment Items Table – A ledger of all posted payments and adjustments made at the encounter level. This includes insurance payments, adjustments, and other ledger activity that affects the encounter as a whole.
Unposted Remittances Table – A list of remittances received at the encounter level that have not yet been applied. These often require manual review before posting.
Just like with procedure-level payments, you can preview certain actions here.
By separating encounter-level activity into its own workspace, the Posting Tool ensures you have a complete and accurate view of both procedure-level and claim-level financials for every encounter.
Claim-Level Payment Items Table (Claim Payment Ledger)

The Claim-Level Payment Items Table provides a comprehensive ledger of all financial activity recorded at the encounter (claim) level, rather than tied to a specific procedure. This allows you to track payments, adjustments, and other actions that affect the claim as a whole.
Key Features:
Rows: Each row represents a posted payment or adjustment applied to the encounter.
Columns include:
Type – Identifies the ledger item (insurance payment, adjustment, patient payment, etc.). Preview rows display their action type (currently only Negation is supported).
Paid Amount – Total amount paid at the claim level.
Patient Responsibility Breakdown – Copay, coinsurance, deductible, and other PR codes, if applicable.
Adjustments – Contractual, other adjustments, or denied amounts applied at the claim level.
Notes – Additional context or explanations for the payment or adjustment.
Other Identifiers – Metadata to support auditing and tracking.
Available Actions:
Negate – Reverse a previously posted payment or adjustment at the claim level.
Unlike procedure-level payments, claim-level items are standalone and do not automatically distribute across procedures. They exist as their own workspace, providing a holistic view of all encounter-level financial activity.
Claim-Level Unposted Remittances Table

The Claim-Level Unposted Remittances Table lists all remittances that have been received at the encounter (claim) level but not yet applied. These remittances are not tied to a single procedure and often require manual review before they can be posted.
Key Features:
Key Features:
Rows: Each row represents a distinct unposted remittance.
Columns include: Charges, Paid, Patient Responsibility Breakdown, Adjustments.
Available Actions:
Post Remittance (Add to preview) – Adds a preview item onto the claim payment ledger.
Archive/Unarchive – Classify remittances that are duplicates or incorrect without posting them.
By surfacing encounter-level remittances in their own table, the Posting Tool ensures that claim-level payments are not overlooked and can be reconciled consistently alongside procedure-level items.
Actions & Preview Mode
What you can do and how
Actions Overview
The Posting Tool provides a set of actions that let you manage posted payments, adjustments, and unposted remittances with precision. Actions are the main way to correct, reclassify, or apply financial activity at both the procedure level and the encounter (claim) level.
Each action is designed to be transparent and reversible through Preview Mode, giving you full visibility into how changes will affect the ledger before committing them.
Key Principles
Actions apply to specific items – Each row in the Payment Items Table or Unposted Remittances Table represents a single payment, adjustment, or remittance. Actions are taken on a row-by-row basis.
Preview first – All actions generate a preview row so you can review changes before posting. This ensures that mistakes can be corrected early and balances remain accurate.
Audit-friendly – Every action you take is tracked separately in the ledger, preserving a clear history of all adjustments and postings.
Multiple levels supported – Actions can be applied to both procedure-level items and claim-level items, depending on the financial activity being managed.
In the sections that follow, you’ll see detailed instructions for each type of action: Posting Remittances, Archiving/Unarchiving, Negations, Write Offs, Write Off PR, Push to PR, and Custom Adjustments. Each section explains when to use the action, how to apply it, and what to expect in Preview Mode.
Action Cheat Sheet
Action | Color in Preview | Applies To | Purpose |
|---|---|---|---|
Negate | Red | Procedure / Claim | Reverse a posted item |
Write Off | Yellow | Payer | Remove uncollectible balance |
Write Off PR | Yellow | Patient | Remove patient balance |
Push to PR | Green | Payer | Move denied balance to patient |
Custom Adjustment | Purple | Procedure / Claim | Manual adjustment of any field |
Preview Mode
Preview Mode is a core feature of the Posting Tool that lets you see the impact of posting actions before they are permanently applied. Whenever you take an action—such as a Posting a remittance, Negation, Write Off, Push to PR, or Custom Adjustment—the tool generates a preview row in the Payment Items Table.
Why Preview Mode Exists
Preview Mode gives you flexibility and control over posting by allowing you to:
Review changes before committing – You can see exactly how actions affect charges, payments, adjustments, patient responsibility, and balances.
Make multiple adjustments safely – Apply several posting actions and confirm them all at once.
Catch mistakes early – Easily undo actions in the preview before they are posted, avoiding accidental ledger changes.
Understand impact at both levels – Preview rows show how changes affect procedure-level and encounter-level totals simultaneously.
How Preview Mode Works
Perform a posting action (Post Remittance, Negation, Write Off, Push to PR, Custom Adjustment).
A preview row appears in the Payment Items Table.

Encounter, payer, and procedure summaries will use crossed-out values alongside updated values to clearly show changes.

You can click directly on the Value columns or Note column in the preview row to make edits.

If needed, click the undo button in the right-most column to remove the preview row.

Once you’re satisfied, click Post (or Confirm Posting for custom adjustments) to permanently apply the changes to the ledger.

Preview Mode is designed to make posting transparent, reversible, and easy to review, so your team can confidently manage both procedure-level and claim-level financial activity.
Unposted Remittances Actions
The Unposted Remittances Tables — whether at the procedure level or claim level — allow you to manage remittances that have not yet been applied. There are two primary actions you can take on these items: Archiving/Unarchiving and Posting.
Archiving/Unarchiving
Archiving lets you set aside remittances without posting them. This is useful when:
The remittance is a duplicate.
The remittance is incorrect or irrelevant for the current encounter.
You want to declutter your workspace before posting.
How it works:
Locate the remittance in the Unposted Remittances Table.
Click the Archive button in the Actions column (right-most column of the table).

The remittance will be moved to the bottom of the table, with an “archived” label and will be grayed out.

To restore an archived remittance, click the Unarchive button in the actions column

Notes:
Archiving a remittance will also mark its status as finalized
Posting
Posting a remittance moves it into preview mode so that it can be applied to the procedure or claim payment ledger. This lets you review its impact on balances before confirming.
How it works:
Locate the unposted remittance you want to post.
Click Post Remittance button.

The remittance will appear in the Payment Items Table as a blue preview row.

Review the preview to see how the remittance affects the balance, PR, and adjustments. It will show crossed-out values alongside updated values, so you can clearly see how the negation impacts encounter-level and (if applicable) procedure-level amounts. Click the undo button (in the right-most column) to remove this preview remittance.
To permanently add this remittance to the ledger, click Post.
Notes:
If a remittance is applied incorrectly, it can be negated after posting.
Hovering over the Posting Status column can provide information about exceptions or insights on why the remittance wasn't auto posted if its in ‘Manual Review’.
Payment Item Actions
The Payment Items Tables — at both the procedure level and claim level — allow you to manage posted payments and adjustments. The Posting Tool provides several actions to correct or reallocate amounts, depending on the situation: Negations, Write Offs, Write Off PR, and Push to PR.
Negate
Negation reverses a previously posted payment or adjustment. Use this when a payment or adjustment was applied incorrectly or needs to be undone.
How it works:
Locate the payment or adjustment in the Payment Items Table.
Open the Actions menu (three-dot menu in the right-most column) and select Negate.

Enter a reason for the negation, then click Negate.

A red preview row will appear showing the negation and its impact on balances.

Review the preview. It will show crossed-out values alongside updated values, so you can clearly see how the negation impacts encounter-level and (if applicable) procedure-level amounts. Click the undo button (in the right-most column) to remove this preview negation.

To permanently add this negation to the ledger, click Post.
Notes:
Negations can be applied to insurance payments and adjustments, they cannot be be applied to patient payments or already negated payment items.
After negation, the original entry remains in the table for auditing purposes. However, it cannot be negated again.
In the preview row, you can click directly on the Value columns or the Note column to edit amounts or text before posting.
Write Off (Procedure Only Action)
⚠️ Currently, Write Offs can only be applied to procedure-level Payment Items.
A Write Off removes a balance that should no longer be pursued or collected. This is often used when a payer indicates that a charge is not collectible, or when your organization decides to absorb the cost.
A Write Off is a net-zero operation: it reclassifies an amount by moving it out of the Denied column and into the Other Adjustments column. This reduces the outstanding balance on the encounter by the written-off amount.
How it works:
Locate the denied balance you want to write off in the Payment Items Table.
Open the Actions menu (three-dot menu in the right-most column) and select Write Off.

Enter a reason for the write off and specify the amount to write off for each denied CARC. Then click Write Off.

A yellow preview row will appear showing the write off and its impact on balances.

Review the preview. Crossed-out values with updated values beside them will show exactly how the write off affects encounter-level and (if applicable) procedure-level amounts. Click the undo button (in the right-most column) to remove this preview write off.

To permanently apply the write off to the ledger, click Post.
Notes:
Write offs can only be applied to remittances with denied amounts.
Like negations, the original amounts remain visible in the ledger for auditing, with the write off applied as a separate line item.
In the preview row, you can click directly on the Value columns or the Note column to edit amounts or text before posting.
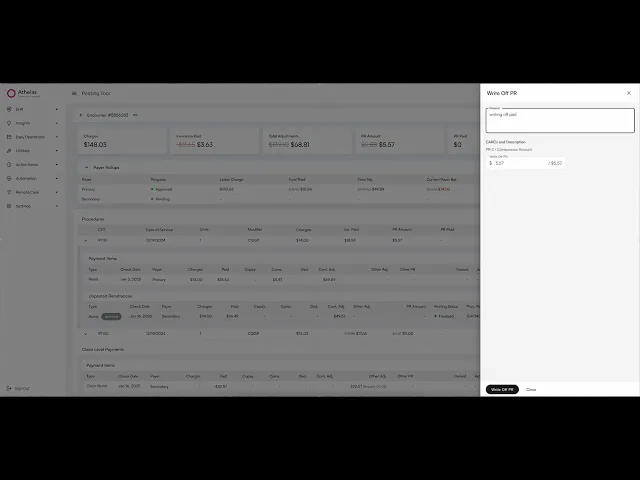
Write Off PR (Procedure Only Action)
⚠️ Currently, Write Offs can only be applied to procedure-level Payment Items.
A Patient Responsibility Write Off removes a balance that was assigned to the patient but should no longer be collected. This is typically used when your organization decides not to bill the patient for a portion of their responsibility (copay, deductible, or coinsurance).
Like payer write offs, this is a net-zero operation: the amount is moved out of the corresponding Patient Responsibility column and into the Other Adjustments column. This reduces the outstanding patient balance on the encounter by the written-off amount.
How it works:
Locate the remittance with a patient responsibility balance (copay, deductible, or coinsurance) you want to write off in the Payment Items Table.
Open the Actions menu (three-dot menu in the right-most column) and select Write Off PR.

Enter a reason for the write off and specify the amount to write off for each PR CARC. Then click Write Off PR.

A yellow preview row will appear showing the write off and its impact on balances.

Review the preview. Crossed-out values with updated values beside them will show how the write off affects encounter-level and (if applicable) procedure-level amounts. Click the undo button (in the right-most column) to remove this preview.

To permanently apply the write off to the ledger, click Post.
Notes:
Write Off PR can only be applied to patient responsibility balances like coinsurance, deductible, or copay (not to payments).
The original amounts remain visible in the ledger for auditing, with the write off recorded as a separate line item.
In the preview row, you can click directly on the Value columns or the Note column to edit amounts or text before posting.
Push To PR (Procedure Only Action)
⚠️ Currently, Write Offs can only be applied to procedure-level Payment Items.
A Push to PR reclassifies a denied balance so that it is collected from the patient instead of the payer. This is typically used when a payer denies and marks a service as the patient’s responsibility.
Like write offs, this is a net-zero operation: the amount is moved out of the denied column and into the Other Pr column. This reduces the payer balance and increases the patient balance on the encounter by the same amount.
How it works:
Locate the denied balance you want to push to patient responsibility in the Payment Items Table.
Open the Actions menu (three-dot menu in the right-most column) and select Push to PR.

Enter a reason for the push and specify the amount to reclassify for each Denied CARC. Then click Push to PR.

A green preview row will appear showing the reclassified balance and its impact on payer and patient balances.

Review the preview. Crossed-out values with updated values beside them will show exactly how the push affects encounter-level and (if applicable) procedure-level amounts. Click the undo button (in the right-most column) to remove this preview.

To permanently apply the push to the ledger, click Post.
Notes:
Push to PR can only be applied to remittances with denied amounts.
The original amounts remain visible in the ledger for auditing, with the reclassification recorded as a separate line item.
In the preview row, you can click directly on the Value columns or the Note column to edit amounts or text before posting.
Custom Adjustments (aka. Manual Adjustments)
A Custom Adjustment allows you to create a tailored adjustment that isn’t captured by standard posting actions like write-offs, negations, or push-to-PR. Use this when you need to manually adjust amounts for a procedure or encounter to accurately reflect your financial records.
Custom adjustments are flexible: you can specify amounts for any column, including charges, payments, denied amounts, patient responsibility, or other adjustments.
How it works:
In the Payment Items Table, click the + Add button located beside the sort button.

Select the claim that should be associated with the new custom adjustment and click Confirm. A purple preview row with empty values will appear in the ledger.


Click on the cells in the preview row to edit and manually specify amounts in any column to reflect the desired correction. Press “Enter” or click outside of the cell to save the changes. You can adjust charges, payments, denied amounts, PR, other adjustments, etc.

Review the preview. Crossed-out values with updated values beside them will show how the custom adjustment affects encounter-level and (if applicable) procedure-level balances. Click the undo button in the right-most column to remove the custom adjustment if needed.

Once the amounts are correct, click Confirm Posting to permanently apply the custom adjustment to the ledger.
Notes:
Only make a custom adjustment if no standard adjustments meet your needs. Use at your own risk.
Charges and Billed columns can only be edited by super users. Attempting to edit these columns will display a warning, as these fields generally should not be modified.
Custom adjustments let you specify adjustments to any financial field in the Payment Items Table.
After posting, the adjustment is recorded as a separate line item for auditing purposes.
Table of Contents
Search all docs
Provider Workflows
Chart Notes
Auto-apply KX Modifier
Getting Started with Chart Notes
AI Appt. Summaries
Chart Note Clinical Types
Download Chart Notes as PDFs
Goals on the chart note
How to add Measurements
Import Previous Medical History
Navigating Flowsheets
Navigating Inbox Workflows
Navigating the Chart Note
Set up Custom Chart Note Templates
Setting up Co-signers on Your Note
Sign a Chart Note
Text Snippets For Your Note
Chart Note Features Not Supported
Chart Notes
Claim Details
Claim Details
Front Office Workflows
Appointments
The Insights Appointments Page
Adding Prior Auth and Alerting
Alternate Methods for Scheduling
How to Add a Walk-In Patient
How to Run an Eligibility Check
How to Schedule an Appointment
How to Take Payments
Sending out reminders and forms
Understanding Appointment Details
Updating Appointment Statuses
Appt. Features not supported
Appointments
Daily Operations
Daily Operations
Patient Communications
General Patient Flows Features
Text Blast Page
Insurance Intake Page
Functional Outcome Measurements
Getting Started with Patient Portal
Complete Intake Forms
Navigating Patient Workflows
Manage Patient Appointments
Manage Payments through Patient Portal
Patient Intake Automation
Update Insurance Info
View Home Exercise Programs
Patient Communications
Patient Responsibility
Charge Saved Credit Cards
Manage Credit Cards
Setting up a Payment Plan
How to Cancel PR
How to Send a Patient Payment Link
How to Push to PR
How to Record Payments
How to Refund a Payment
How to Request via Text or Email
How to Set Up Miscellaneous Line Item Charges
How to Take Payment for Families
How to Undo a Write Off
How to Write Off PR
Patient Responsibility Page
PR Overpayment Refunds and Estimated vs. Remittance PR
PR Settings
PR Timeline
Patient Responsibility
Billing Workflows
Front Office Payments
Front Office Payments
Reports
A/R Reports
Building and Running Reports
Claim Adjustments Report
Collections Report
Custom Collections Report
Detailed Charges Report
Export Claim Details
Generate a Transaction Report
Patient Balances Report
Patient Charges Report
Patient Claims One-pagers
Patient Collections Report
Patient Eligibility Report
Posting Log Report
Site Transaction Report
Site Transaction Report Summary
Submitted Claims Report
Upcoming Patient Statements Report
Reports
Owners & Administration
Last updated:
Aug 5, 2025
How to Use the Posting Tool Page
Posting
Front Office Workflows
Overview
When it comes to remittances, the vast majority of posting can be handled by Athelas' automated posting systems. However, payers occasionally send malformed, duplicate, or conflicting data in their remittances. Athelas’ systems will flag these cases for manual review, either by our operations team or your practice’s staff. The Athelas Posting Tool is designed to give you more flexibility and control over remittances that are either marked for manual review or that you want to adjust manually.
Here's a short demo:
How It Helps?
The Athelas Posting Tool is designed to simplify and streamline manual posting, giving your team the tools to handle exceptions and adjustments quickly, accurately, and with full visibility. Here’s how it helps:
Reduces Manual Errors: Preview Mode lets you see the impact of every action before it’s posted, helping prevent mistakes.
Centralizes Financial Activity: Procedure-level and claim-level payments are displayed in one place, providing a complete view of an encounter’s financials.
Supports Complex Adjustments: Actions like Negations, Write Offs, Write Off PR, Push to PR, and Custom Adjustments let you manage exceptions efficiently.
Audit-Friendly: Every action is tracked separately, preserving a clear history of postings for internal reviews and compliance.
Improves Productivity: Encounter and payer-level rollups highlight totals and discrepancies, so your team can focus on the items that need attention most.
By providing visibility, control, and safety checks, the Posting Tool helps your team post remittances confidently while maintaining accurate financial records.
Key Concepts
Term | Description |
|---|---|
Encounter / Claim | A single patient visit or claim that may include multiple procedures. The Posting Tool supports both procedure-level and encounter-level posting. |
Procedure | A specific service provided during an encounter (e.g., a lab test or office visit). Each procedure has its own financial details. |
Payment Item | A record of a posted payment, adjustment, or other financial activity applied to a procedure or encounter. |
Unposted Remittance | A payment or adjustment received from a payer but not yet applied to the ledger. These often posted automatically by our system, but sometimes require manual review. |
Patient Responsibility (PR) | The portion of a charge the patient is responsible for, including copays, coinsurance, or deductibles. |
Denied Amount | A portion of a charge that the payer will not cover. Denied amounts can be written off or pushed to patient responsibility. |
Write Off | A ledger action that removes a balance that is no longer collectible from the payer or patient. |
Negation | A ledger action that reverses a previously posted payment or adjustment. |
Push to PR | A ledger action that reclassifies denied payer amounts to patient responsibility. |
Custom Adjustment | A manually entered adjustment for any financial field that is not captured by standard actions. |
Preview Mode | A temporary, reversible view that shows the impact of any action on balances before it is permanently posted. |
CARC / RARC | Claim Adjustment Reason Codes (CARC) and Remittance Advice Remark Codes (RARC) explain why a payer partially or fully denied a charge. |
Encounter Rollup / Summary | Summary totals of all procedures for a single encounter, showing charges, payments, adjustments, PR, and balances. |
Payer Rollup / Summary | Summary totals broken down by payer for a single encounter, showing progress before posting. |
Navigation & Summaries
Navigating To Posting Tool
There are three ways to open an encounter in the Posting Tool:
From a Claim
Open the desired claim in claim details.
Open the Actions menu.
Select Posting Tool.
From Search (Command + K / Search Icon)
Click the search icon in the header (or press Command + k).
Search for the Encounter ID.
The Posting Tool option for that encounter will appear — click it to navigate.
From the Posting Tool Page
Open the Posting Tool page (/posting-tool). You can also get here via Sidebar → Utilities → Posting Tool.
Use the filters to find the encounter you need.
Click the row in the table to open the Posting Tool for that encounter.
Understanding Encounter & Payer Summaries
At the top of the Posting Tool, you’ll see two types of summaries (rollups):
Encounter Rollup – Totals for the entire encounter across all procedures and payers. This gives you a complete overall overview of charges, payments, adjustments, PR, and balance.
Payer Rollup – A breakdown by payer (Primary, Secondary, Patient etc.), showing progress with each payer before posting.
Both update live as you preview posting actions (e.g. negations, write offs, etc.). More on previews later.
Note: A pulsing animation indicates that the previews are loading
Data Workspaces
Understanding the tables and work areas
Understanding the Procedures Table
The Procedures Table is the central workspace for reviewing and acting on all procedures associated with an encounter. Each row represents a single procedure, giving you insight into its charges, payments, adjustments, and balances. This table is where most posting actions will be performed.
Key features of the Procedures Table:
Procedure Details: Each procedure row displays identifying data such as CPT codes, modifiers, and service dates.
Financial Metrics: Each procedure row shows important financial fields calculated from the payment ledger for that procedure (more on this later), including:
Charges – The billed amount for the procedure.
Ins. Paid – Total amount paid by insurance.
Adjustments – Contractual adjustments, write-offs, or other reductions.
PR Amount – Patient responsibility as determined by insurance.
PR Paid – Amount already collected from the patient.
Balance – Remaining amount owed, calculated as Charges – (Ins. Paid + Adjustments + PR Paid).
Preview Mode: Any posting actions you take will appear as a live preview in to let you see the impact on the encounter before confirming. (more on this later)
Expanding a Procedure Row
Clicking on a procedure row opens a subsection containing two important tables for that procedure:
Payment Items Table – Shows all payments and adjustments that have already been applied to the procedure.
Unposted Remittances Table – Shows remittances received from payers that have not yet been posted.
Procedure-Level Payment Items Table (Procedure Payment Ledger)
The Payment Items Table provides full visibility into all financial activity that has been recorded for a specific procedure.
Key Features:
Rows: Each row represents a posted payment or adjustment.
Columns include:
Type – Identifies the ledger item (remittance, adjustment, patient payment, etc.). Preview rows will display their action type (Negation, Write Off, Write Off PR, Push to PR).
Paid Amount – Amount paid by the payer.
Patient Responsibility Breakdown – Copay, coinsurance, deductible, and other PR.
Adjustments – Contractual, other adjustments, or denied amounts.
Notes – Any supporting context or comments.
Other Identifiers – Additional metadata for auditing and tracking.
Available Actions (more on this later):
Negate – Reverse a previously posted payment or adjustment.
Write Off – Apply a write-off to reduce the procedure balance.
Write Off PR – Apply a write-off specifically to patient responsibility.
Push to PR – Move denied or uncollectible payer amounts to the patient responsibility bucket.
Procedure-Level Unposted Remittances Table
The Unposted Remittances Table shows all remittances for a procedure that have been received but not yet posted. These items typically require manual review before they can be posted.
Purpose: Surfaces remittances that could not be auto-posted.
Tip: Hover over the Posting Status column to see details on why a remittance was not posted automatically.
Key Features:
Rows: Each row represents a distinct unposted remittance.
Columns include: Charges, Paid, Patient Responsibility Breakdown, Adjustments.
Available Actions:
Post Remittance (Add to preview) – Adds a preview item onto the procedure’s payment ledger.
Archive/Unarchive – Classify remittances that are duplicates or incorrect without posting them.
Understanding Claim Level Payments
Not all payments and adjustments apply to a single procedure — some are made at the encounter (claim) level. The Claim-Level Payments section provides visibility into these items so you can review and manage them alongside procedure-level activity.
💡Note: This section will only display if the encounter has claim level payment items or remittances.
This section appears directly below the Procedures Table and mirrors its structure. It shows 2 familiar views:
Payment Items Table – A ledger of all posted payments and adjustments made at the encounter level. This includes insurance payments, adjustments, and other ledger activity that affects the encounter as a whole.
Unposted Remittances Table – A list of remittances received at the encounter level that have not yet been applied. These often require manual review before posting.
Just like with procedure-level payments, you can preview certain actions here.
By separating encounter-level activity into its own workspace, the Posting Tool ensures you have a complete and accurate view of both procedure-level and claim-level financials for every encounter.
Claim-Level Payment Items Table (Claim Payment Ledger)
The Claim-Level Payment Items Table provides a comprehensive ledger of all financial activity recorded at the encounter (claim) level, rather than tied to a specific procedure. This allows you to track payments, adjustments, and other actions that affect the claim as a whole.
Key Features:
Rows: Each row represents a posted payment or adjustment applied to the encounter.
Columns include:
Type – Identifies the ledger item (insurance payment, adjustment, patient payment, etc.). Preview rows display their action type (currently only Negation is supported).
Paid Amount – Total amount paid at the claim level.
Patient Responsibility Breakdown – Copay, coinsurance, deductible, and other PR codes, if applicable.
Adjustments – Contractual, other adjustments, or denied amounts applied at the claim level.
Notes – Additional context or explanations for the payment or adjustment.
Other Identifiers – Metadata to support auditing and tracking.
Available Actions:
Negate – Reverse a previously posted payment or adjustment at the claim level.
Unlike procedure-level payments, claim-level items are standalone and do not automatically distribute across procedures. They exist as their own workspace, providing a holistic view of all encounter-level financial activity.
Claim-Level Unposted Remittances Table
The Claim-Level Unposted Remittances Table lists all remittances that have been received at the encounter (claim) level but not yet applied. These remittances are not tied to a single procedure and often require manual review before they can be posted.
Key Features:
Key Features:
Rows: Each row represents a distinct unposted remittance.
Columns include: Charges, Paid, Patient Responsibility Breakdown, Adjustments.
Available Actions:
Post Remittance (Add to preview) – Adds a preview item onto the claim payment ledger.
Archive/Unarchive – Classify remittances that are duplicates or incorrect without posting them.
By surfacing encounter-level remittances in their own table, the Posting Tool ensures that claim-level payments are not overlooked and can be reconciled consistently alongside procedure-level items.
Actions & Preview Mode
What you can do and how
Actions Overview
The Posting Tool provides a set of actions that let you manage posted payments, adjustments, and unposted remittances with precision. Actions are the main way to correct, reclassify, or apply financial activity at both the procedure level and the encounter (claim) level.
Each action is designed to be transparent and reversible through Preview Mode, giving you full visibility into how changes will affect the ledger before committing them.
Key Principles
Actions apply to specific items – Each row in the Payment Items Table or Unposted Remittances Table represents a single payment, adjustment, or remittance. Actions are taken on a row-by-row basis.
Preview first – All actions generate a preview row so you can review changes before posting. This ensures that mistakes can be corrected early and balances remain accurate.
Audit-friendly – Every action you take is tracked separately in the ledger, preserving a clear history of all adjustments and postings.
Multiple levels supported – Actions can be applied to both procedure-level items and claim-level items, depending on the financial activity being managed.
In the sections that follow, you’ll see detailed instructions for each type of action: Posting Remittances, Archiving/Unarchiving, Negations, Write Offs, Write Off PR, Push to PR, and Custom Adjustments. Each section explains when to use the action, how to apply it, and what to expect in Preview Mode.
Action Cheat Sheet
Action | Color in Preview | Applies To | Purpose |
|---|---|---|---|
Negate | Red | Procedure / Claim | Reverse a posted item |
Write Off | Yellow | Payer | Remove uncollectible balance |
Write Off PR | Yellow | Patient | Remove patient balance |
Push to PR | Green | Payer | Move denied balance to patient |
Custom Adjustment | Purple | Procedure / Claim | Manual adjustment of any field |
Preview Mode
Preview Mode is a core feature of the Posting Tool that lets you see the impact of posting actions before they are permanently applied. Whenever you take an action—such as a Posting a remittance, Negation, Write Off, Push to PR, or Custom Adjustment—the tool generates a preview row in the Payment Items Table.
Why Preview Mode Exists
Preview Mode gives you flexibility and control over posting by allowing you to:
Review changes before committing – You can see exactly how actions affect charges, payments, adjustments, patient responsibility, and balances.
Make multiple adjustments safely – Apply several posting actions and confirm them all at once.
Catch mistakes early – Easily undo actions in the preview before they are posted, avoiding accidental ledger changes.
Understand impact at both levels – Preview rows show how changes affect procedure-level and encounter-level totals simultaneously.
How Preview Mode Works
Perform a posting action (Post Remittance, Negation, Write Off, Push to PR, Custom Adjustment).
A preview row appears in the Payment Items Table.
Encounter, payer, and procedure summaries will use crossed-out values alongside updated values to clearly show changes.
You can click directly on the Value columns or Note column in the preview row to make edits.
If needed, click the undo button in the right-most column to remove the preview row.
Once you’re satisfied, click Post (or Confirm Posting for custom adjustments) to permanently apply the changes to the ledger.
Preview Mode is designed to make posting transparent, reversible, and easy to review, so your team can confidently manage both procedure-level and claim-level financial activity.
Unposted Remittances Actions
The Unposted Remittances Tables — whether at the procedure level or claim level — allow you to manage remittances that have not yet been applied. There are two primary actions you can take on these items: Archiving/Unarchiving and Posting.
Archiving/Unarchiving
Archiving lets you set aside remittances without posting them. This is useful when:
The remittance is a duplicate.
The remittance is incorrect or irrelevant for the current encounter.
You want to declutter your workspace before posting.
How it works:
Locate the remittance in the Unposted Remittances Table.
Click the Archive button in the Actions column (right-most column of the table).
The remittance will be moved to the bottom of the table, with an “archived” label and will be grayed out.
To restore an archived remittance, click the Unarchive button in the actions column
Notes:
Archiving a remittance will also mark its status as finalized
Posting
Posting a remittance moves it into preview mode so that it can be applied to the procedure or claim payment ledger. This lets you review its impact on balances before confirming.
How it works:
Locate the unposted remittance you want to post.
Click Post Remittance button.
The remittance will appear in the Payment Items Table as a blue preview row.
Review the preview to see how the remittance affects the balance, PR, and adjustments. It will show crossed-out values alongside updated values, so you can clearly see how the negation impacts encounter-level and (if applicable) procedure-level amounts. Click the undo button (in the right-most column) to remove this preview remittance.
To permanently add this remittance to the ledger, click Post.
Notes:
If a remittance is applied incorrectly, it can be negated after posting.
Hovering over the Posting Status column can provide information about exceptions or insights on why the remittance wasn't auto posted if its in ‘Manual Review’.
Payment Item Actions
The Payment Items Tables — at both the procedure level and claim level — allow you to manage posted payments and adjustments. The Posting Tool provides several actions to correct or reallocate amounts, depending on the situation: Negations, Write Offs, Write Off PR, and Push to PR.
Negate
Negation reverses a previously posted payment or adjustment. Use this when a payment or adjustment was applied incorrectly or needs to be undone.
How it works:
Locate the payment or adjustment in the Payment Items Table.
Open the Actions menu (three-dot menu in the right-most column) and select Negate.
Enter a reason for the negation, then click Negate.
A red preview row will appear showing the negation and its impact on balances.
Review the preview. It will show crossed-out values alongside updated values, so you can clearly see how the negation impacts encounter-level and (if applicable) procedure-level amounts. Click the undo button (in the right-most column) to remove this preview negation.
To permanently add this negation to the ledger, click Post.
Notes:
Negations can be applied to insurance payments and adjustments, they cannot be be applied to patient payments or already negated payment items.
After negation, the original entry remains in the table for auditing purposes. However, it cannot be negated again.
In the preview row, you can click directly on the Value columns or the Note column to edit amounts or text before posting.
Write Off (Procedure Only Action)
⚠️ Currently, Write Offs can only be applied to procedure-level Payment Items.
A Write Off removes a balance that should no longer be pursued or collected. This is often used when a payer indicates that a charge is not collectible, or when your organization decides to absorb the cost.
A Write Off is a net-zero operation: it reclassifies an amount by moving it out of the Denied column and into the Other Adjustments column. This reduces the outstanding balance on the encounter by the written-off amount.
How it works:
Locate the denied balance you want to write off in the Payment Items Table.
Open the Actions menu (three-dot menu in the right-most column) and select Write Off.
Enter a reason for the write off and specify the amount to write off for each denied CARC. Then click Write Off.
A yellow preview row will appear showing the write off and its impact on balances.
Review the preview. Crossed-out values with updated values beside them will show exactly how the write off affects encounter-level and (if applicable) procedure-level amounts. Click the undo button (in the right-most column) to remove this preview write off.
To permanently apply the write off to the ledger, click Post.
Notes:
Write offs can only be applied to remittances with denied amounts.
Like negations, the original amounts remain visible in the ledger for auditing, with the write off applied as a separate line item.
In the preview row, you can click directly on the Value columns or the Note column to edit amounts or text before posting.
Write Off PR (Procedure Only Action)
⚠️ Currently, Write Offs can only be applied to procedure-level Payment Items.
A Patient Responsibility Write Off removes a balance that was assigned to the patient but should no longer be collected. This is typically used when your organization decides not to bill the patient for a portion of their responsibility (copay, deductible, or coinsurance).
Like payer write offs, this is a net-zero operation: the amount is moved out of the corresponding Patient Responsibility column and into the Other Adjustments column. This reduces the outstanding patient balance on the encounter by the written-off amount.
How it works:
Locate the remittance with a patient responsibility balance (copay, deductible, or coinsurance) you want to write off in the Payment Items Table.
Open the Actions menu (three-dot menu in the right-most column) and select Write Off PR.
Enter a reason for the write off and specify the amount to write off for each PR CARC. Then click Write Off PR.
A yellow preview row will appear showing the write off and its impact on balances.
Review the preview. Crossed-out values with updated values beside them will show how the write off affects encounter-level and (if applicable) procedure-level amounts. Click the undo button (in the right-most column) to remove this preview.
To permanently apply the write off to the ledger, click Post.
Notes:
Write Off PR can only be applied to patient responsibility balances like coinsurance, deductible, or copay (not to payments).
The original amounts remain visible in the ledger for auditing, with the write off recorded as a separate line item.
In the preview row, you can click directly on the Value columns or the Note column to edit amounts or text before posting.
Push To PR (Procedure Only Action)
⚠️ Currently, Write Offs can only be applied to procedure-level Payment Items.
A Push to PR reclassifies a denied balance so that it is collected from the patient instead of the payer. This is typically used when a payer denies and marks a service as the patient’s responsibility.
Like write offs, this is a net-zero operation: the amount is moved out of the denied column and into the Other Pr column. This reduces the payer balance and increases the patient balance on the encounter by the same amount.
How it works:
Locate the denied balance you want to push to patient responsibility in the Payment Items Table.
Open the Actions menu (three-dot menu in the right-most column) and select Push to PR.
Enter a reason for the push and specify the amount to reclassify for each Denied CARC. Then click Push to PR.
A green preview row will appear showing the reclassified balance and its impact on payer and patient balances.
Review the preview. Crossed-out values with updated values beside them will show exactly how the push affects encounter-level and (if applicable) procedure-level amounts. Click the undo button (in the right-most column) to remove this preview.
To permanently apply the push to the ledger, click Post.
Notes:
Push to PR can only be applied to remittances with denied amounts.
The original amounts remain visible in the ledger for auditing, with the reclassification recorded as a separate line item.
In the preview row, you can click directly on the Value columns or the Note column to edit amounts or text before posting.
Custom Adjustments (aka. Manual Adjustments)
A Custom Adjustment allows you to create a tailored adjustment that isn’t captured by standard posting actions like write-offs, negations, or push-to-PR. Use this when you need to manually adjust amounts for a procedure or encounter to accurately reflect your financial records.
Custom adjustments are flexible: you can specify amounts for any column, including charges, payments, denied amounts, patient responsibility, or other adjustments.
How it works:
In the Payment Items Table, click the + Add button located beside the sort button.
Select the claim that should be associated with the new custom adjustment and click Confirm. A purple preview row with empty values will appear in the ledger.
Click on the cells in the preview row to edit and manually specify amounts in any column to reflect the desired correction. Press “Enter” or click outside of the cell to save the changes. You can adjust charges, payments, denied amounts, PR, other adjustments, etc.
Review the preview. Crossed-out values with updated values beside them will show how the custom adjustment affects encounter-level and (if applicable) procedure-level balances. Click the undo button in the right-most column to remove the custom adjustment if needed.
Once the amounts are correct, click Confirm Posting to permanently apply the custom adjustment to the ledger.
Notes:
Only make a custom adjustment if no standard adjustments meet your needs. Use at your own risk.
Charges and Billed columns can only be edited by super users. Attempting to edit these columns will display a warning, as these fields generally should not be modified.
Custom adjustments let you specify adjustments to any financial field in the Payment Items Table.
After posting, the adjustment is recorded as a separate line item for auditing purposes.