Search all docs
Provider Workflows
Chart Notes
Auto-apply KX Modifier
Getting Started with Chart Notes
AI Appt. Summaries
Chart Note Clinical Types
Download Chart Notes as PDFs
Goals on the chart note
How to add Measurements
Import Previous Medical History
Navigating Flowsheets
Navigating Inbox Workflows
Navigating the Chart Note
Set up Custom Chart Note Templates
Setting up Co-signers on Your Note
Sign a Chart Note
Text Snippets For Your Note
Chart Note Features Not Supported
Chart Notes
Claim Details
Claim Details
Front Office Workflows
Appointments
The Insights Appointments Page
Adding Prior Auth and Alerting
Alternate Methods for Scheduling
How to Add a Walk-In Patient
How to Run an Eligibility Check
How to Schedule an Appointment
How to Take Payments
Sending out reminders and forms
Understanding Appointment Details
Updating Appointment Statuses
Appt. Features not supported
Appointments
Daily Operations
Daily Operations
Patient Communications
General Patient Flows Features
Text Blast Page
Insurance Intake Page
Functional Outcome Measurements
Getting Started with Patient Portal
Complete Intake Forms
Navigating Patient Workflows
Manage Patient Appointments
Manage Payments through Patient Portal
Patient Intake Automation
Update Insurance Info
View Home Exercise Programs
Patient Communications
Patient Responsibility
Charge Saved Credit Cards
Manage Credit Cards
Setting up a Payment Plan
How to Cancel PR
How to Send a Patient Payment Link
How to Push to PR
How to Record Payments
How to Refund a Payment
How to Request via Text or Email
How to Set Up Miscellaneous Line Item Charges
How to Take Payment for Families
How to Undo a Write Off
How to Write Off PR
Patient Responsibility Page
PR Overpayment Refunds and Estimated vs. Remittance PR
PR Settings
PR Timeline
Patient Responsibility
Billing Workflows
Front Office Payments
Front Office Payments
Reports
A/R Reports
Building and Running Reports
Claim Adjustments Report
Collections Report
Custom Collections Report
Detailed Charges Report
Export Claim Details
Generate a Transaction Report
Patient Balances Report
Patient Charges Report
Patient Claims One-pagers
Patient Collections Report
Patient Eligibility Report
Posting Log Report
Site Transaction Report
Site Transaction Report Summary
Submitted Claims Report
Upcoming Patient Statements Report
Reports
Owners & Administration
Last updated:
Aug 8, 2025
Navigating Patient Workflows
Patient Communication
Front Office Workflows
Overview
The new Patient Flow page was carefully designed to improve visibility while setting up workflow configurations.
Users will be able to preview patients that will be texted every time they make a change to a workflow, preventing accidental edits that cause the config to not message as expected.
This document aims to highlight the key improvements made, and how to better use them. The new page can be found under https://insights.athelas.com/patient-workflows

Usage
Creating a New Automated Intake Workflow
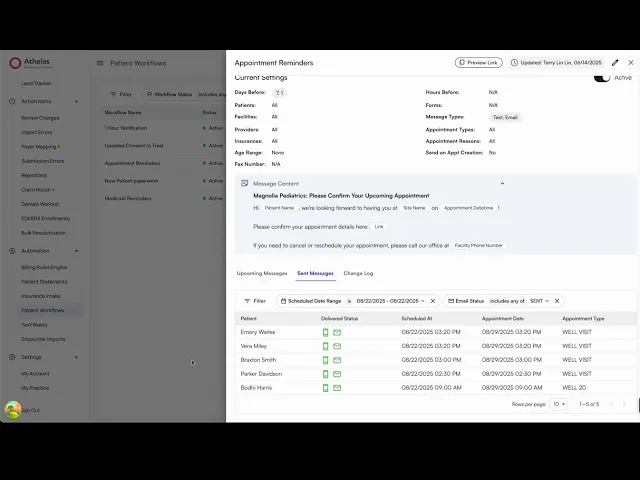
Using the workflows page, you are able to customize exactly which appointments get sent specific intake forms and even configure the message and time when they’re sent out. At the top of the page, you’re able to name your workflow and then configure the specifications which the intake forms and appointment reminders will be sent out.


These specifications include:
Appointment Types: Specify which appointment types are sent this workflow
Appointment Reasons: Specify the appointment reasons that apply to this workflow
Patients: Specify which patients will receive this workflow
This feature is useful when testing out workflows, as you can create a test patient and set it to only be sent to that individual
Facilities: Specify which facilities will receive this workflow
Providers: Specify which providers the patient must be scheduled with to receive this workflow
Appointment Insurances: Specify which insurances a patient must tie to an appointment to receive this workflow
Minimum Age: Specifies a minimum age a patient must be in order to receive this workflow
Maximum Age: Specifies a maximum age a patient cannot surpass in order to receive this workflow
The option to send out intake forms immediately upon the creation of an appointment matching the workflow’s specifications is also available. Simply check the box next to Send Immediately on Appointment Creation. Additionally, there are two methods that the workflow can be sent by: email and/or text.

Regardless of the method of delivery, you the message contents will show up the same for both. This message can be configured to your liking. Scroll over the “i” icon next to message templates for additional coding that will populate unique information based off the specifications indicated within the workflow. For instance, inputting {patient_name} will show the patient’s name in the text/email sent out.

If you’re ever unsure that your message is populating correctly for the patient, there is a message preview available. This is found at the bottom of Message Template. You are also encouraged to send this workflow to a test patient beforehand just to ensure that no errors are made.

Appointment reminders can also be configured to be sent 3 separate times to a patient (not including immediately upon appointment creation). Here, you’ll be able to customize the amount of days and hours you’d like to send the reminder before the appointment.
❗Note: Appointment reminders are queued to be sent out at midnight each day. If you create an appointment for a patient that is scheduled for tomorrow- they will not receive a reminder if the message is only scheduled to be sent 1 day before. However, they will be able to receive the reminder if its set to an hour before.

Lastly, at the very bottom you will be able to select the intake forms you’d like to send to the patient. You are able to select as many or as little forms as you’d like by clicking on the checkbox to the left of the intake form. To bulk select all templates, select the checkbox at the very top next to Template Name.

Editing an existing workflow

Now, when editing an existing workflow, before any changes are saved, a preview modal will pop up showing all patients that will receive communication if that edit is confirmed.
This brings a whole new level of visibility into the impact of workflows when users are creating/editing them

We also show Appointment Typeand Facility, since these are the most common fields users use to specify their configs
Visualizing impact of workflow
Main table
On the main table, users are able to see per workflow how many messages are going still going out in that day and how many were already sent. That allows them to check at a glance if something is wrong with their configs.

You can also click on the bubbles and they will show you an exact breakdown! Here is a little Demo!
Per workflow
When clicking a workflow, users will see:
The full configuration
A preview of the message content that is going out
Upcoming and Sent message

On the Sent Messages table, there are key informations useful for debugging a workflow config:
Patient name
Delivery Status
Date and time the text/email was scheduled to go out
Date and Time the text was delivered
Appointment type
Appointment date

If a text/email failed to reach the patient, that will also be displayed

Change Log
The change log tab in the workflow drawer allows users to check exactly what was change in every edit, along with who did it

Features Supported:
Send welcome messages
Set up workflows to be texted/emailed to patients with pre-visit forms
Send a one-off pre-visit communication with customized forms
Create custom forms to be filled before an appointment
Visualize documents filled by patients
Confirm and cancel appointments
Table of Contents
Search all docs
Provider Workflows
Chart Notes
Auto-apply KX Modifier
Getting Started with Chart Notes
AI Appt. Summaries
Chart Note Clinical Types
Download Chart Notes as PDFs
Goals on the chart note
How to add Measurements
Import Previous Medical History
Navigating Flowsheets
Navigating Inbox Workflows
Navigating the Chart Note
Set up Custom Chart Note Templates
Setting up Co-signers on Your Note
Sign a Chart Note
Text Snippets For Your Note
Chart Note Features Not Supported
Chart Notes
Claim Details
Claim Details
Front Office Workflows
Appointments
The Insights Appointments Page
Adding Prior Auth and Alerting
Alternate Methods for Scheduling
How to Add a Walk-In Patient
How to Run an Eligibility Check
How to Schedule an Appointment
How to Take Payments
Sending out reminders and forms
Understanding Appointment Details
Updating Appointment Statuses
Appt. Features not supported
Appointments
Daily Operations
Daily Operations
Patient Communications
General Patient Flows Features
Text Blast Page
Insurance Intake Page
Functional Outcome Measurements
Getting Started with Patient Portal
Complete Intake Forms
Navigating Patient Workflows
Manage Patient Appointments
Manage Payments through Patient Portal
Patient Intake Automation
Update Insurance Info
View Home Exercise Programs
Patient Communications
Patient Responsibility
Charge Saved Credit Cards
Manage Credit Cards
Setting up a Payment Plan
How to Cancel PR
How to Send a Patient Payment Link
How to Push to PR
How to Record Payments
How to Refund a Payment
How to Request via Text or Email
How to Set Up Miscellaneous Line Item Charges
How to Take Payment for Families
How to Undo a Write Off
How to Write Off PR
Patient Responsibility Page
PR Overpayment Refunds and Estimated vs. Remittance PR
PR Settings
PR Timeline
Patient Responsibility
Billing Workflows
Front Office Payments
Front Office Payments
Reports
A/R Reports
Building and Running Reports
Claim Adjustments Report
Collections Report
Custom Collections Report
Detailed Charges Report
Export Claim Details
Generate a Transaction Report
Patient Balances Report
Patient Charges Report
Patient Claims One-pagers
Patient Collections Report
Patient Eligibility Report
Posting Log Report
Site Transaction Report
Site Transaction Report Summary
Submitted Claims Report
Upcoming Patient Statements Report
Reports
Owners & Administration
Last updated:
Aug 8, 2025
Navigating Patient Workflows
Patient Communication
Front Office Workflows
Overview
The new Patient Flow page was carefully designed to improve visibility while setting up workflow configurations.
Users will be able to preview patients that will be texted every time they make a change to a workflow, preventing accidental edits that cause the config to not message as expected.
This document aims to highlight the key improvements made, and how to better use them. The new page can be found under https://insights.athelas.com/patient-workflows
Usage
Creating a New Automated Intake Workflow
Using the workflows page, you are able to customize exactly which appointments get sent specific intake forms and even configure the message and time when they’re sent out. At the top of the page, you’re able to name your workflow and then configure the specifications which the intake forms and appointment reminders will be sent out.
These specifications include:
Appointment Types: Specify which appointment types are sent this workflow
Appointment Reasons: Specify the appointment reasons that apply to this workflow
Patients: Specify which patients will receive this workflow
This feature is useful when testing out workflows, as you can create a test patient and set it to only be sent to that individual
Facilities: Specify which facilities will receive this workflow
Providers: Specify which providers the patient must be scheduled with to receive this workflow
Appointment Insurances: Specify which insurances a patient must tie to an appointment to receive this workflow
Minimum Age: Specifies a minimum age a patient must be in order to receive this workflow
Maximum Age: Specifies a maximum age a patient cannot surpass in order to receive this workflow
The option to send out intake forms immediately upon the creation of an appointment matching the workflow’s specifications is also available. Simply check the box next to Send Immediately on Appointment Creation. Additionally, there are two methods that the workflow can be sent by: email and/or text.
Regardless of the method of delivery, you the message contents will show up the same for both. This message can be configured to your liking. Scroll over the “i” icon next to message templates for additional coding that will populate unique information based off the specifications indicated within the workflow. For instance, inputting {patient_name} will show the patient’s name in the text/email sent out.
If you’re ever unsure that your message is populating correctly for the patient, there is a message preview available. This is found at the bottom of Message Template. You are also encouraged to send this workflow to a test patient beforehand just to ensure that no errors are made.
Appointment reminders can also be configured to be sent 3 separate times to a patient (not including immediately upon appointment creation). Here, you’ll be able to customize the amount of days and hours you’d like to send the reminder before the appointment.
❗Note: Appointment reminders are queued to be sent out at midnight each day. If you create an appointment for a patient that is scheduled for tomorrow- they will not receive a reminder if the message is only scheduled to be sent 1 day before. However, they will be able to receive the reminder if its set to an hour before.
Lastly, at the very bottom you will be able to select the intake forms you’d like to send to the patient. You are able to select as many or as little forms as you’d like by clicking on the checkbox to the left of the intake form. To bulk select all templates, select the checkbox at the very top next to Template Name.
Editing an existing workflow
Now, when editing an existing workflow, before any changes are saved, a preview modal will pop up showing all patients that will receive communication if that edit is confirmed.
This brings a whole new level of visibility into the impact of workflows when users are creating/editing them
We also show Appointment Typeand Facility, since these are the most common fields users use to specify their configs
Visualizing impact of workflow
Main table
On the main table, users are able to see per workflow how many messages are going still going out in that day and how many were already sent. That allows them to check at a glance if something is wrong with their configs.
You can also click on the bubbles and they will show you an exact breakdown! Here is a little Demo!
Per workflow
When clicking a workflow, users will see:
The full configuration
A preview of the message content that is going out
Upcoming and Sent message
On the Sent Messages table, there are key informations useful for debugging a workflow config:
Patient name
Delivery Status
Date and time the text/email was scheduled to go out
Date and Time the text was delivered
Appointment type
Appointment date
If a text/email failed to reach the patient, that will also be displayed
Change Log
The change log tab in the workflow drawer allows users to check exactly what was change in every edit, along with who did it
Features Supported:
Send welcome messages
Set up workflows to be texted/emailed to patients with pre-visit forms
Send a one-off pre-visit communication with customized forms
Create custom forms to be filled before an appointment
Visualize documents filled by patients
Confirm and cancel appointments