
Overview
The Prior Authorizations Tracker is the dedicated worklist for all authorization activity at your practice. It replaces the fragmented workflow of tracking auths across patient demographics, appointment details, encounter details, and cases with a dedicated worklist that shows every patient who needs, has, or is about to need an auth — and lets you assign, note, filter, and act on them in one place. The tracker supports both Pre-Certifications (payer-based auths with an authorization number) and Referrals (referring-provider-based auths). It tracks utilization by Visits or CPT units, automatically decrements as appointments happen and claims submit, and warns staff before an auth runs out of visits or days.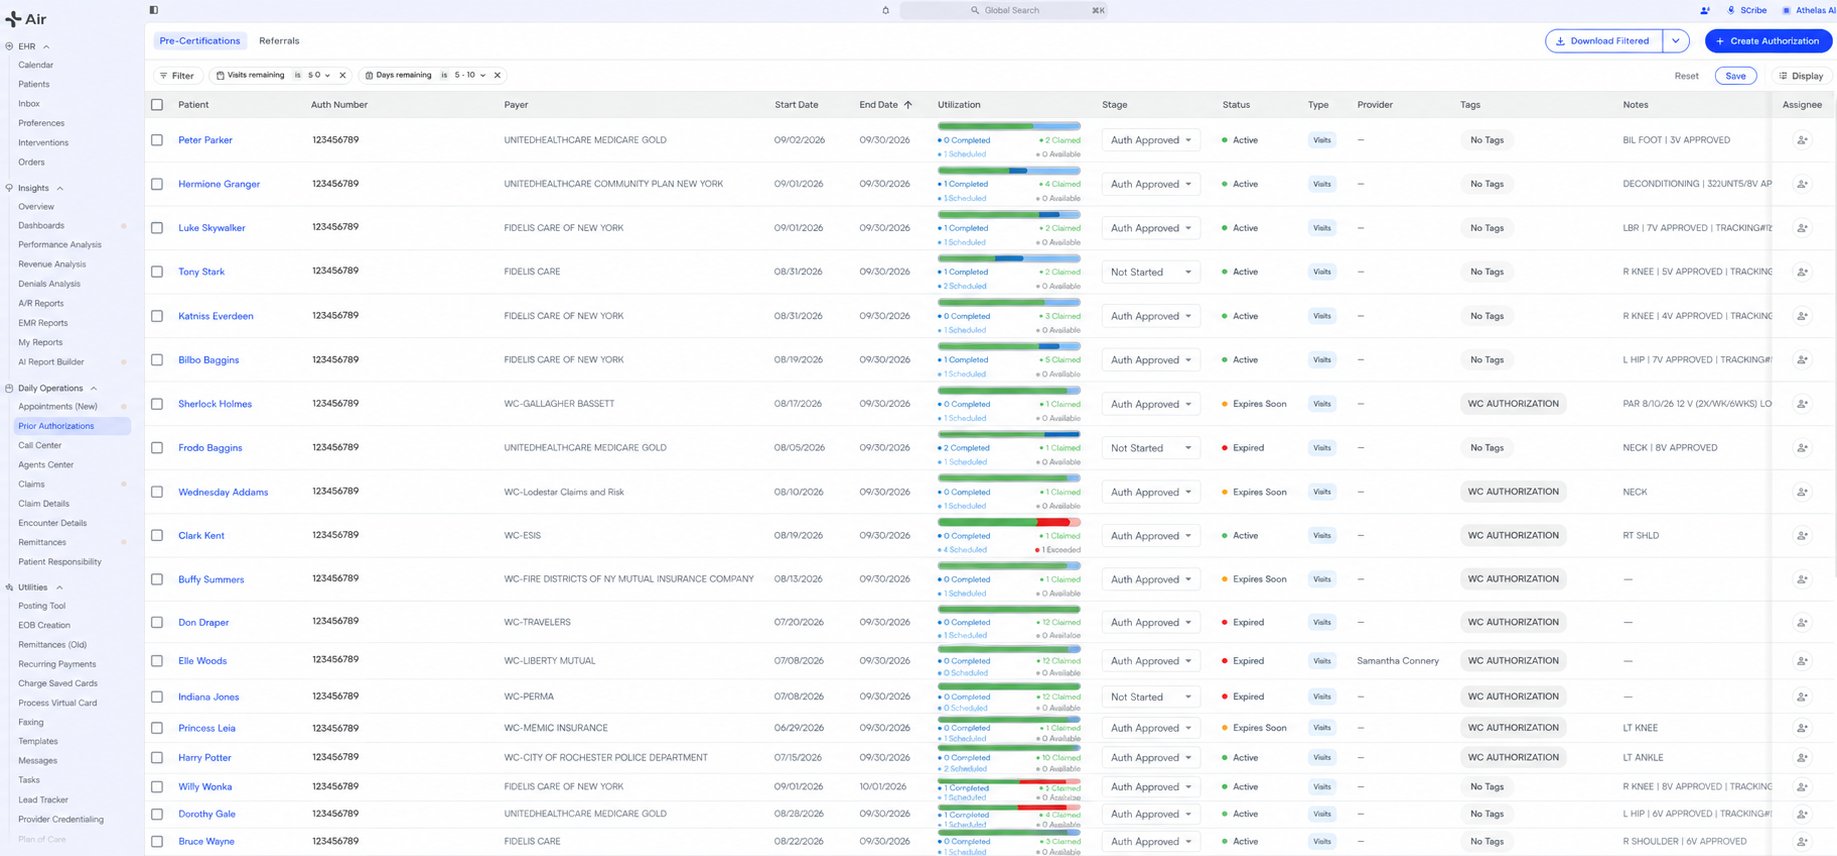
Accessing the Tracker
The Prior Authorizations Tracker lives in the left sidebar under Daily Operations, labeled Prior Authorizations.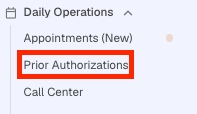
Views: Pre-Certifications vs Referrals
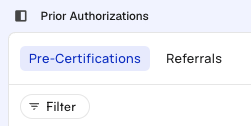
The tracker opens with two built-in views, shown as chips at the top left of the page. Built-in views open with no filters applied:- Pre-Certifications — the payer-side view. Shows a Payer column and requires an Authorization Number when creating a new record.
- Referrals — the referring-provider view. Replaces the Payer column with Referring Provider, and the Authorization Number becomes optional (labeled Auth # (Optional) in the create form).
Tracker Details
Left to right, the prior auth table shows:- Patient — clickable, opens the patient’s chart in a new tab
- Auth Number
- Payer (Pre-Cert view) or Referring Provider (Referrals view)
- Start Date — sortable, default sort
- End Date — sortable
- Utilization — the visits/units/days tracker (see below)
- Stage — inline-editable dropdown of your site’s workflow stages
- Status — read-only, auto-calculated (Active / Expires Soon / Expired / Needs Auth)
- Type — Visits (blue) or CPTs (yellow)
- Facility — facility of the most recent linked appointment or manually-added
- Provider — rendering provider(s) the auth applies to
- Tags — site-defined labels
- Assignee — click to open the assignee picker to assign to an internal staff member
Filters
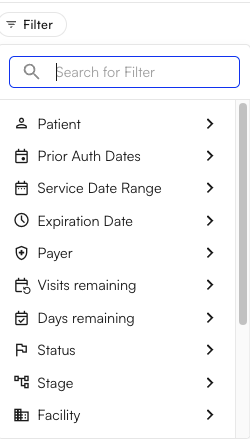
Filters live in the top filter bar. Every filter persists to both the URL (so views are shareable) and local storage (so they survive reload and navigating away and back).- Patients — filter by one or more patients (is any of / is none of)
- Date of Service — appointment date range
- Expiration Date — auth end-date range
- Facilities — visible only for EHR sites
- Tracking Type — Visits or CPTs
- CPT Codes — filters to auths whose procedures include the selected codes (implicitly sets tracking type to CPTs)
- Tags — site-defined prior-auth tags
- Insurance — filter by payer / insurance company
- Show Archived — Active Only (default) or Show All
Stage vs Status — what’s the difference?
The tracker maintains two different fields which indicate properties about the auth record: Stage represents where the record is in it’s journey from creation to completion, and you set it manually. It’s a site-configurable list of labels meant to mirror your actual workflow of procuring and using an authorization — for example Not Started, Auth Requested, Pending Payer Response, Auth Approved, Auth Denied. Stage can be selected directly from the Stage column in the table or from the authorization details drawer. Sites define their own stages within EHR Preferences > Prior Authorization.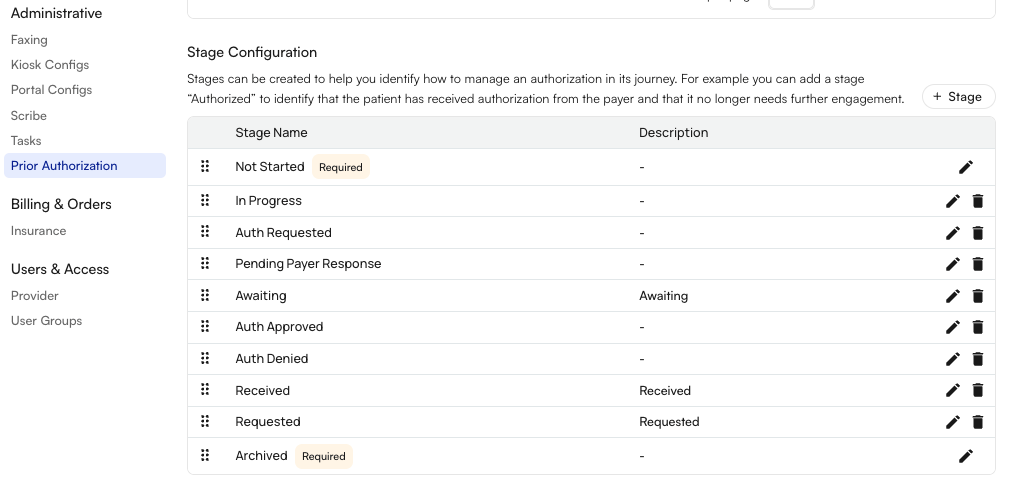
- Active (green) — auth is in effect with visits/units remaining
- Expires Soon (yellow) — within 7 days of expiration or ≤2 visits remaining
- Expired (red) — end date has passed / no visits remaining
- Needs Auth (grey) — case or patient requires an auth but no valid record exists yet
The Details Drawer
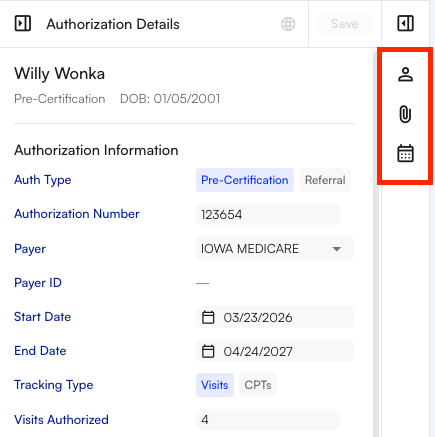
Clicking any row opens the Authorization Details drawer. The header shows the patient name and auth number as a breadcrumb, arrows to page through the filtered list, and icon buttons: close, Open payer portal (globe), and Save (enabled only when you have unsaved edits). If you’ve edited anything, an undo icon appears next to Save to revert. The body scrolls through these sections: Authorization Information. Auth Type toggle, Auth Number, Payer + Payer ID (or Referring Provider), Start Date, End Date, Tracking Type toggle. For Visits: Visits Authorized (editable), Visits Completed, Scheduled Visits, Remaining Visits. For CPTs: rows of CPT code + units. Ends with a free-text Auth Notes field. Authorization Assignment. Stage, Assigned To, Provider, Facility. Visit Utilization. The full progress-bar view of the tracker. If the auth has been overused, this section shows Completed Appointments (exceeded) and Scheduled Appointments (exceeded) lists with a dropdown per appointment to reassign it to another valid authorization. Notes. A running list of dated notes on the auth. The composer placeholder reads Add a note… type @ to tag a teammate; the submit button is Add Note. Toggle Make note universal to make the note visible outside this auth record. Activity Timeline. Chronological log of edits — field changes, state changes, appointment links — with the user and timestamp on each entry. Empty state: No activity yet.Multi-panel Behavior
There are three collapsible panels that open from icons on the right edge. These allow your staff to multi-task and view more patient details while working on a specific auth record:- Patient Demographics — MRN, name, gender, DOB, age, phone, email, address, episodes of care, and insurance providers. Every field is copyable.
- Attachments — patient attachments with search, upload, bulk download, and a link into the full attachments page.
- Appointments — patient appointments with row selection, “open in new tab,” and CSV download of selected rows.
Assignment
Each row shows the current assignee as an avatar in the Assignee column. Clicking it opens a searchable picker of active users (with the current user pinned at the top) plus a No assignee clear option. Changes commit immediately; if the update fails you’ll see Failed to update assignee. For bulk assignment, select rows with the checkboxes, then use the floating bulk-actions panel at the bottom of the page. The picker there shows partial-selection indicators when the selected rows currently have different assignees.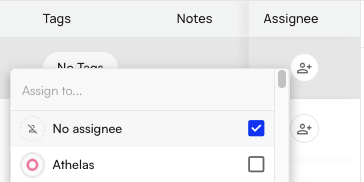
The Utilization Tracker
Every auth renders a utilization tracker — inline in the table’s Utilization column and expanded in the details drawer. Visits and CPT-unit auths show a horizontal progress bar with four stats: Completed (blue), Claimed (green), Scheduled (light blue), and either Available (gray) or Exceeded (red conic-gradient) depending on whether the count exceeds the authorized total. When exceeded, the drawer’s Visit Utilization section grows to include the reassignment lists described above.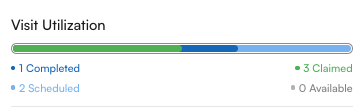
Bulk Actions and CSV Export
Selecting any rows with the checkboxes floats a bulk actions panel at the bottom of the screen showing the count of selected authorizations. Available actions:- Assign — pick an assignee, or No assignee to clear.
- Archive — from the Action menu. Capped at 200 rows per operation; over the cap the button tooltip reads Only 200 authorizations can be archived at once. {n} are selected — narrow your selection to continue. Confirmation dialog: Archive {n} Authorization(s)? — Archiving these {n} authorizations removes them from the working list and clears any future appointment links.
Working with Authorizations
Creating a new authorization
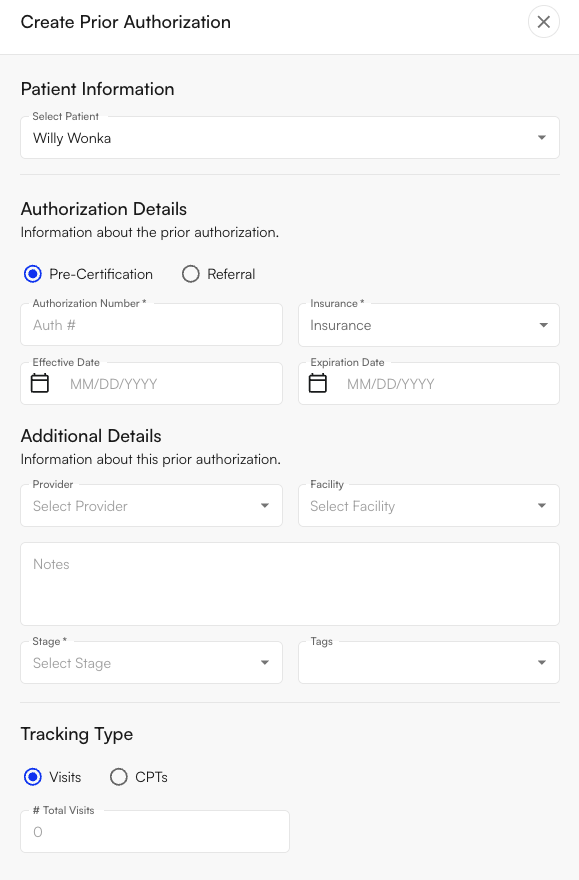
Click + Create Authorization at the top right. The drawer has two sections — Patient Information and Authorization Details — and a Pre-Certification / Referral radio at the top. Fill in:- Auth type (Pre-Cert or Referral)
- Authorization Number — required for Pre-Cert, optional for Referral
- If the auth number already exists for that patient, a duplicate-guard confirmation appears before saving — the system creates a new, distinct auth record rather than appending to the existing one.
- Insurance (Pre-Cert) or Referring Provider (Referral)
- Effective Date and Expiration Date
- Tracking Type — Visits or CPTs
- Tags
- For Visits: the visits authorized; for CPTs: the CPT + unit rows
Automatic auth record creation
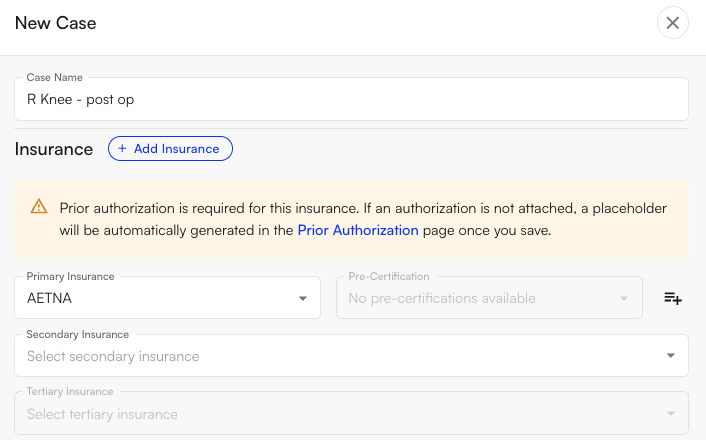
Many rows in the tracker never need to be created by hand — the system auto-creates a Needs Auth shell record whenever a case is saved with an insurance that requires prior auth on that slot.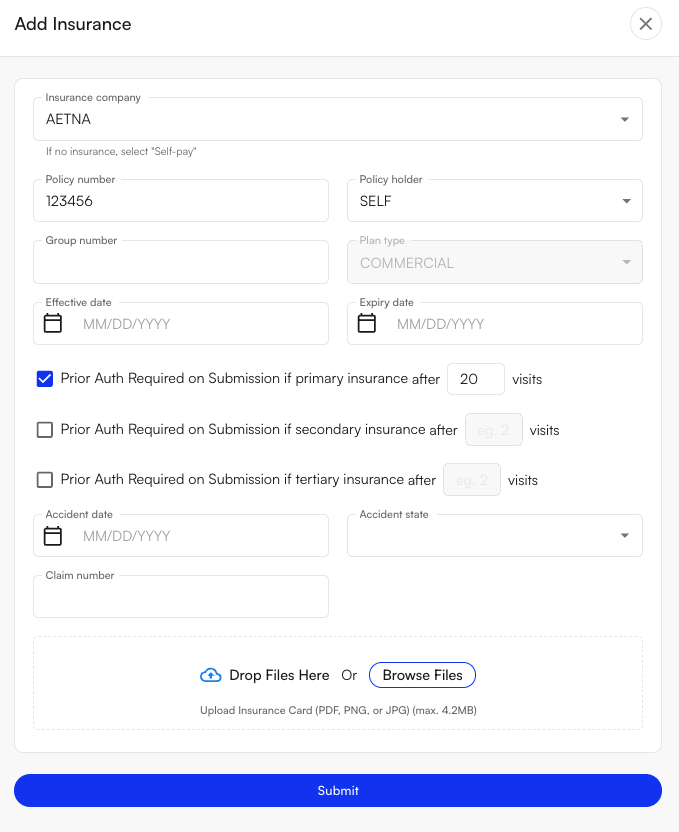
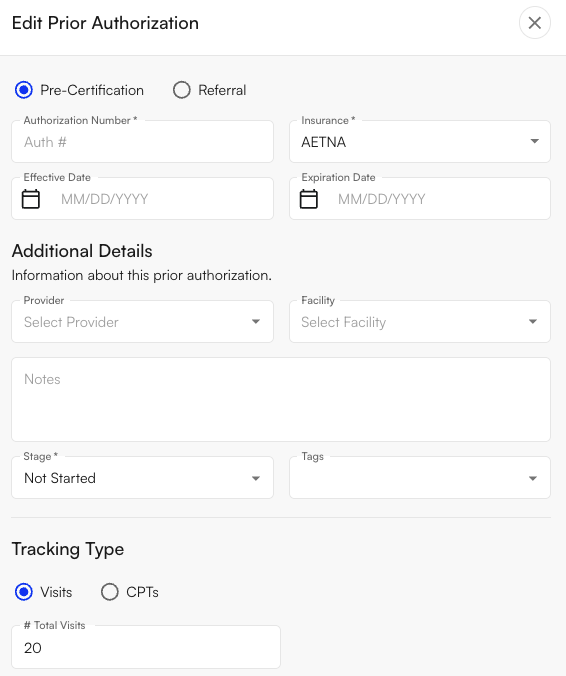
- Status: Needs Auth
- Category: Pre-Certification
- No auth number (you fill it in later)
- Patient, insurance company, and PII pre-populated
- Visits Authorized seeded from the after N visits value on that insurance — patient value first, falling back to the site value. If neither is set, the visit count stays blank until an auth is entered.
- An activity timeline entry is written when the shell is created: “Prior Auth {id} auto-created (needs auth) with {N} authorized visits.”
Calendar and Appointment Integration
On any appointment’s calendar tooltip, a Prior Authorization section appears. If no auth is linked, it shows an Add link that opens the appointment’s prior-auth dialog to attach one. If an auth is linked, it shows the auth number and the visit count — {current} (of {total}). When the linked auth has 0 or 1 visits remaining, the visit block flips to a warning color so the front desk sees the risk before check-in. A broader Missing prior auth alert also surfaces on the appointment tooltip and in check-in warnings when an appointment’s insurance requires an auth but none is attached.Chart-Note Submission Check
When a provider signs a chart note, the system checks each of the appointment’s insurances against your Insurance Preferences (see below). If any insurance requires a prior auth and the appointment doesn’t have one on that insurance tier, a confirmation dialog appears:Submit note with missing insurance requirements?
One or more active insurances for this appointment require information that is currently missing for this appointment:
Prior authorization missing for: {Primary/Secondary/Tertiary Insurance Co}
Would you like to submit this note with the missing insurance requirements?The buttons are Go Back and Submit Without Insurance Requirements. This is a soft warning, not a hard block — the provider can override and submit — but the missed auth is now surfaced at the moment of billing rather than in a denial weeks later.
Configuring Auth Requirements
Auth requirements are configured in two places: at the site level (per payer, applied everywhere that payer appears) and at the patient level (per patient-insurance record, used as an override). Both drive the same downstream behavior — the Needs Auth auto-create and the chart-note submission gate.Site-level rules (EHR Preferences → Insurances)
Each payer has an Insurance Preference row that controls whether that payer requires a prior auth and how many visits are allowed before submission is gated. Open Insurance Preferences, click Add Insurance Preference or edit an existing row to open the Insurance Settings drawer. The drawer surfaces three per-tier checkboxes, each paired with an after[ N ] visits number field:
- Require Prior Authorization to Submit Chart Note if primary insurance
- Require Prior Authorization to Submit Chart Note if secondary insurance
- Require Prior Authorization to Submit Chart Note if tertiary insurance
N = 0 means an auth is required immediately (no visits allowed without one). Setting N = 2 allows the first two submitted visits on a case to go through without an auth; the third is gated. Leaving the number blank means the auth is required as soon as any visit needs to be submitted without one. The placeholder reads eg. 2.
Patient-level overrides (Patient Demographics → Insurance)
Some patients need different rules than the payer default — a special contract, a Workers Comp claim with pre-approved visits, or any case where the payer-wide rule doesn’t fit. Open the patient’s demographics page, click into the insurance row, and use the Edit Insurance drawer. The same three per-tier checkboxes appear on the patient-insurance record, each with its own after[ N ] visits field:
- Prior Auth Required on Submission if primary insurance
- Prior Auth Required on Submission if secondary insurance
- Prior Auth Required on Submission if tertiary insurance
What “after N visits” actually gates
When the provider signs a chart note, the system counts unique submitted appointments on the same case that use this insurance in this slot (excluding the note being submitted). If that count is at or aboveN, submission is blocked.