> ## Documentation Index
> Fetch the complete documentation index at: https://docs.athelas.com/llms.txt
> Use this file to discover all available pages before exploring further.
# Getting Started as a Staff Member
> Learn how to add patients, manage appointments, and use the calendar as a staff member in Insights
Welcome to Insights! This guide covers everything you need to know to get started as a staff member, including adding patients, managing appointments, and navigating the calendar.
## Adding a new patient
Click the button to add a new patient. A side panel opens where you enter general patient demographics information.
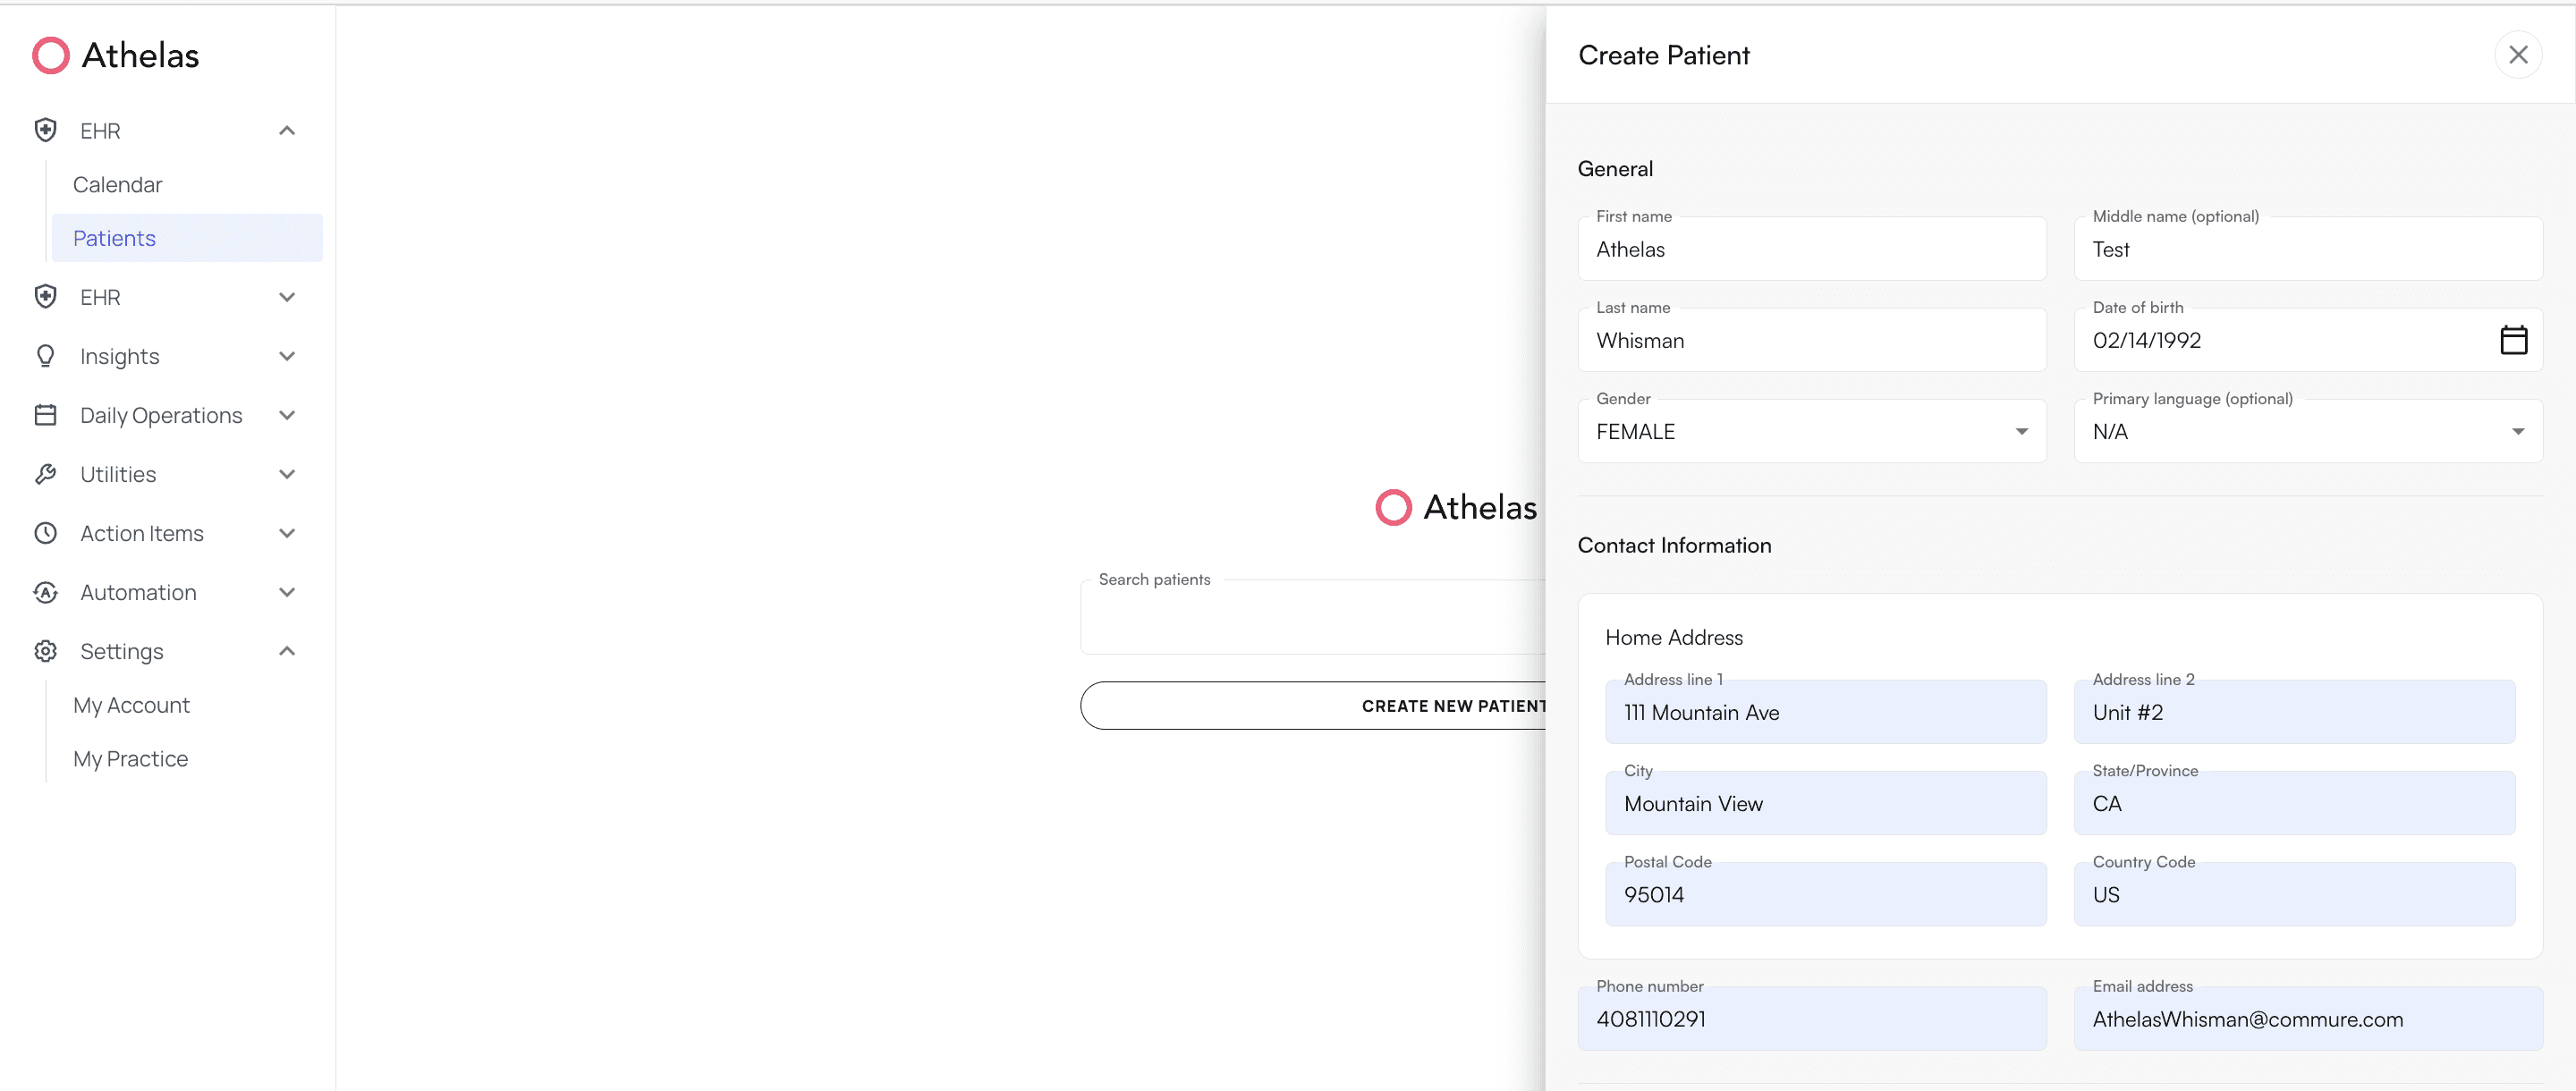 Fill in the following required fields:
* **Full Patient Name**
* First and Last Name
* Middle Name (if applicable)
* **Gender**
* **Date of Birth**
* **Contact Information**
* Home Address (Address Line(s), City, State, Post Code, and Country Code)
* Mailing Address (if different from Home Address)
* Phone Number
* Email Address
You can add insurance information, set up self-pay, or mark insurance as missing.
Fill in the following required fields:
* **Full Patient Name**
* First and Last Name
* Middle Name (if applicable)
* **Gender**
* **Date of Birth**
* **Contact Information**
* Home Address (Address Line(s), City, State, Post Code, and Country Code)
* Mailing Address (if different from Home Address)
* Phone Number
* Email Address
You can add insurance information, set up self-pay, or mark insurance as missing.
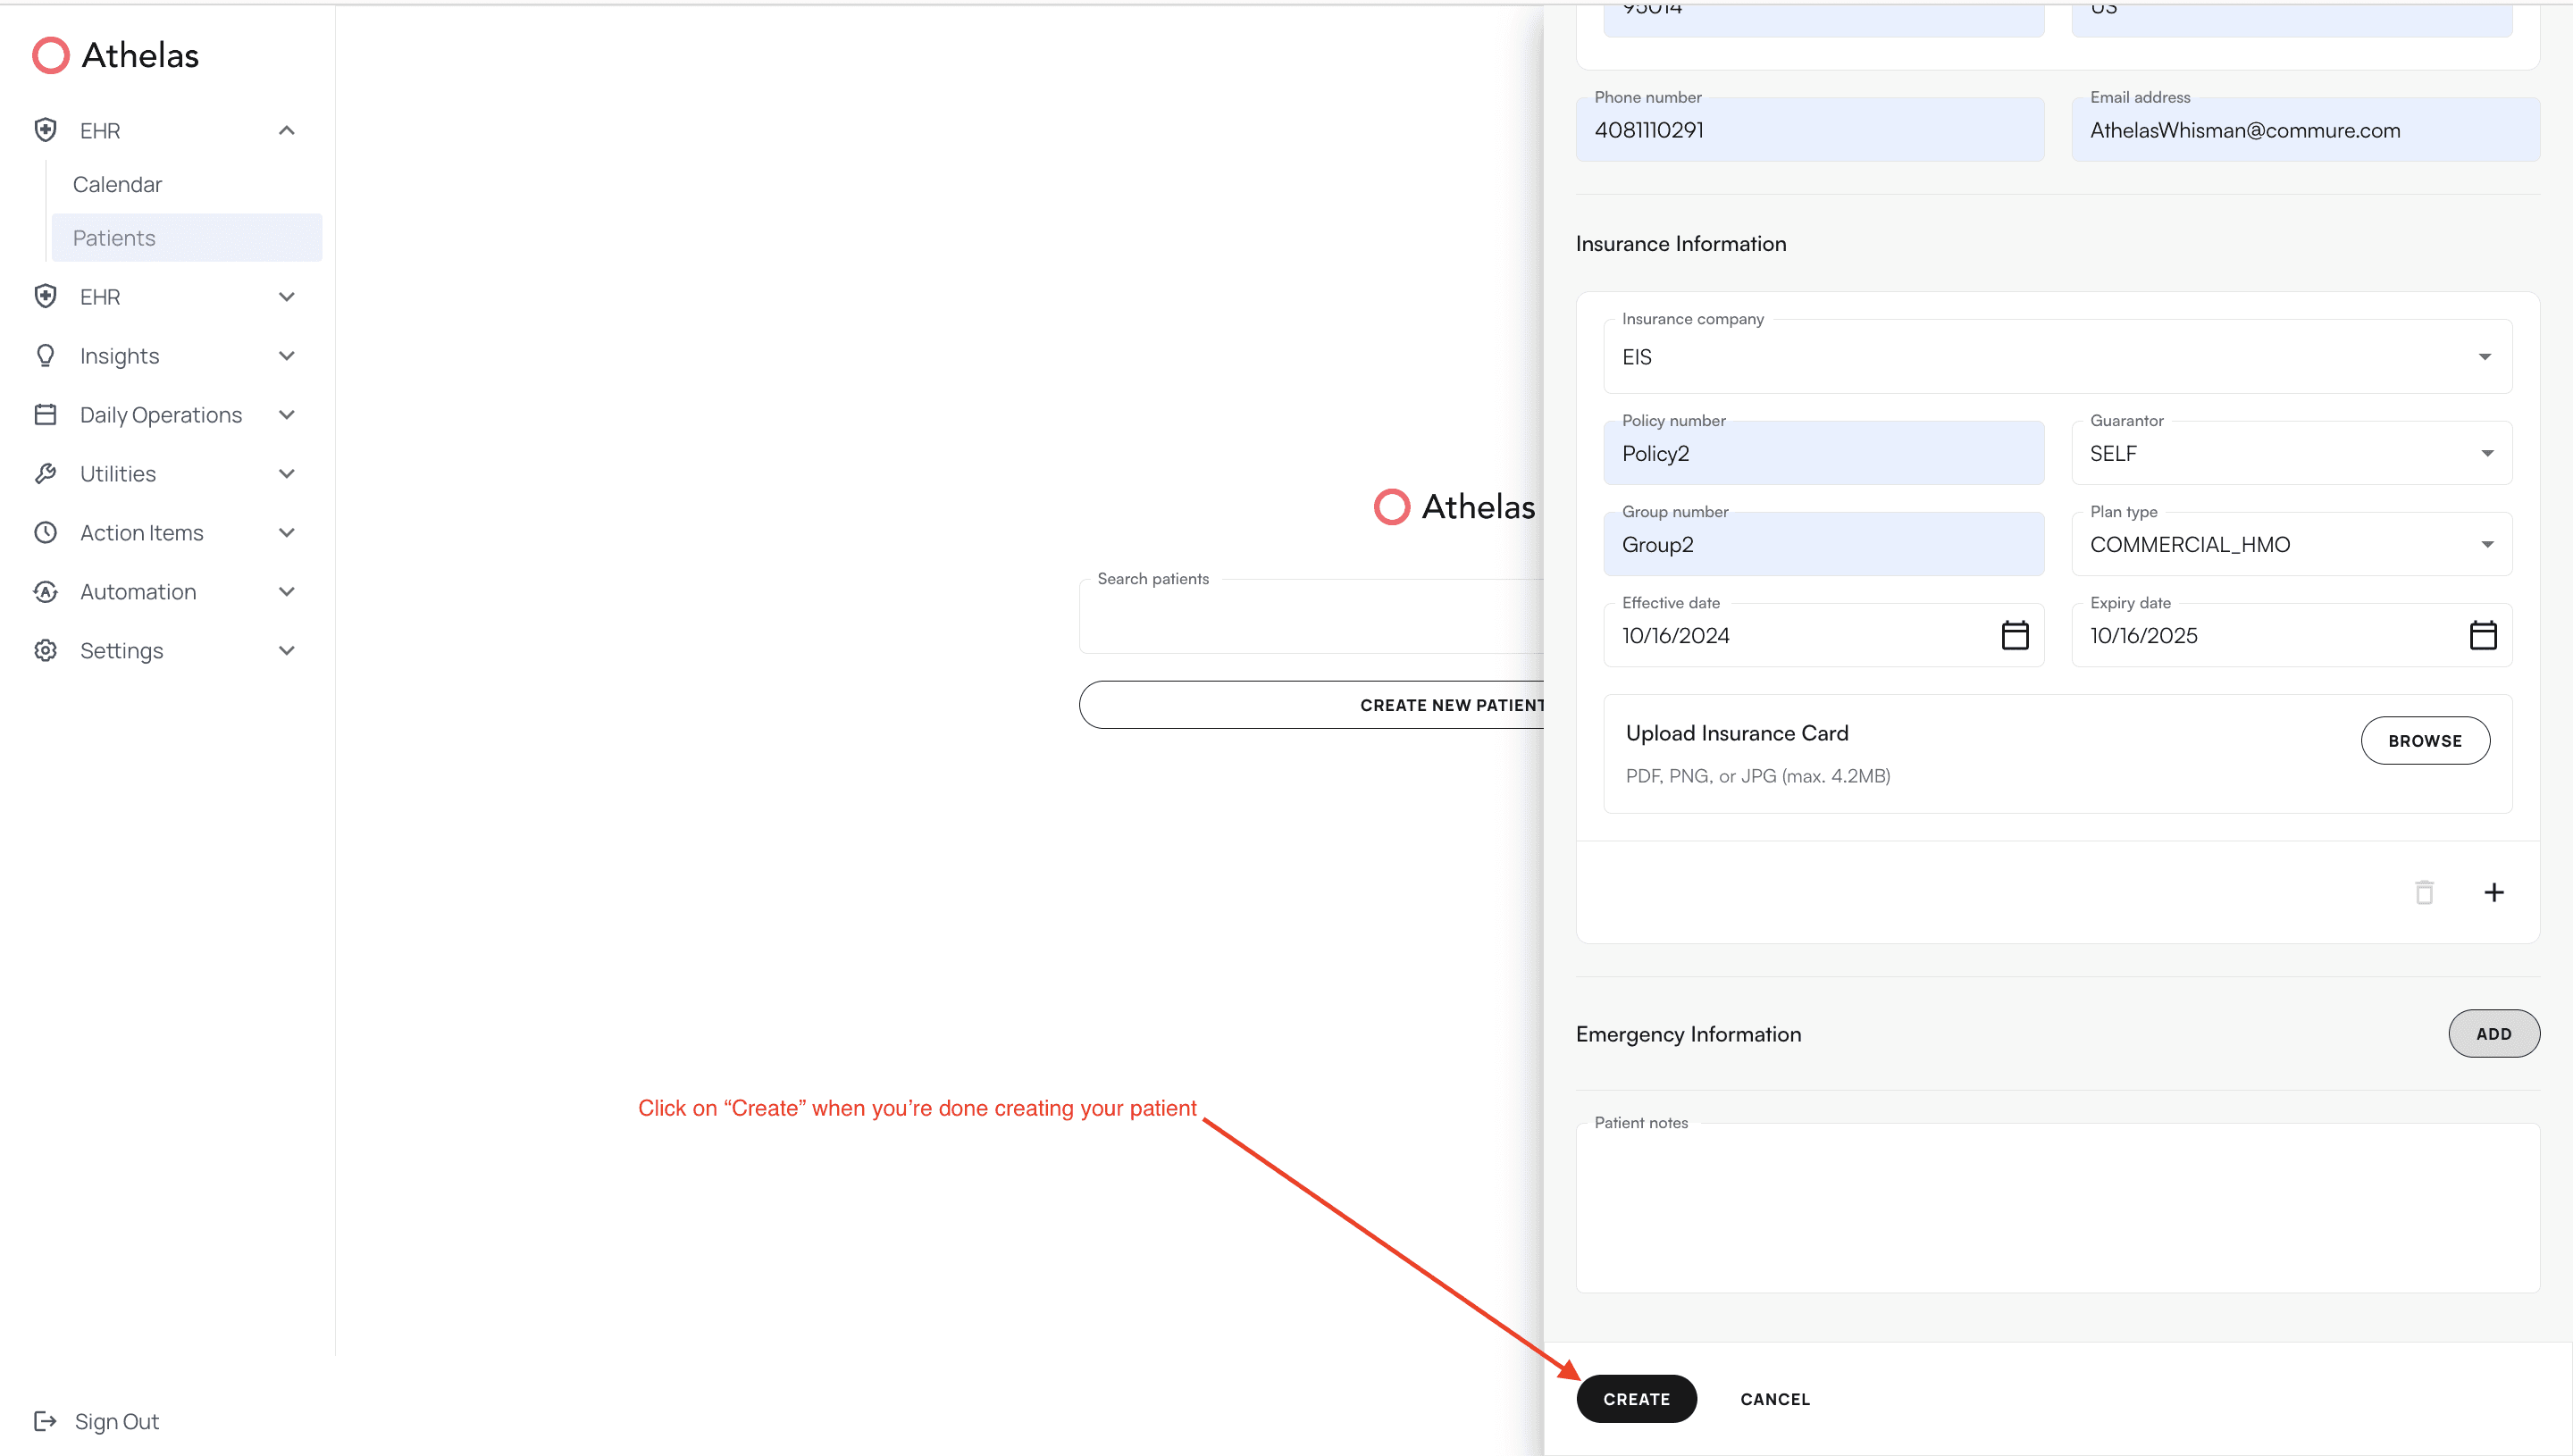
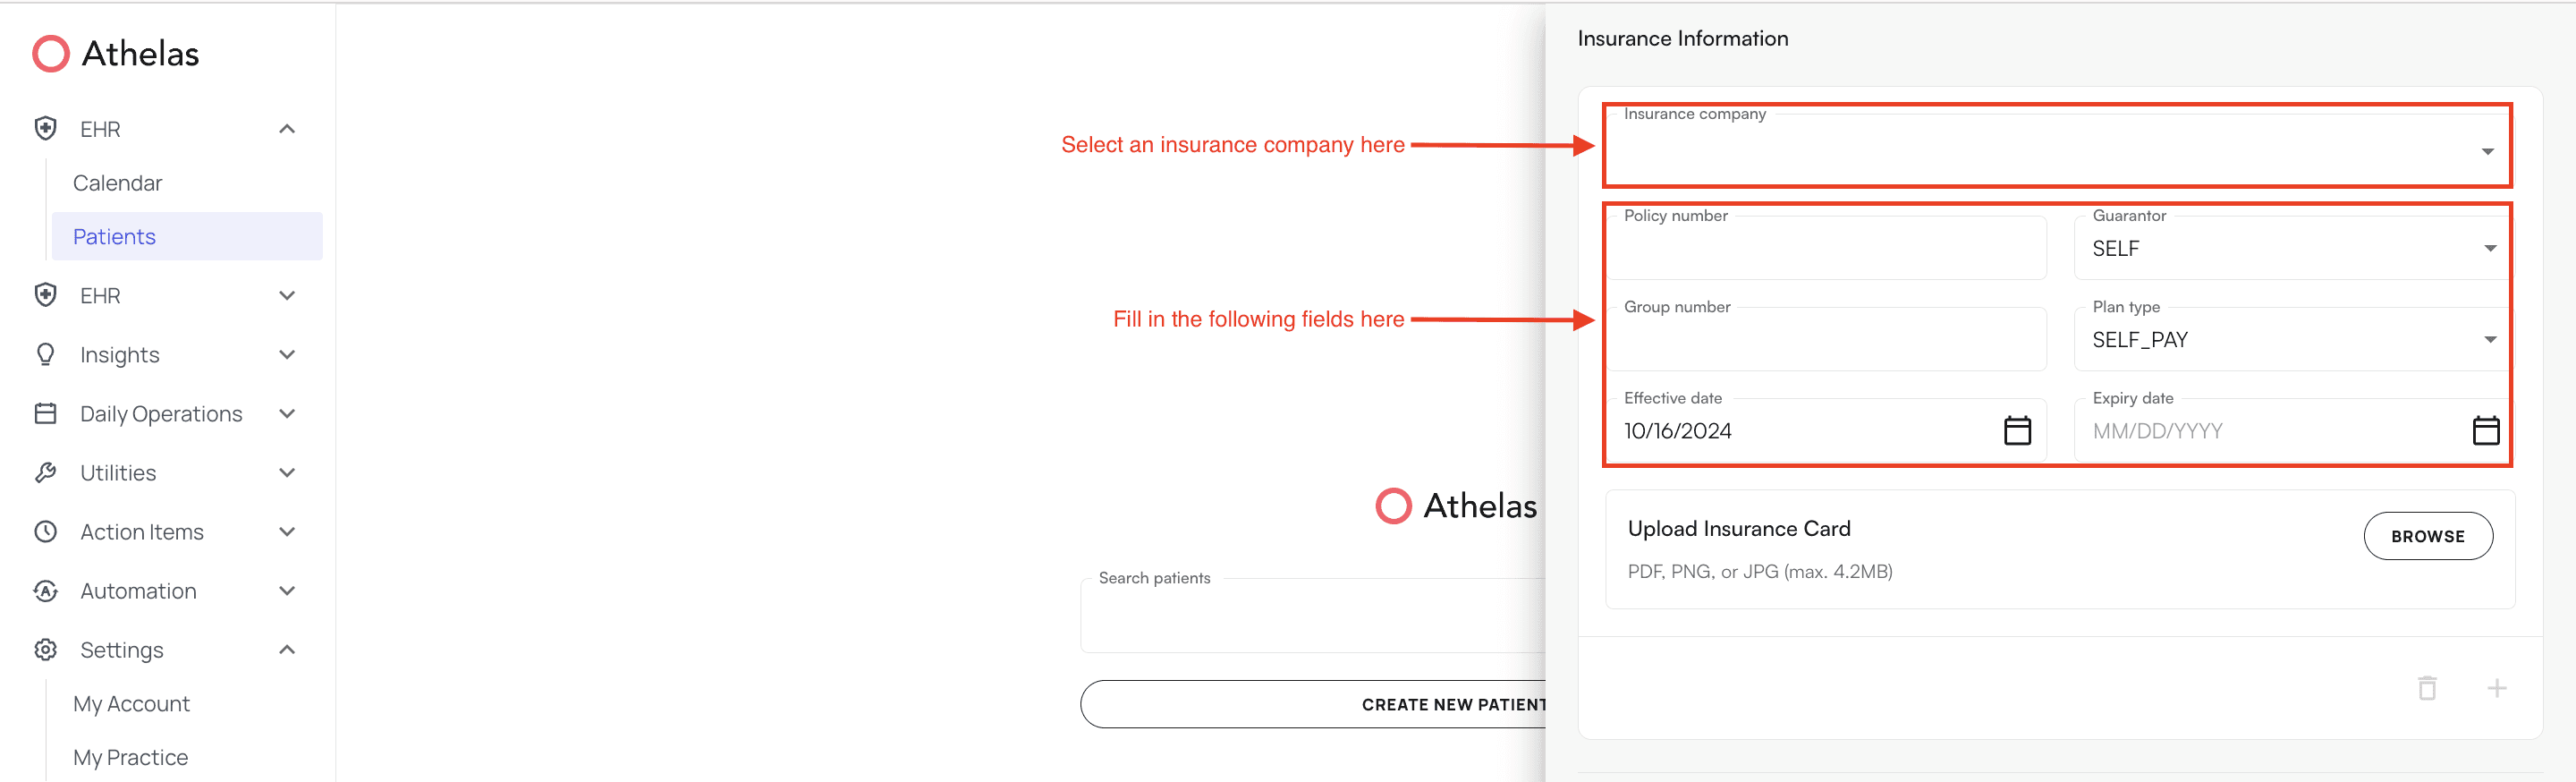 **To add insurance:**
1. Select an insurance company from the dropdown menu
2. Enter the following information:
* Policy Number
* Group Number
* Effective and expiration dates
* Guarantor (relationship to policy holder)
**If the relationship to policy holder is SELF:** Leave the guarantor field as is.
**If the relationship to policy holder is not SELF:** Click the guarantor box and enter the policy holder's information:
* First Name
* Last Name
* Email Address
* Phone Number
* Date of Birth
* Gender
* Home Address (Address Line(s), City, State, Postal Code, and Country Code)
**To add insurance:**
1. Select an insurance company from the dropdown menu
2. Enter the following information:
* Policy Number
* Group Number
* Effective and expiration dates
* Guarantor (relationship to policy holder)
**If the relationship to policy holder is SELF:** Leave the guarantor field as is.
**If the relationship to policy holder is not SELF:** Click the guarantor box and enter the policy holder's information:
* First Name
* Last Name
* Email Address
* Phone Number
* Date of Birth
* Gender
* Home Address (Address Line(s), City, State, Postal Code, and Country Code)
 Click the "+" button to add additional insurance policies.
When you add a worker's compensation insurance company, the payer type automatically changes to Worker's Compensation. You can also manually override the payer type to Worker's Compensation.
The following additional fields populate when you select a worker's compensation insurance company:
* Accident Date
* Claim Number
Fill out these fields with your patient's information.
Click the "+" button to add additional insurance policies.
When you add a worker's compensation insurance company, the payer type automatically changes to Worker's Compensation. You can also manually override the payer type to Worker's Compensation.
The following additional fields populate when you select a worker's compensation insurance company:
* Accident Date
* Claim Number
Fill out these fields with your patient's information.
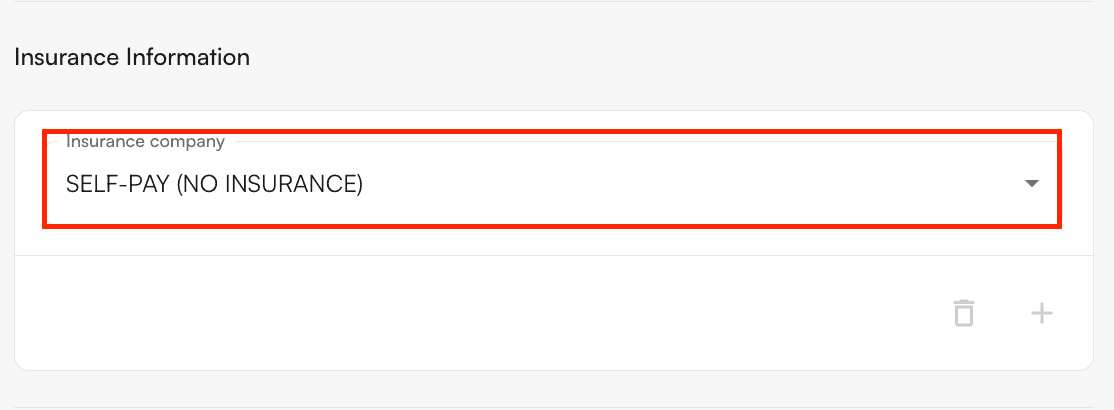
 **To add Self-Pay:** Type "Self Pay" in the Insurance Company field. Upon selection, the insurance details disappear and only "Self-Pay (No Insurance)" remains.
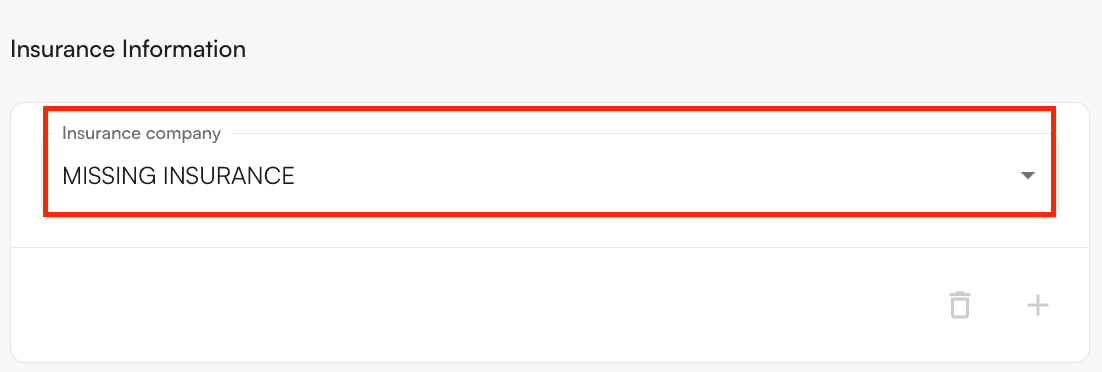
 **To mark insurance as missing:** Type "Missing Insurance" in the Insurance Company field. Upon selection, the insurance details disappear and only "Missing Insurance" remains.
 After entering all required and desired fields, click "Create" at the bottom of the panel.
 ## Adding cases, prior authorizations, and referring providers
After creating a patient, you can add prior authorizations, set insurance priority, create cases, and add referring providers.
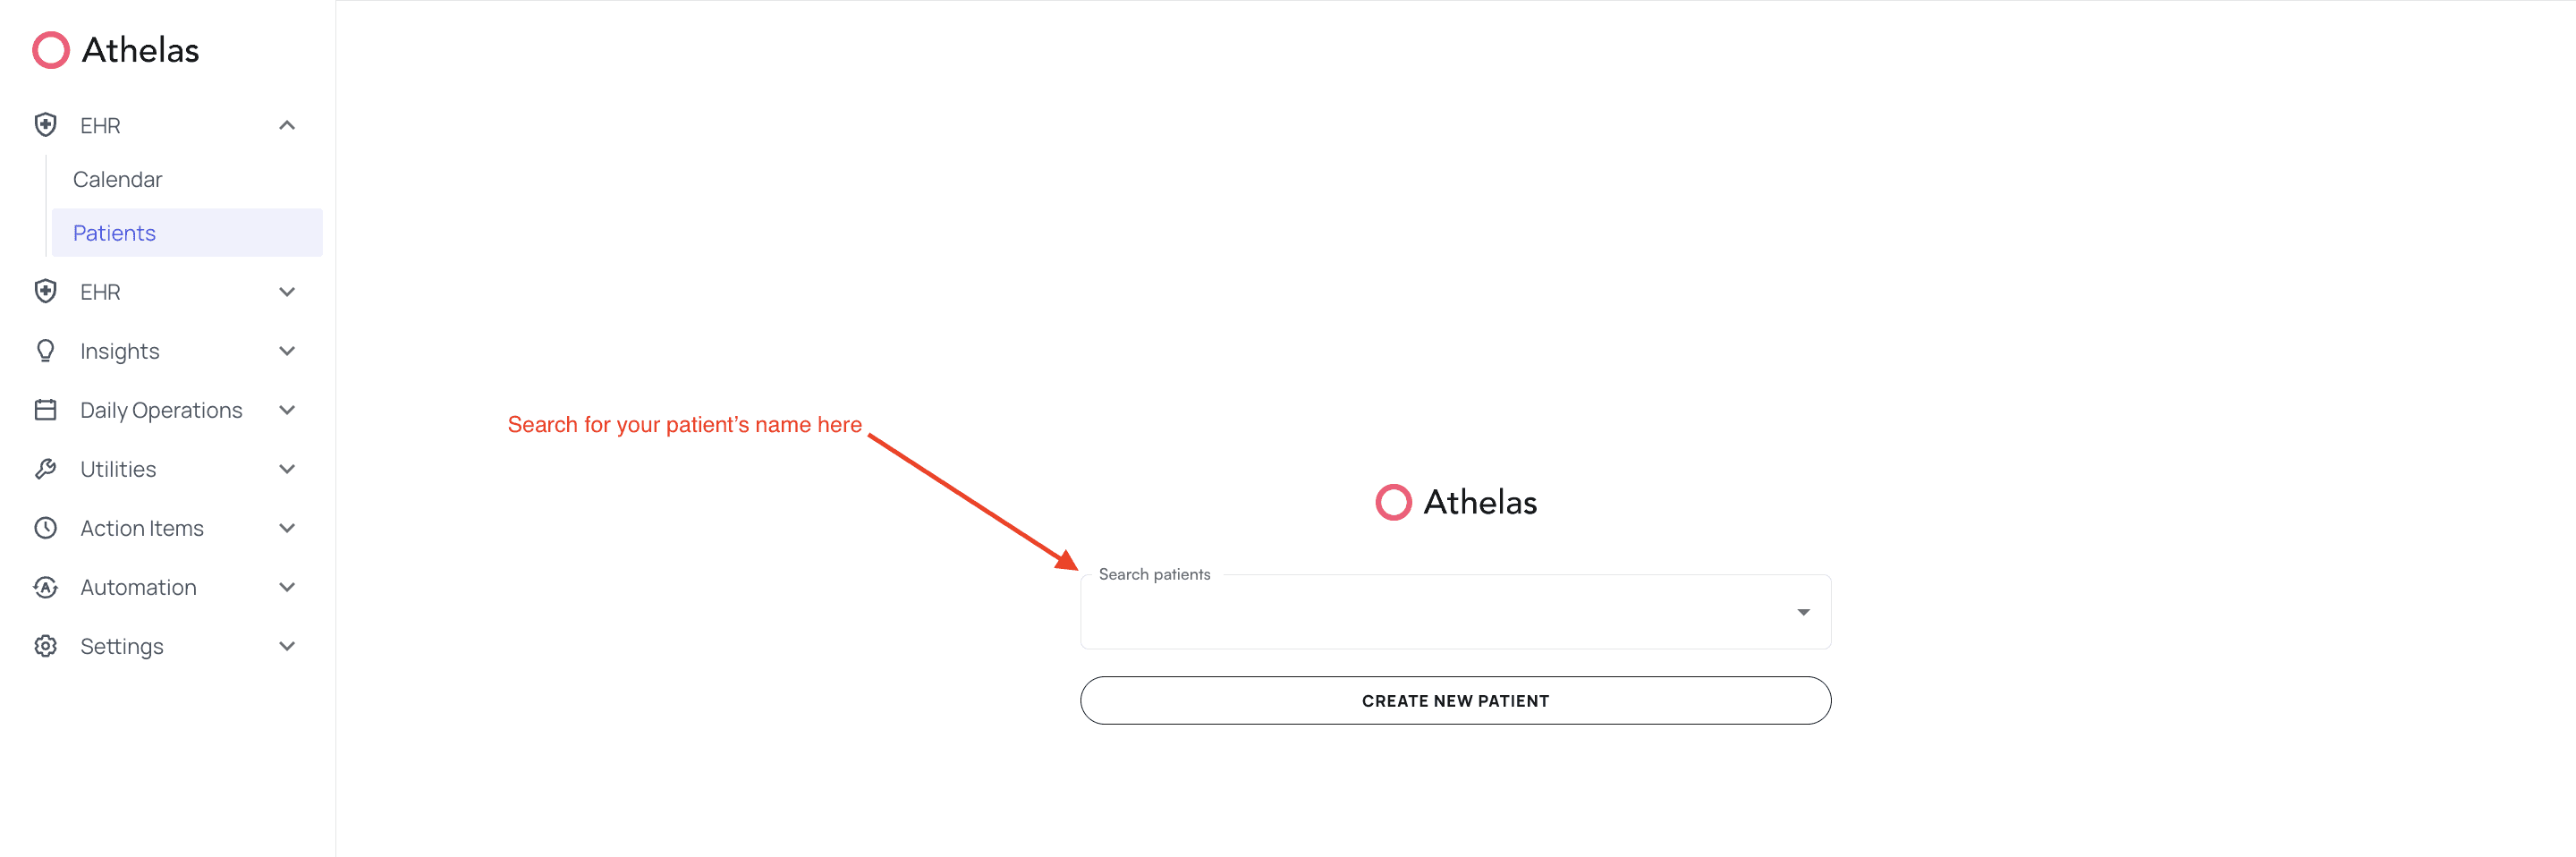
Search for your patient and open their patient demographics page.
## Adding cases, prior authorizations, and referring providers
After creating a patient, you can add prior authorizations, set insurance priority, create cases, and add referring providers.
Search for your patient and open their patient demographics page.
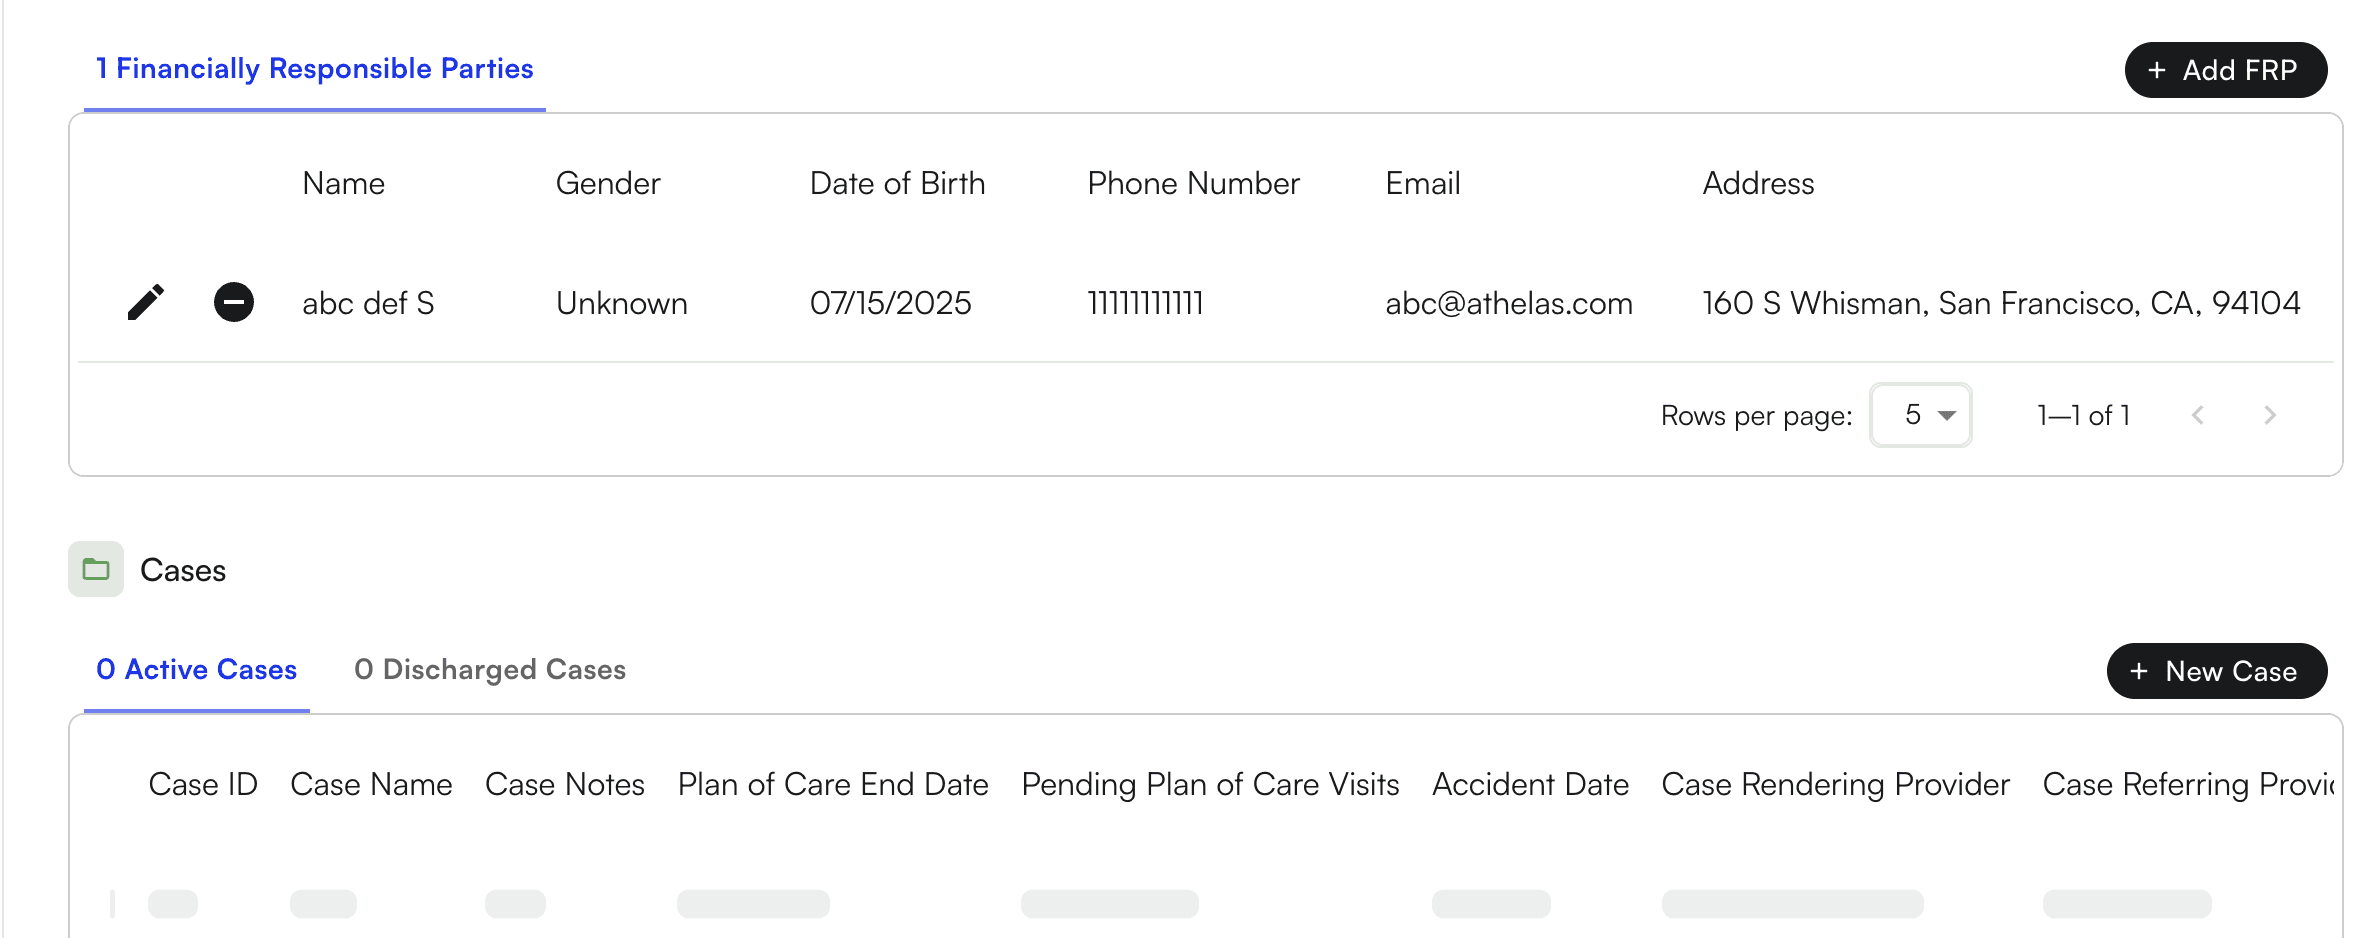
 Click "Create" under the Cases section. You can select insurance priority and enter the following fields:
* Case Name
* Referring Provider
* Case Notes
Click "Create" under the Cases section. You can select insurance priority and enter the following fields:
* Case Name
* Referring Provider
* Case Notes
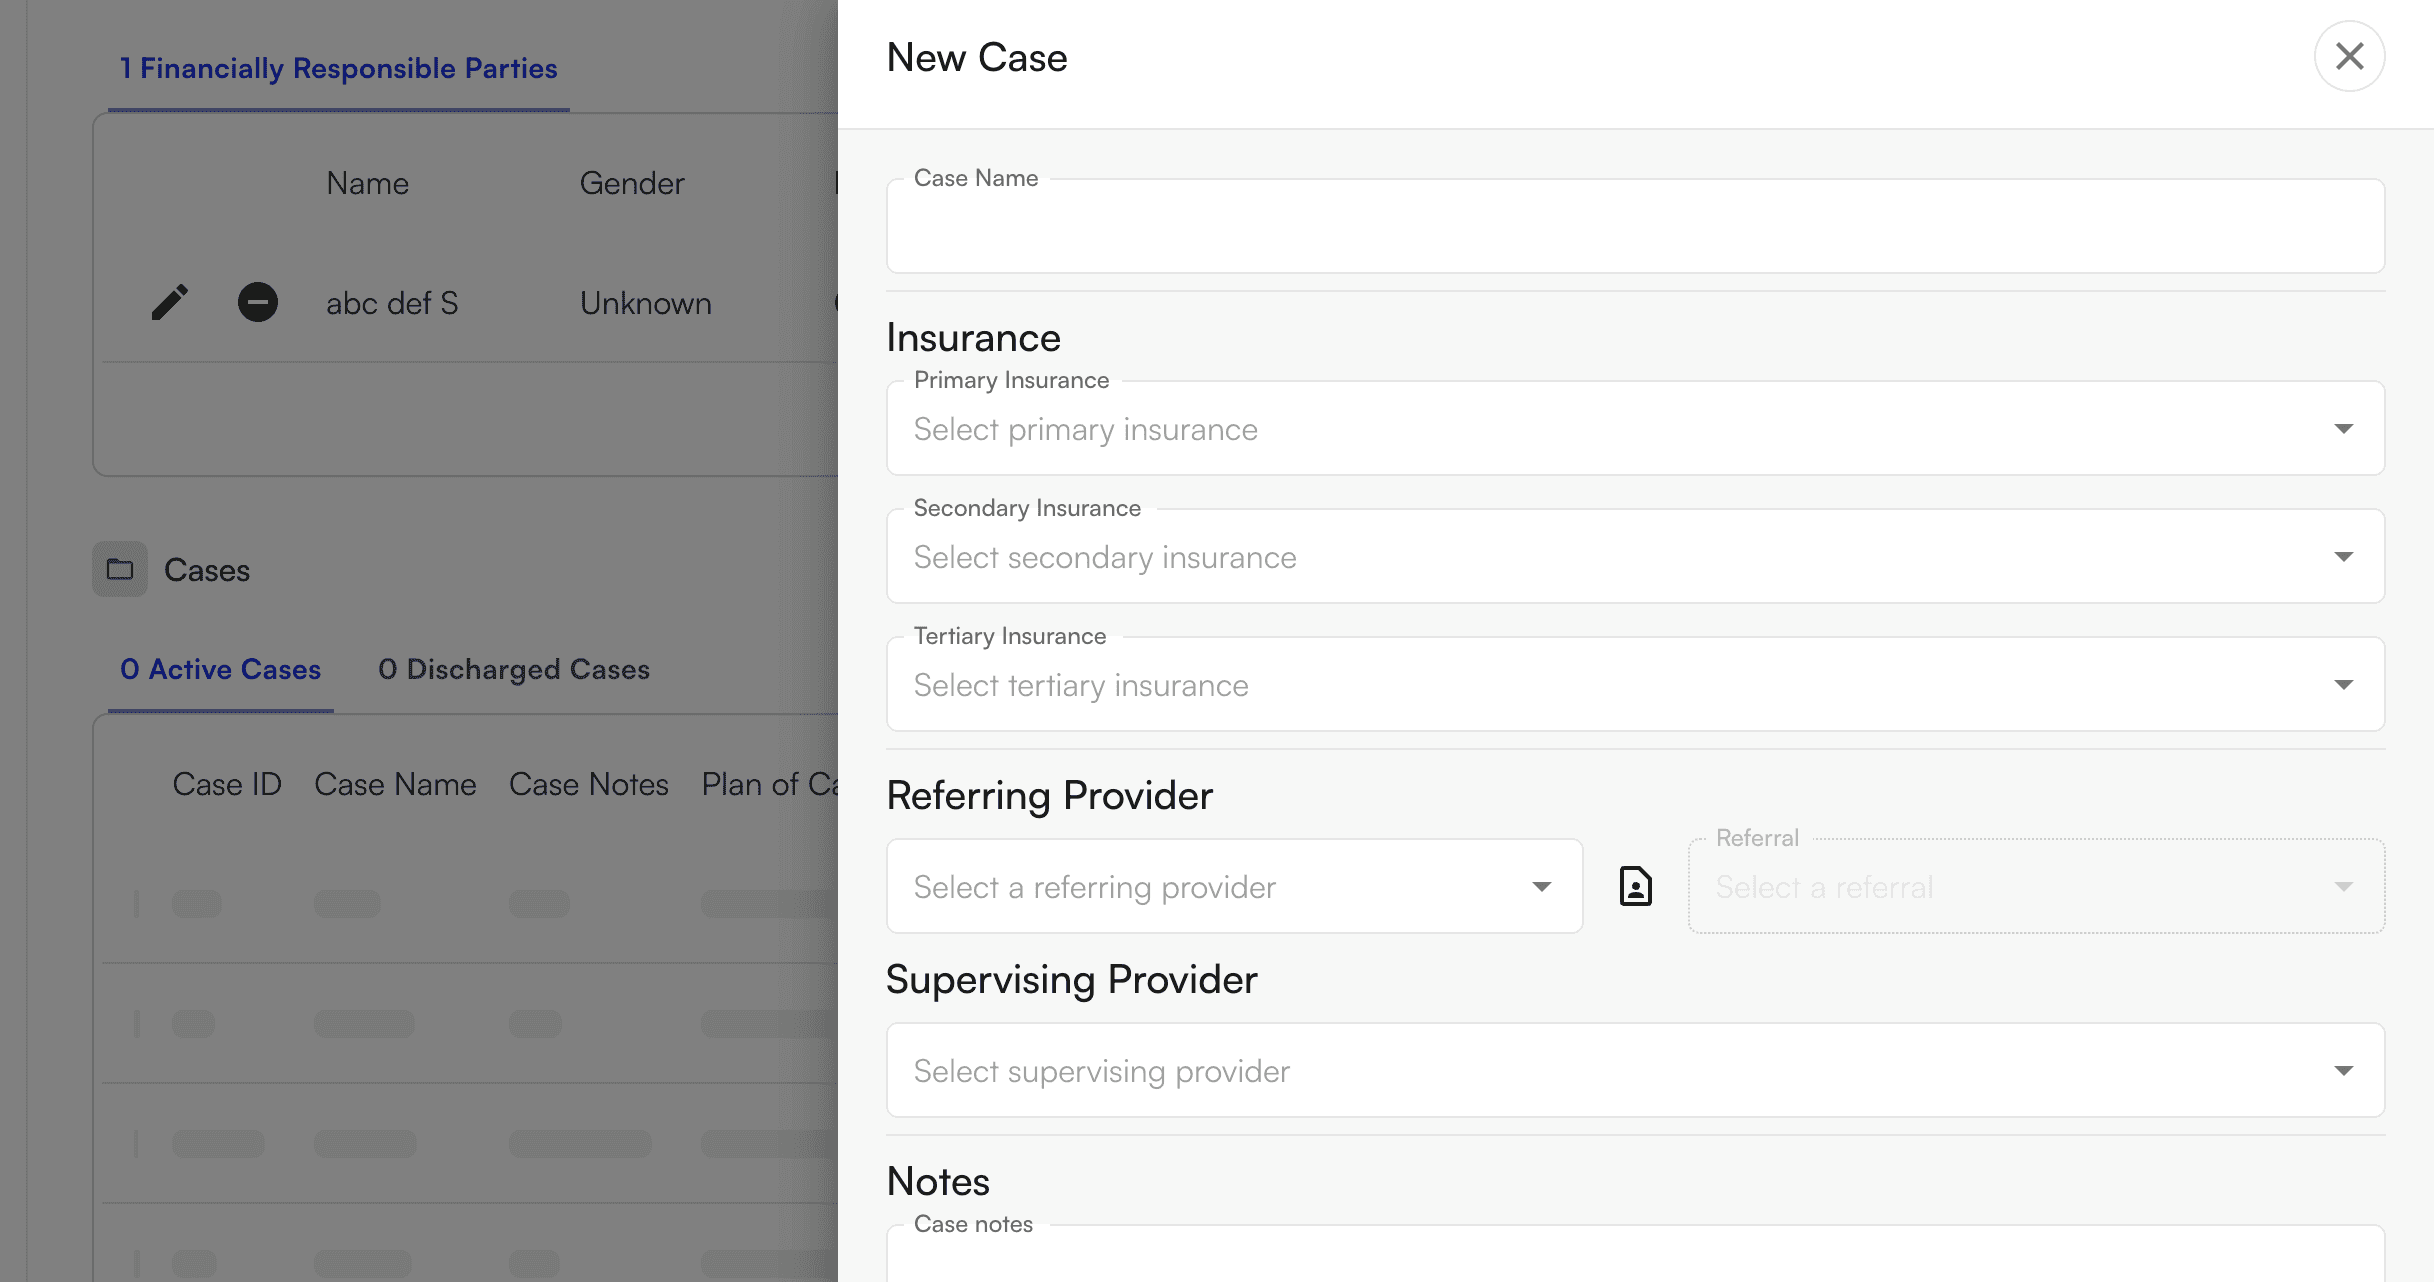
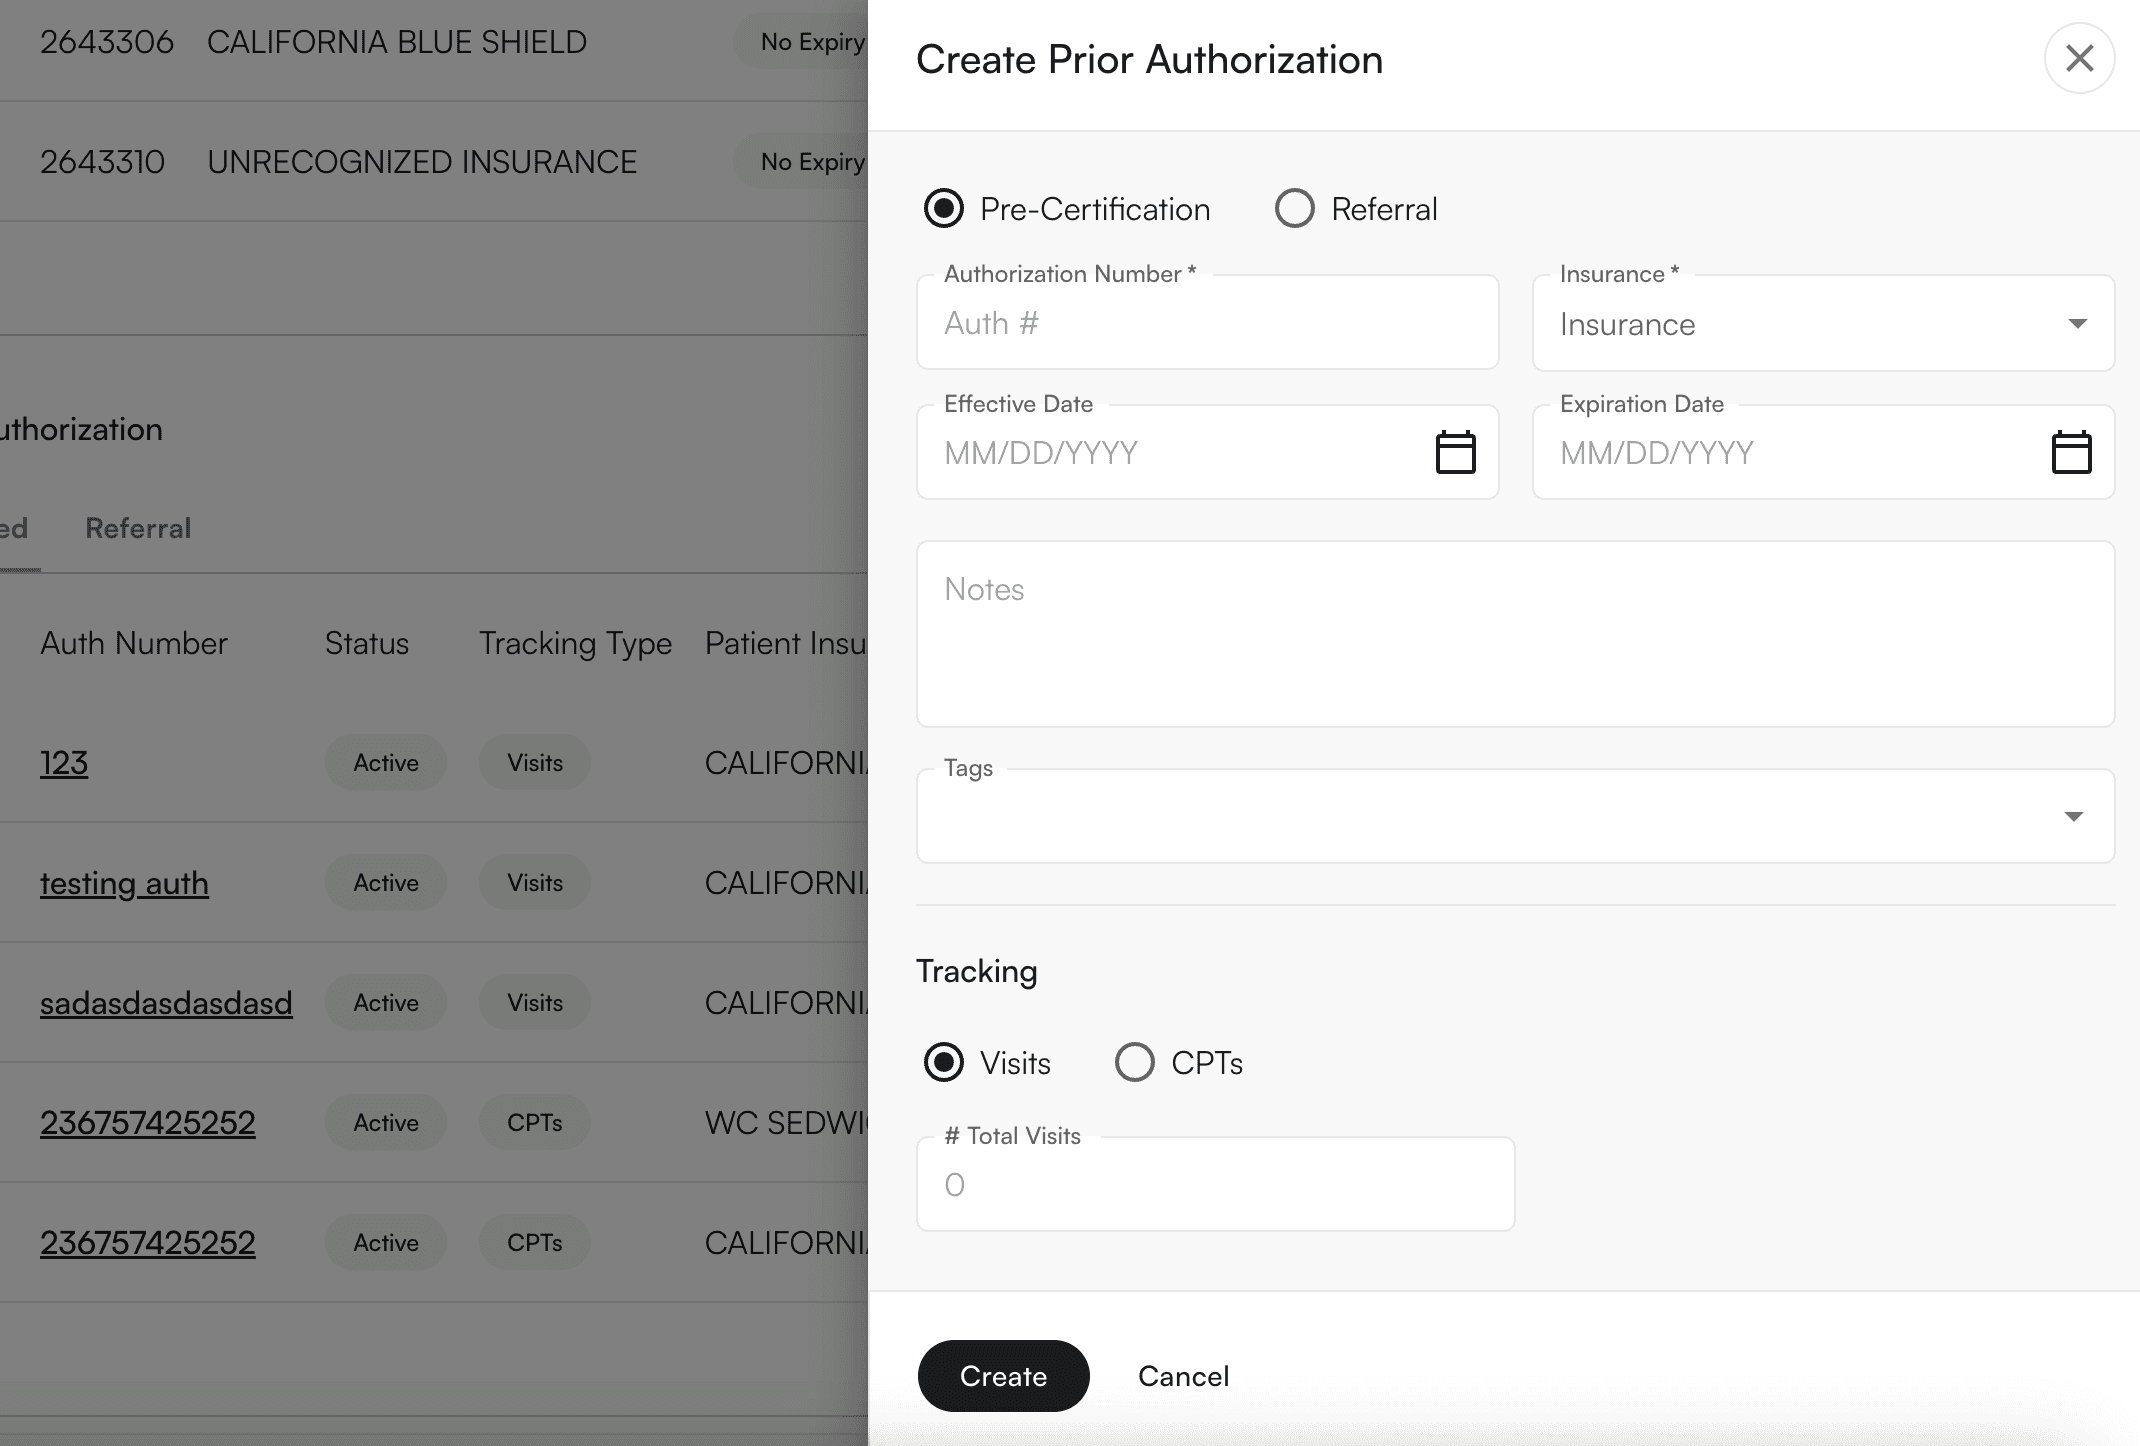
 Scroll down to the Prior Authorization section and click "+ New Prior Auth". A window opens in the middle of your screen where you can enter:
* Auth Number
* Total Number of Visits
* Effective Date
* Expiration Date
* Insurance this Prior Auth is tied to
Click "Create" after entering all desired information.
Scroll down to the Prior Authorization section and click "+ New Prior Auth". A window opens in the middle of your screen where you can enter:
* Auth Number
* Total Number of Visits
* Effective Date
* Expiration Date
* Insurance this Prior Auth is tied to
Click "Create" after entering all desired information.
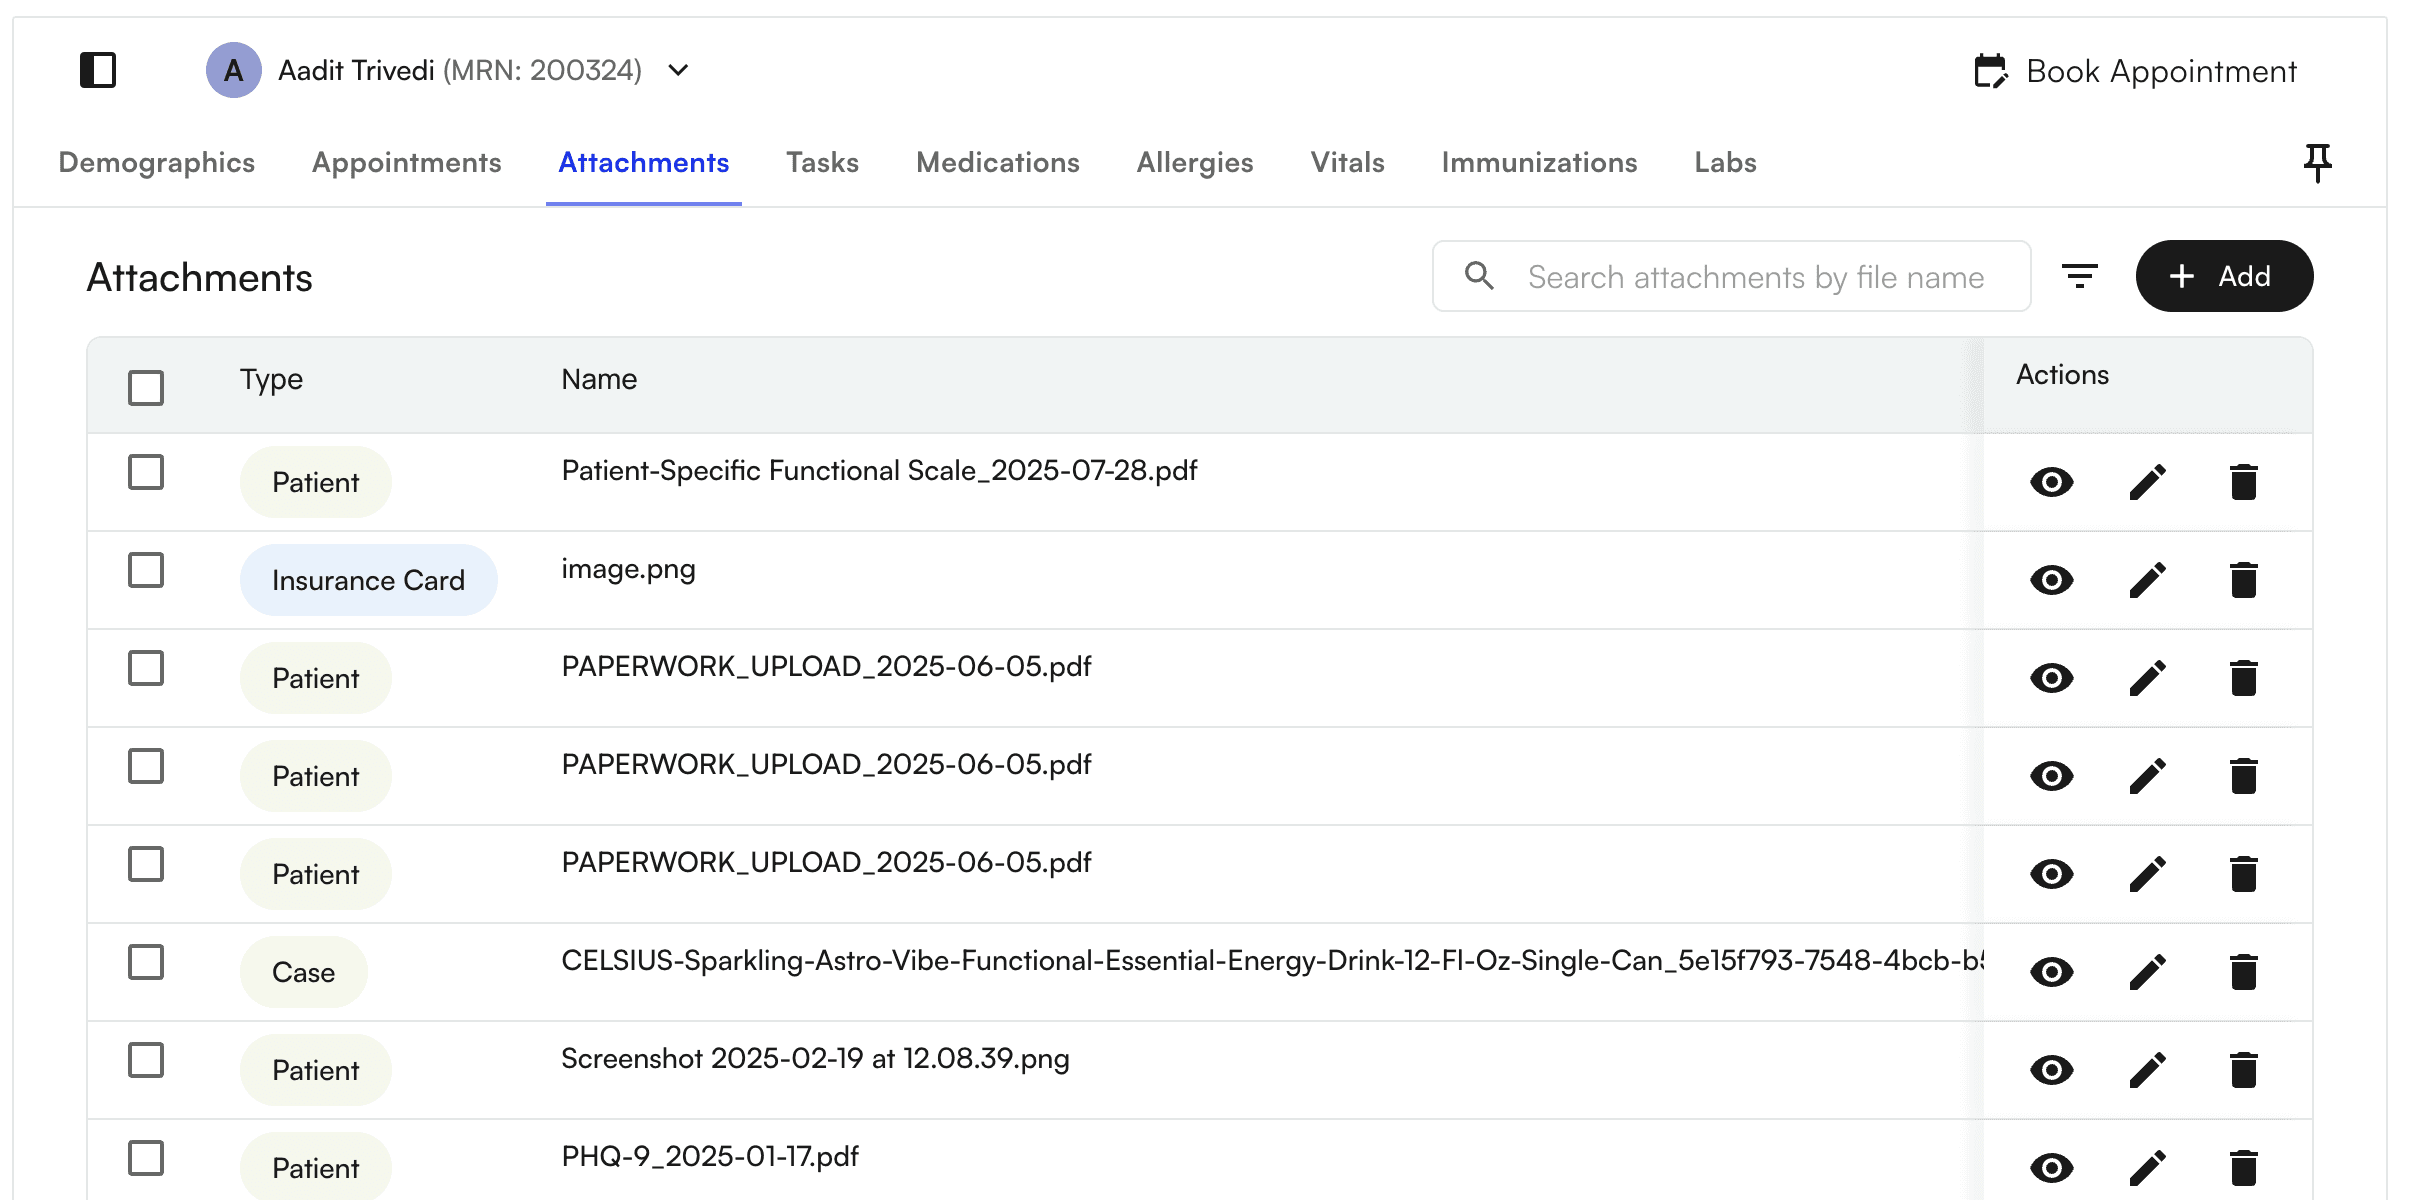
 The Attachments tab contains all attachments related to the patient. Intake forms automatically appear here, along with any uploaded scripts from chart notes.
 ## Calendar walkthrough
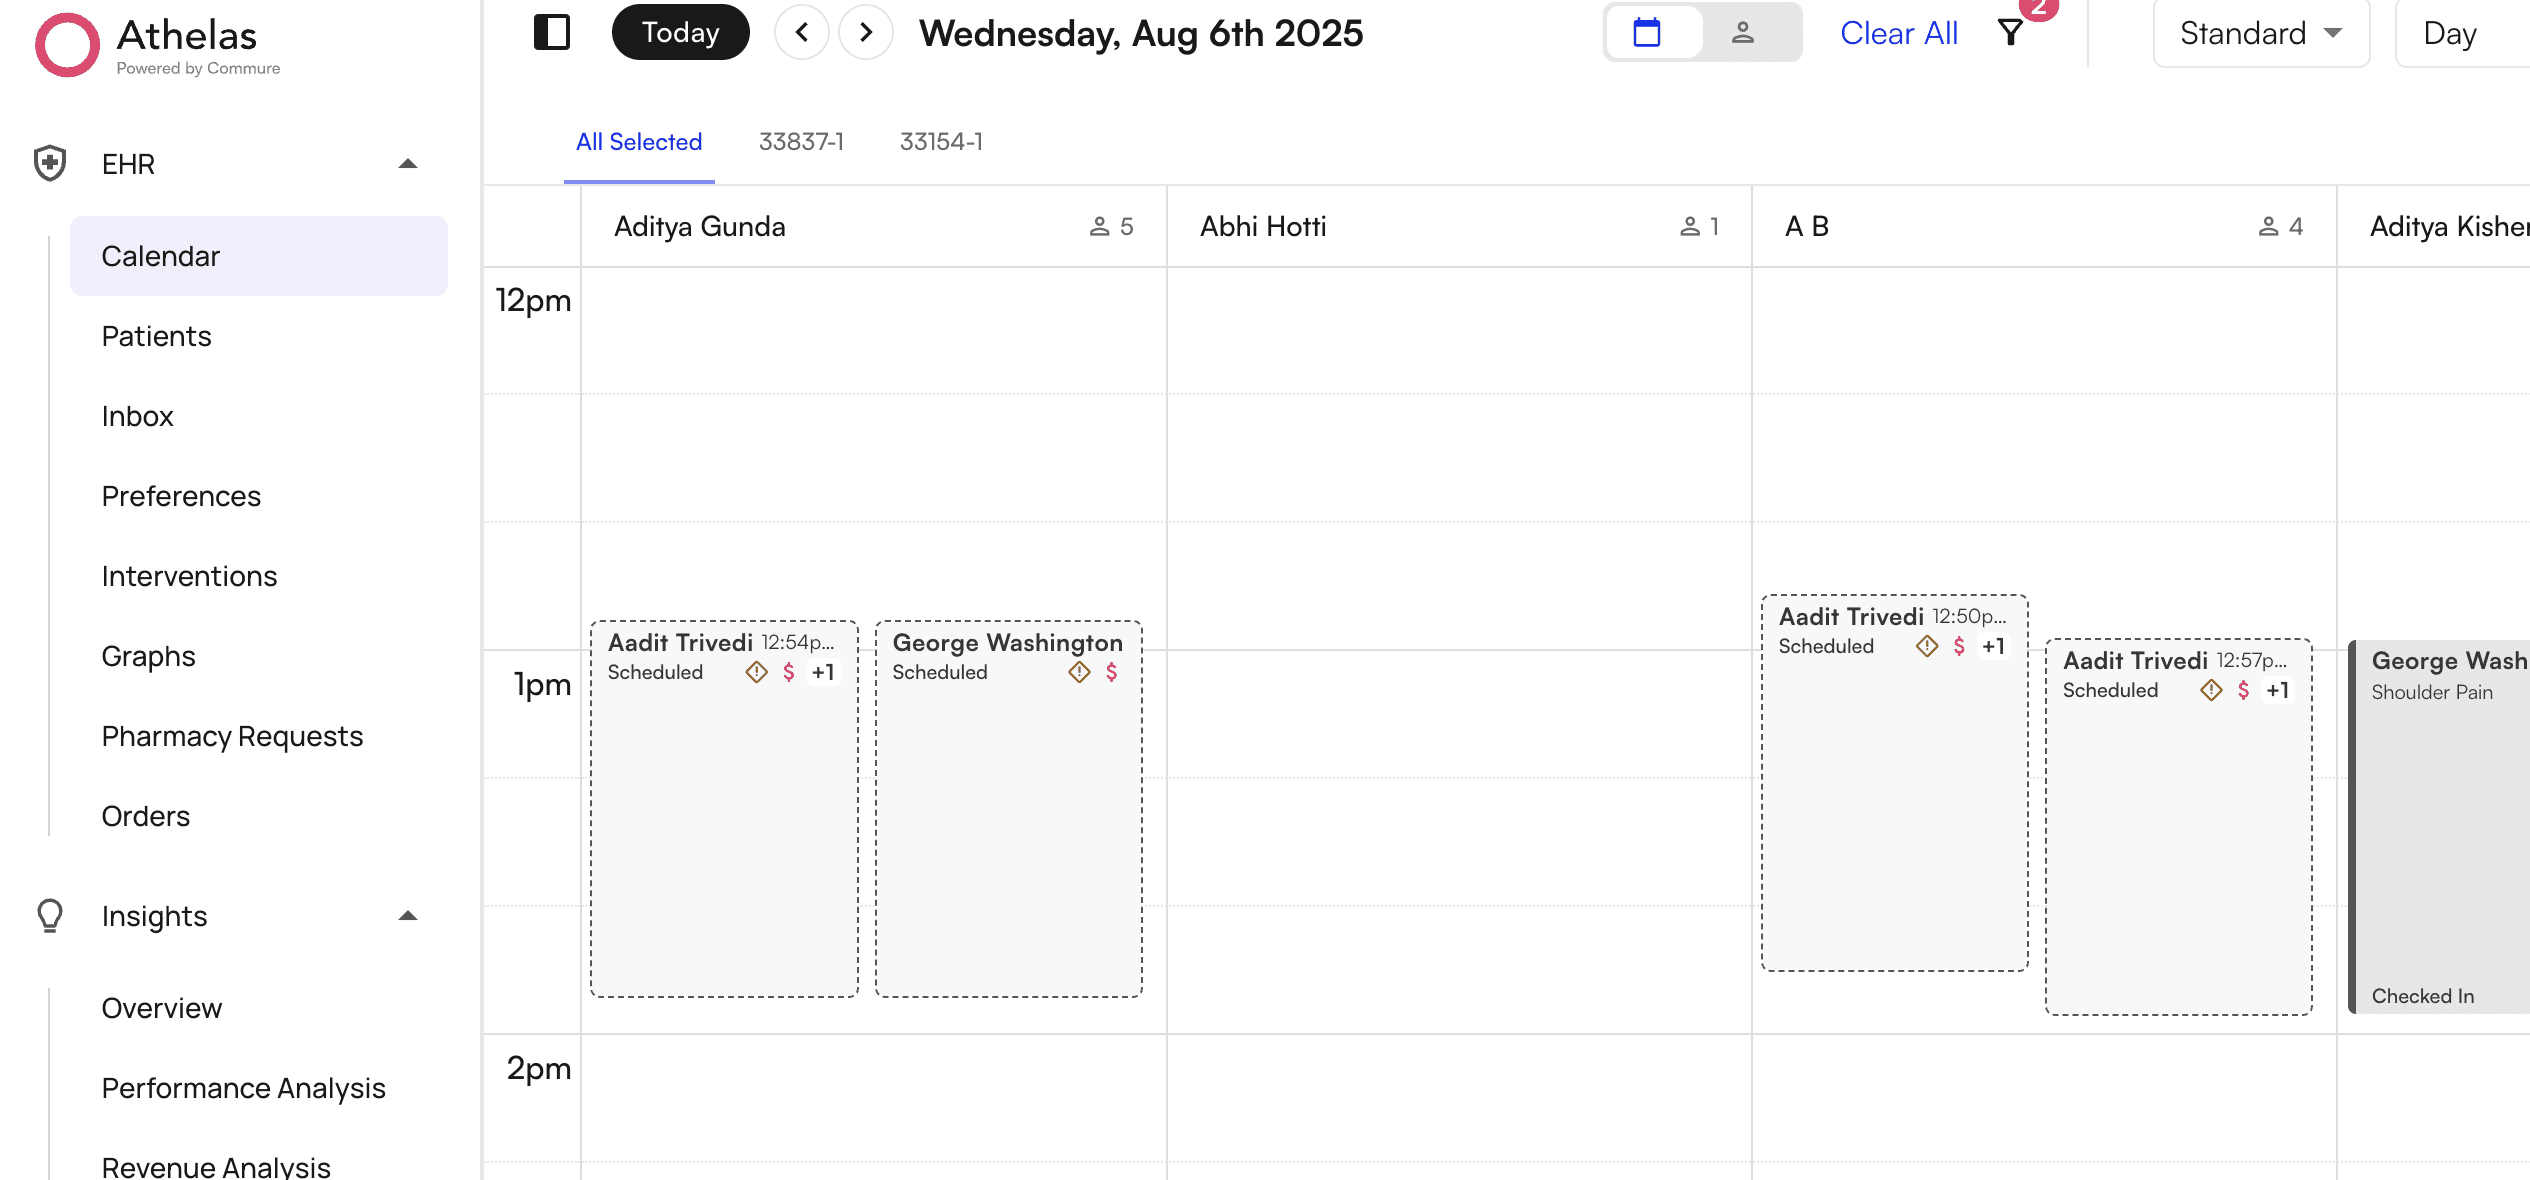
The calendar provides a quick overview of your day at a glance, helping you spend less time deciphering schedules and more time assisting patients.
## Calendar walkthrough
The calendar provides a quick overview of your day at a glance, helping you spend less time deciphering schedules and more time assisting patients.
 ### Accessing and filtering the calendar
Click "Calendar" in the left-hand menu. To populate the calendar with information, click the filters icon in the top right corner.
### Accessing and filtering the calendar
Click "Calendar" in the left-hand menu. To populate the calendar with information, click the filters icon in the top right corner.
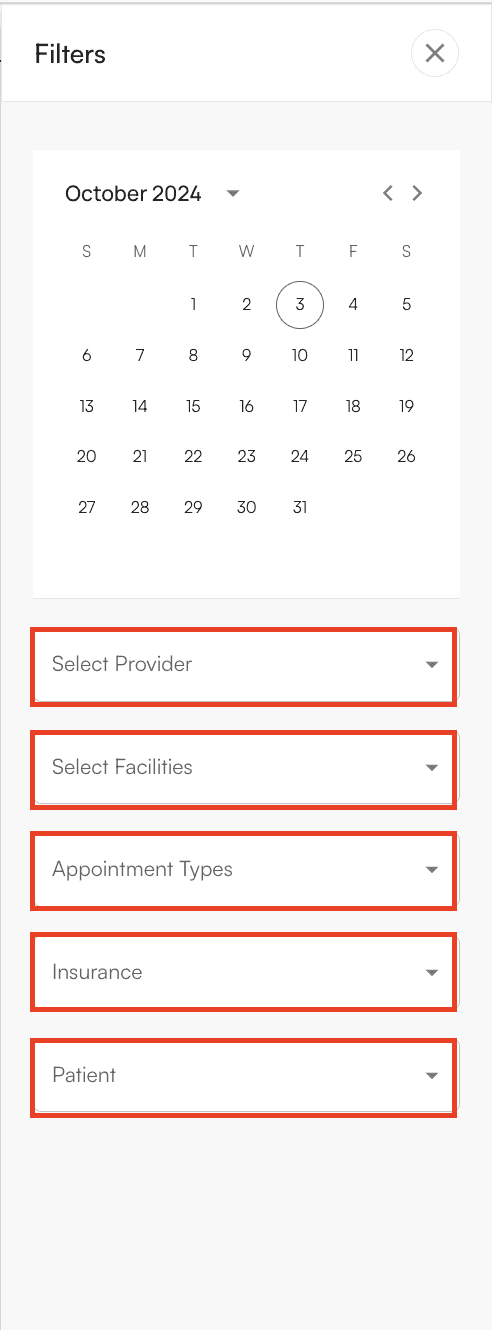
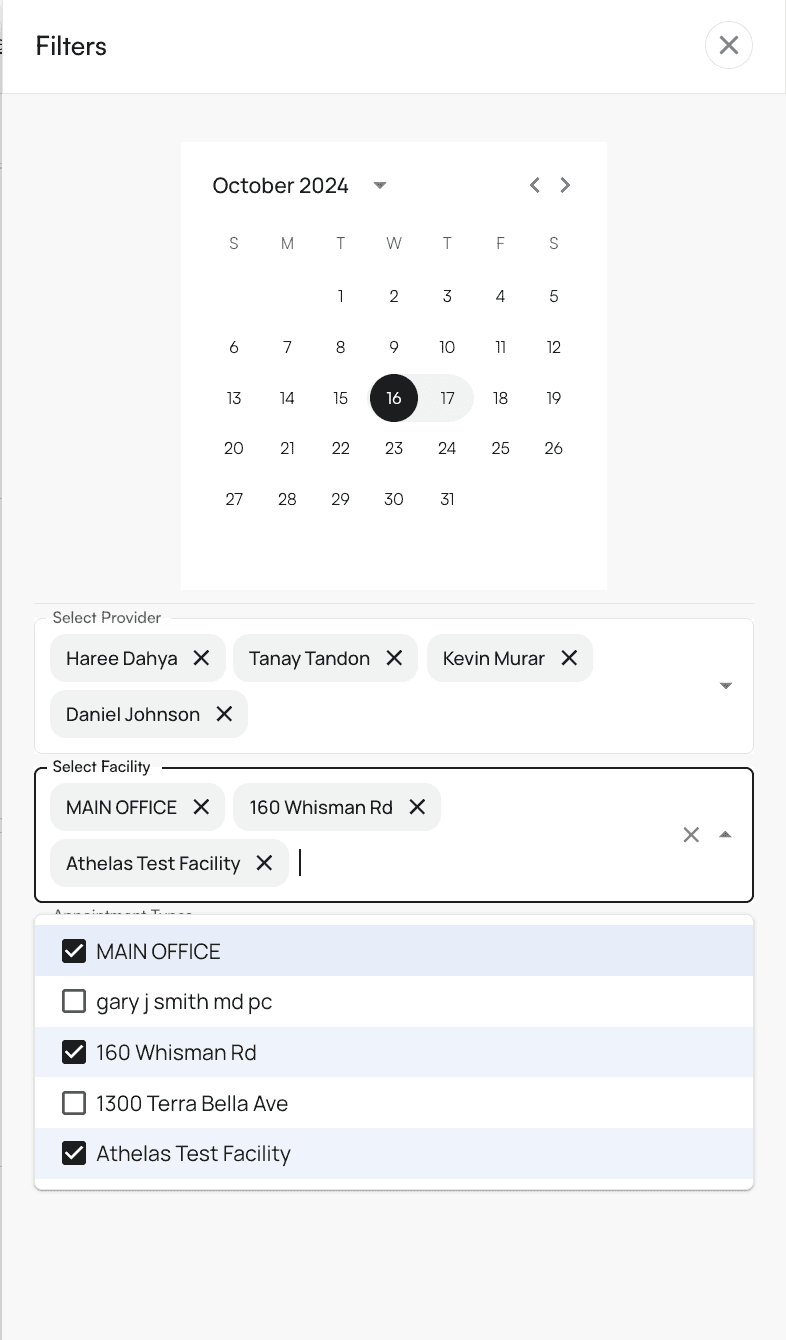
 A side panel opens on the right with filter options. You can filter by:
* Provider
* Facility
* Appointment Type
* Insurance
* Patient
A side panel opens on the right with filter options. You can filter by:
* Provider
* Facility
* Appointment Type
* Insurance
* Patient
 You can select multiple providers and facilities to display on the calendar view.
### Understanding schedule blocks
Each schedule block displays the following information:
* Case
* Eligibility status
* Payment Status
* Appointment status
You can select multiple providers and facilities to display on the calendar view.
### Understanding schedule blocks
Each schedule block displays the following information:
* Case
* Eligibility status
* Payment Status
* Appointment status
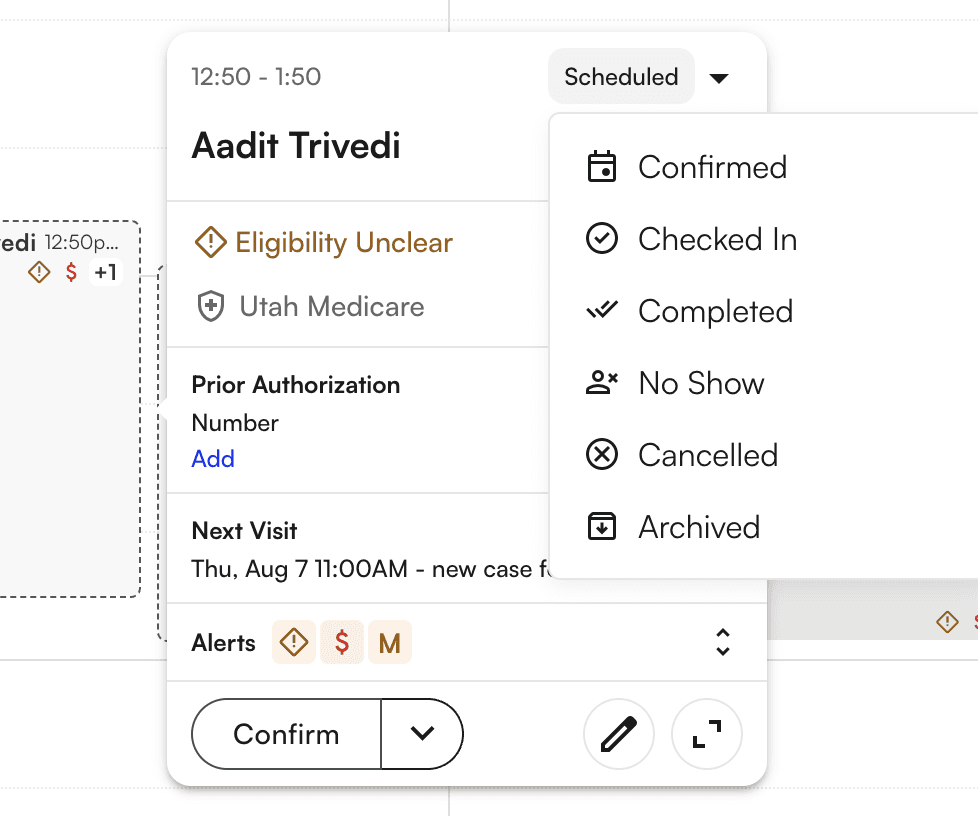
 **Hover actions:** When you hover over a calendar block, a popup appears with actions you can take:
* Edit the appointment
* Re-run eligibility
* Update appointment status (if not checked in)
* Add Prior Auth information
* Schedule future appointments
* Open the chart note
**Hover actions:** When you hover over a calendar block, a popup appears with actions you can take:
* Edit the appointment
* Re-run eligibility
* Update appointment status (if not checked in)
* Add Prior Auth information
* Schedule future appointments
* Open the chart note

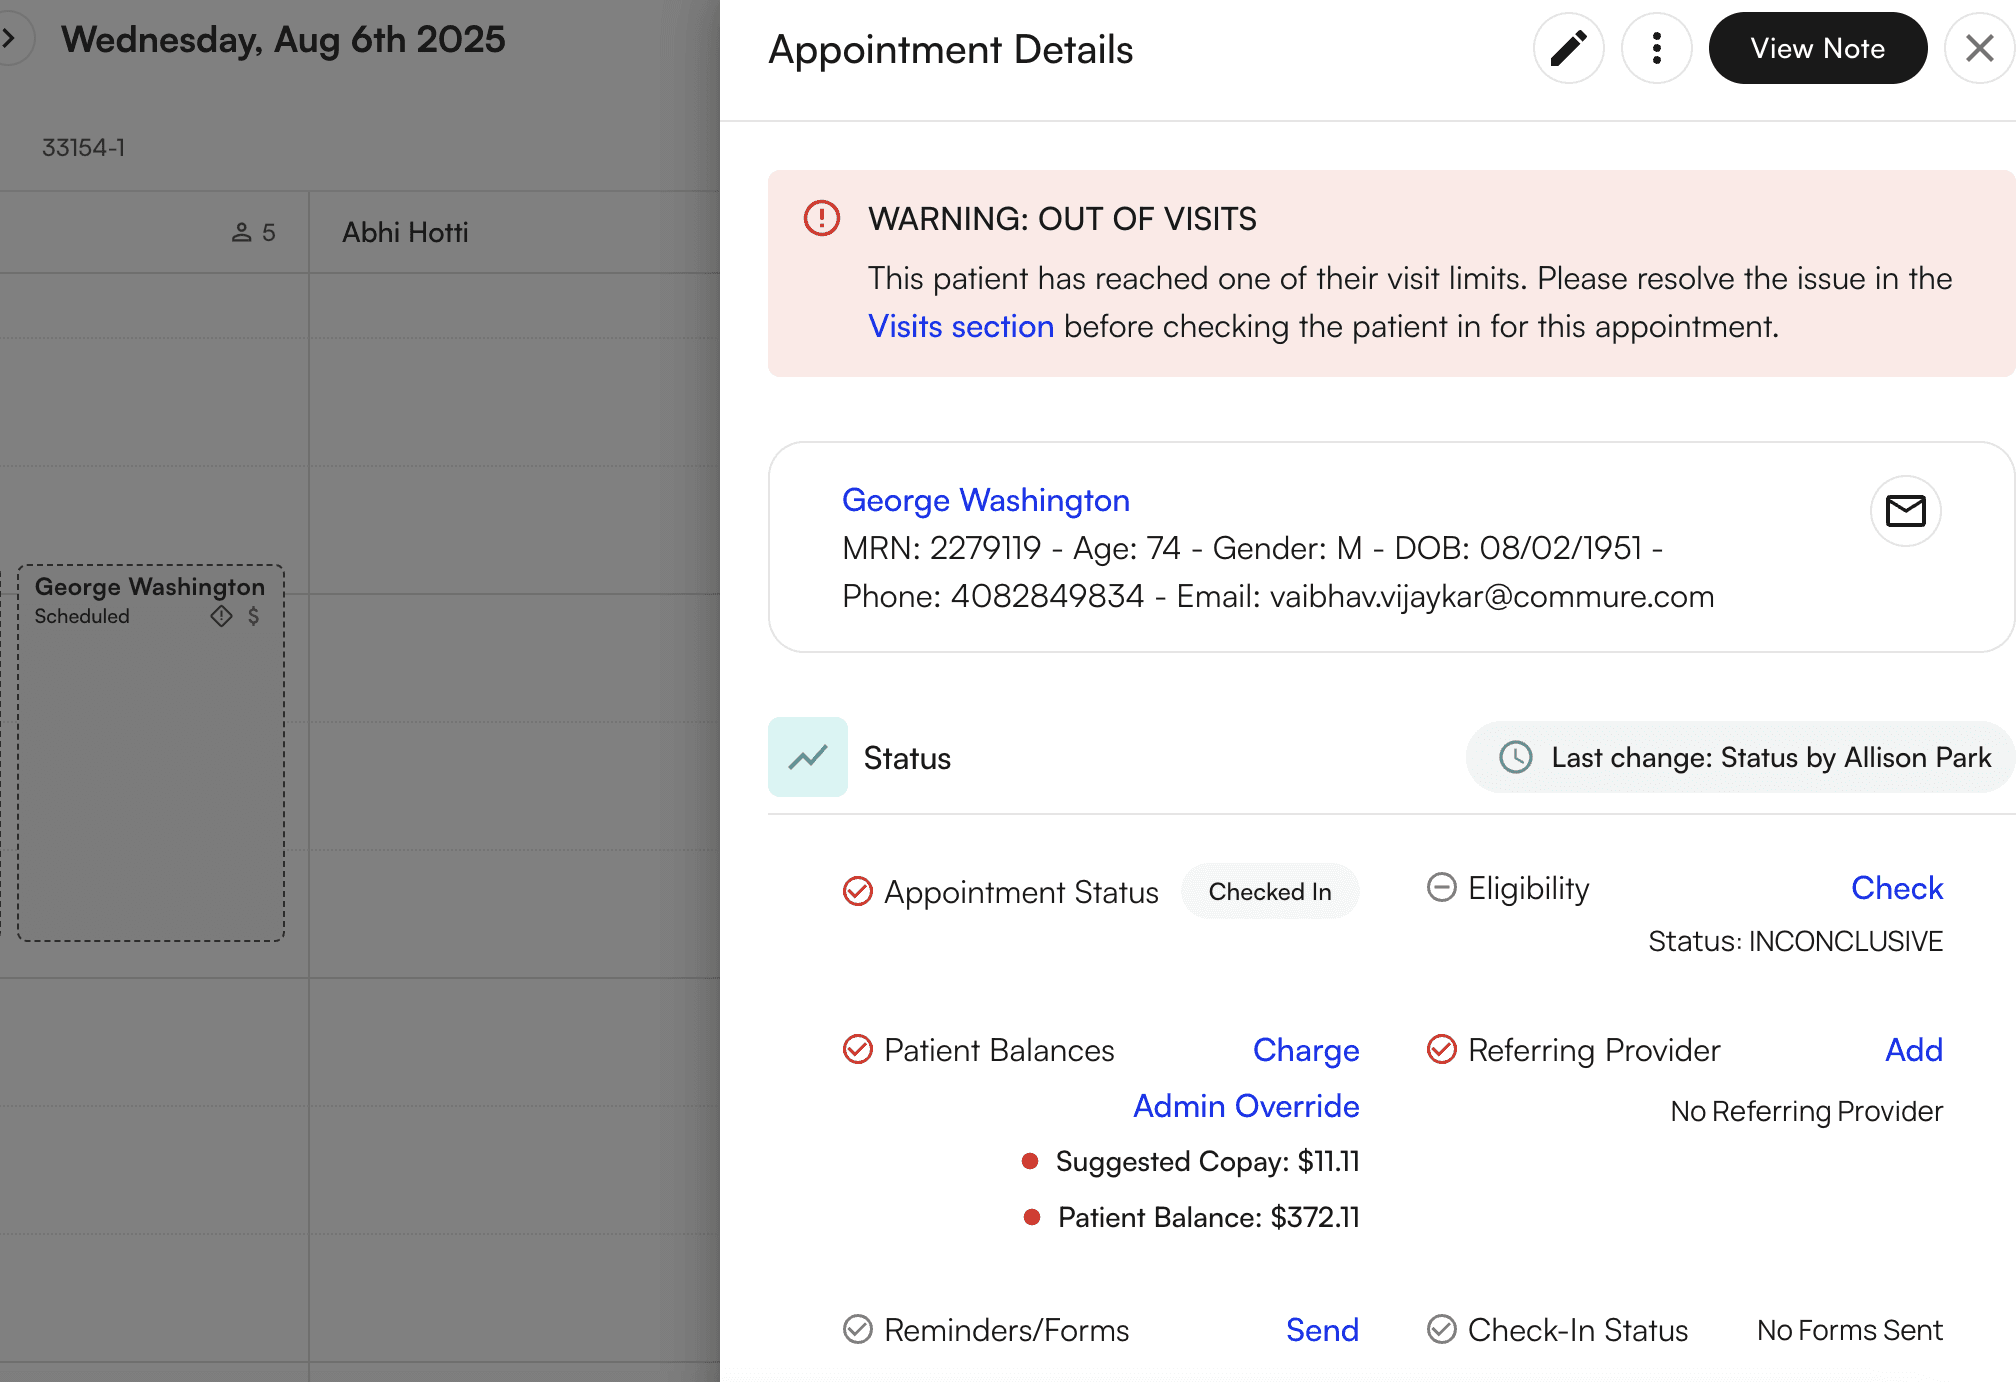
 **Click actions:** Click a schedule block to open a side menu with appointment details, including:
* General patient demographics
* Appointment Status
* Eligibility
* Patient Balances
* Referring Provider
* Reminders/Forms
* Check-In Status
* Prior Authorization for the patient's Primary Insurance
* Chart Note Status
* Appointment Type
* Provider
* Appointment Date and Time
* Facility
* Summary of the previous appointment
**Click actions:** Click a schedule block to open a side menu with appointment details, including:
* General patient demographics
* Appointment Status
* Eligibility
* Patient Balances
* Referring Provider
* Reminders/Forms
* Check-In Status
* Prior Authorization for the patient's Primary Insurance
* Chart Note Status
* Appointment Type
* Provider
* Appointment Date and Time
* Facility
* Summary of the previous appointment
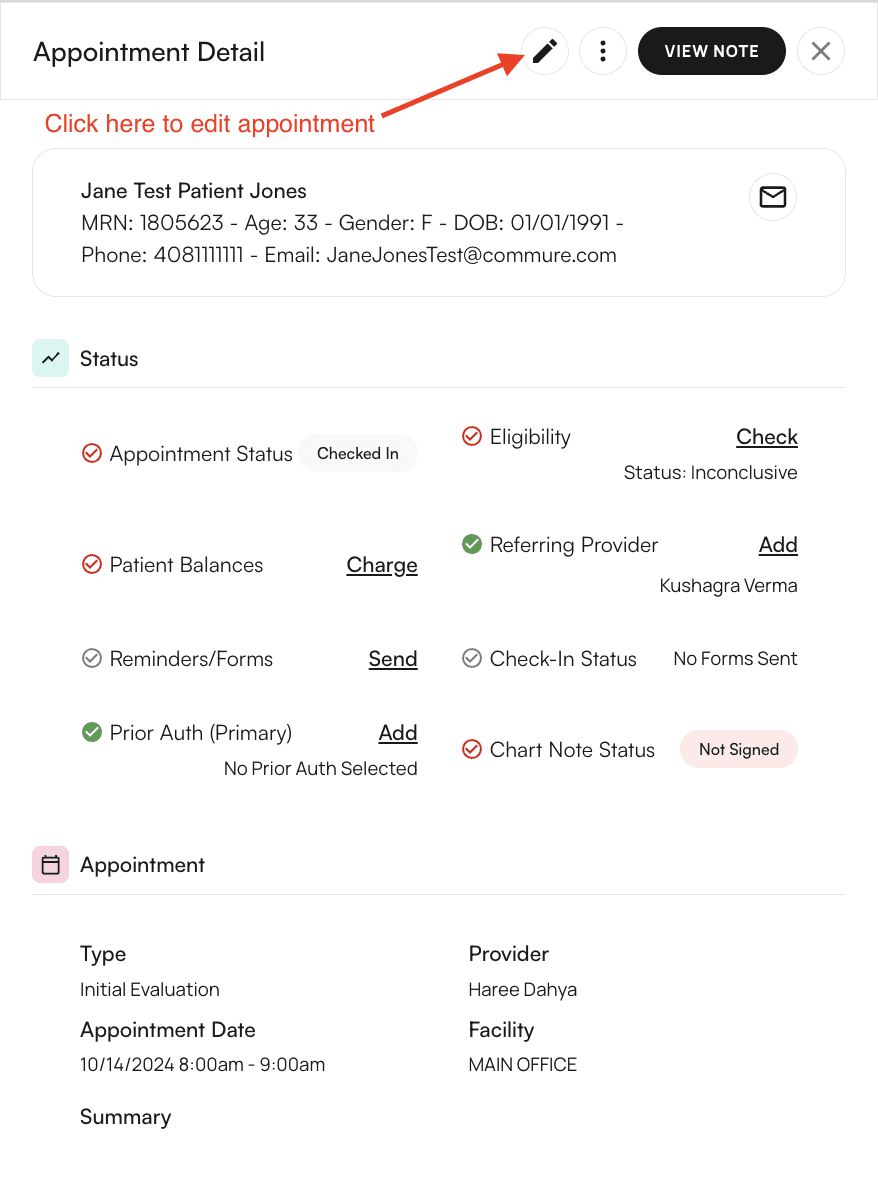
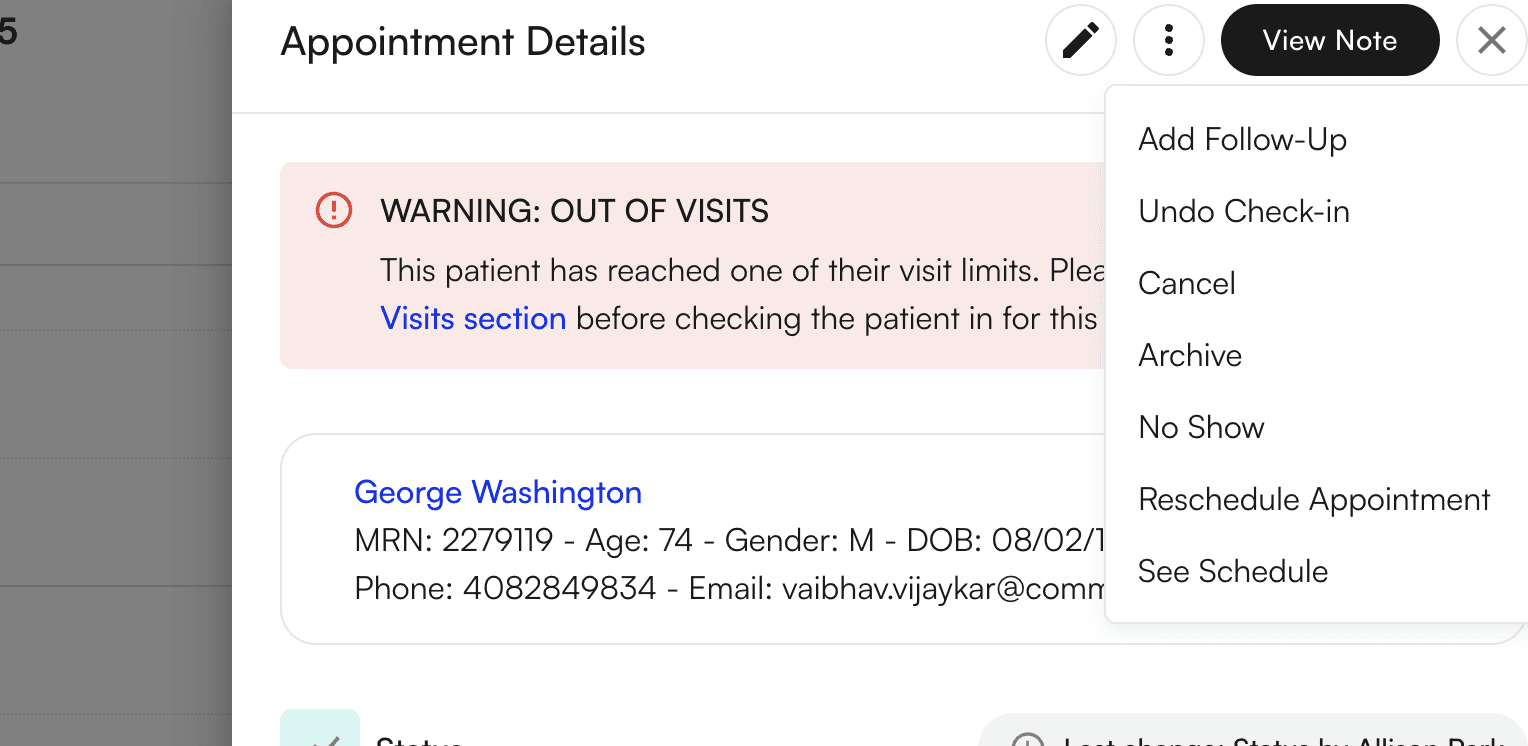
 **Edit appointment:** Click the pencil icon at the top of the Appointment Detail side menu to edit appointment details.
 **Additional actions:** Click the three vertical dots next to the appointment edit icon to:
* Add a follow-up appointment
* Check-In and Undo Check-In
* Cancel the appointment (you'll be prompted to enter a cancellation reason)
* Mark the appointment as No Show
* View the patient's entire schedule
**Additional actions:** Click the three vertical dots next to the appointment edit icon to:
* Add a follow-up appointment
* Check-In and Undo Check-In
* Cancel the appointment (you'll be prompted to enter a cancellation reason)
* Mark the appointment as No Show
* View the patient's entire schedule
 ## Creating appointments
You can create appointments using multiple methods. All methods open the same appointment creation side panel.
### Method 1: From the calendar header
Navigate to the calendar and click the "+ Create New" button in the top right corner of the screen.
## Creating appointments
You can create appointments using multiple methods. All methods open the same appointment creation side panel.
### Method 1: From the calendar header
Navigate to the calendar and click the "+ Create New" button in the top right corner of the screen.
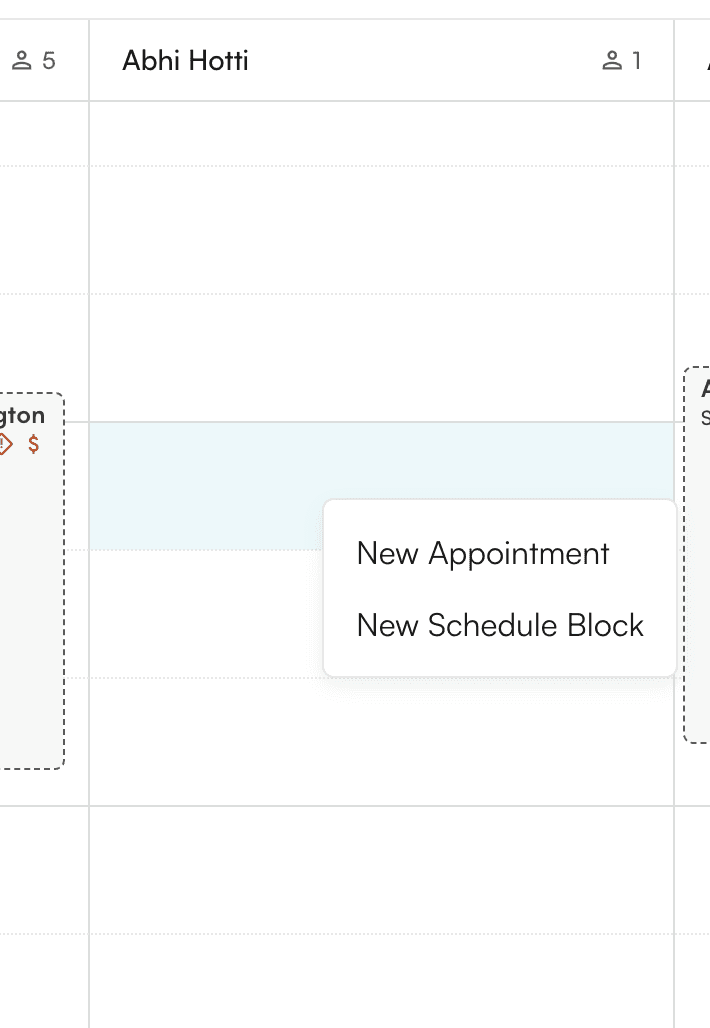
 ### Method 2: From an empty calendar slot
Click any empty space in the calendar to create an appointment at that time.
### Method 2: From an empty calendar slot
Click any empty space in the calendar to create an appointment at that time.
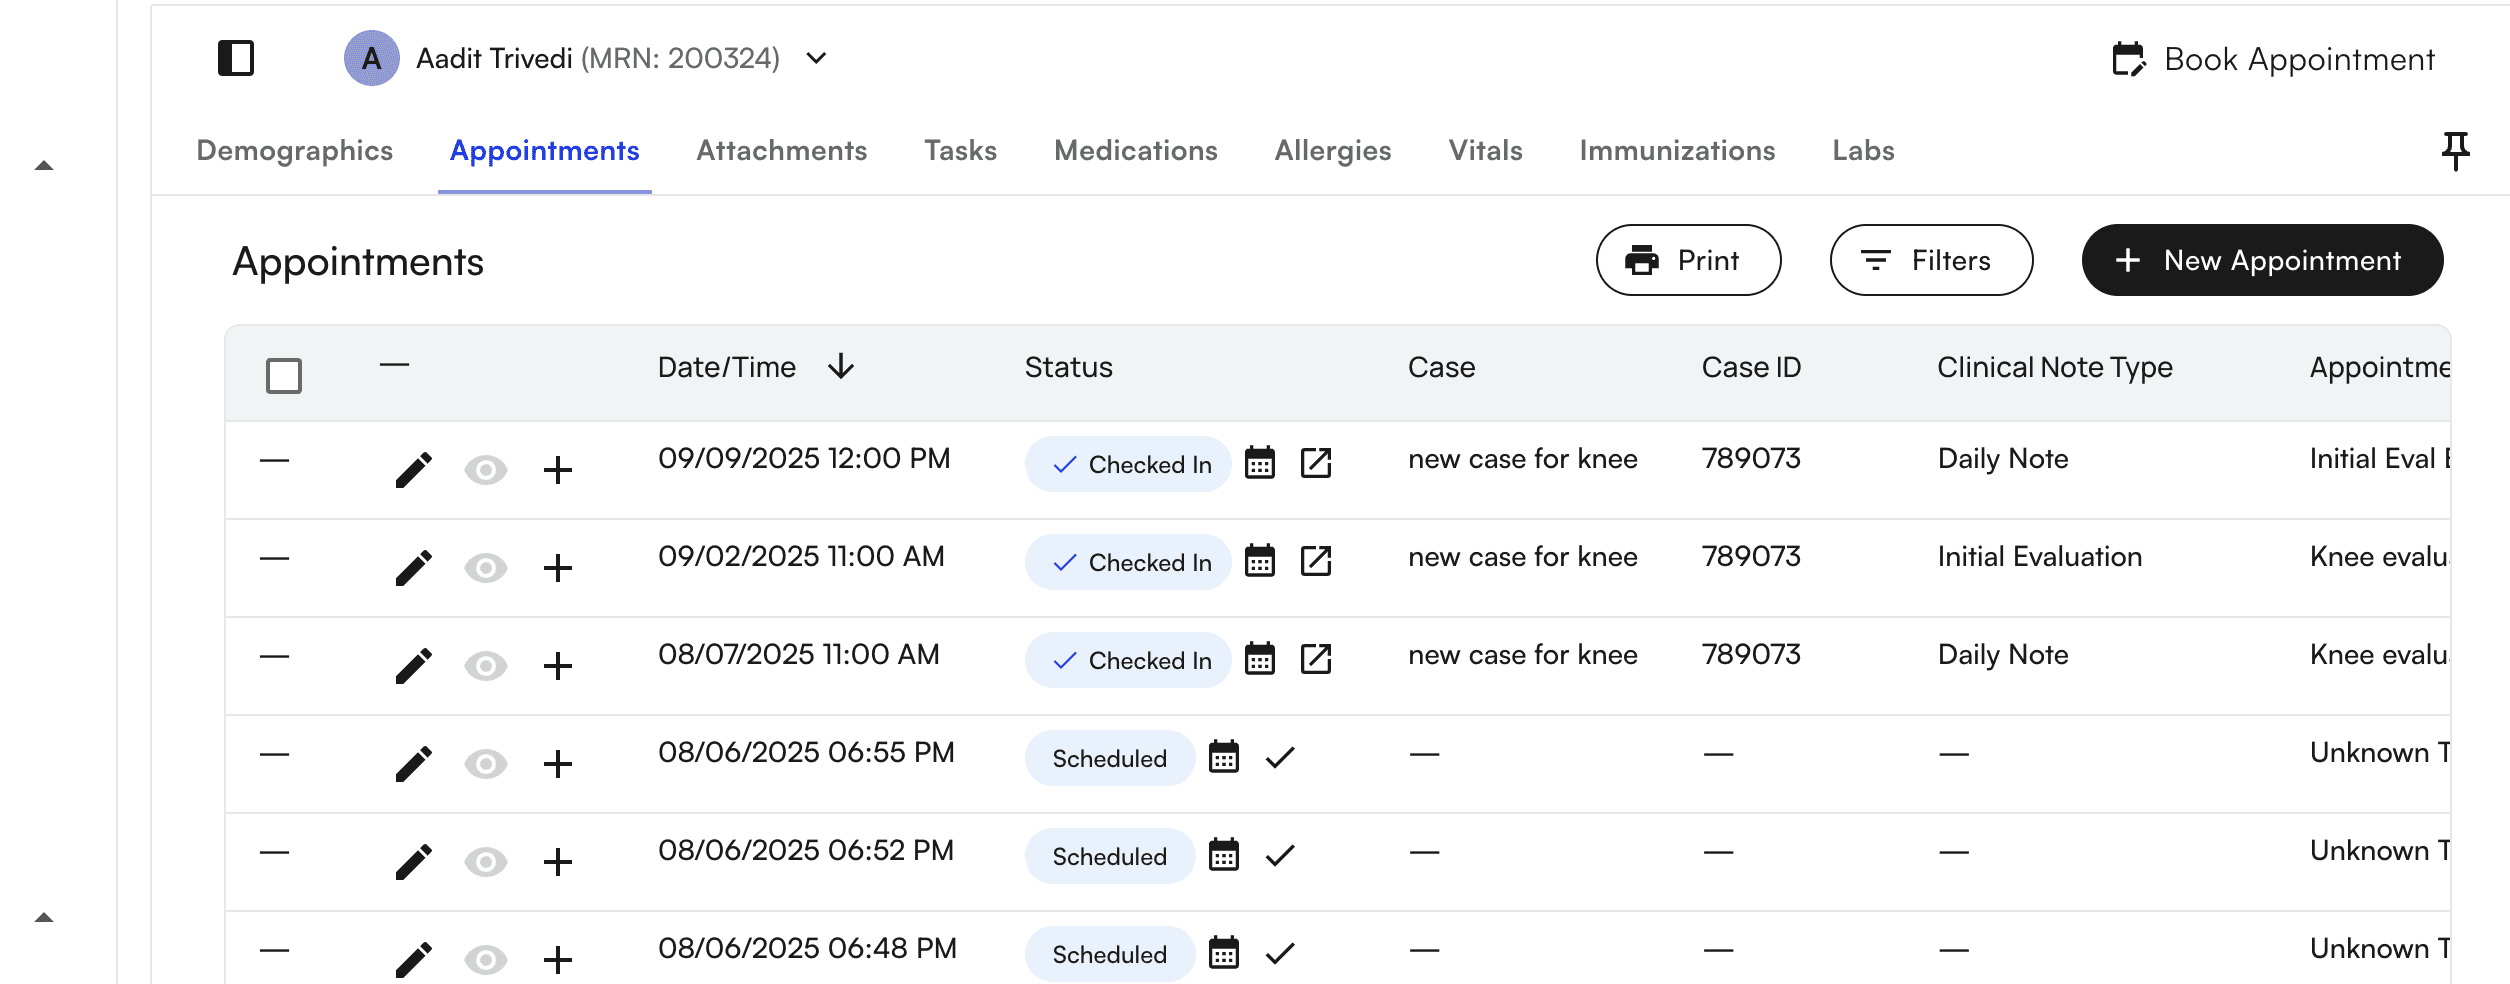
 ### Method 3: From patient appointments
Navigate to **Patients** and search for your patient's name. Click on "Appointments" after entering the patient's demographics. Click "+ New Appointment" or "Book Appointment" in the top right corner.
### Method 3: From patient appointments
Navigate to **Patients** and search for your patient's name. Click on "Appointments" after entering the patient's demographics. Click "+ New Appointment" or "Book Appointment" in the top right corner.

 ### Filling out appointment details
Regardless of which method you use, clicking "+ New Appointment" opens a side panel where you enter appointment information.
### Filling out appointment details
Regardless of which method you use, clicking "+ New Appointment" opens a side panel where you enter appointment information.
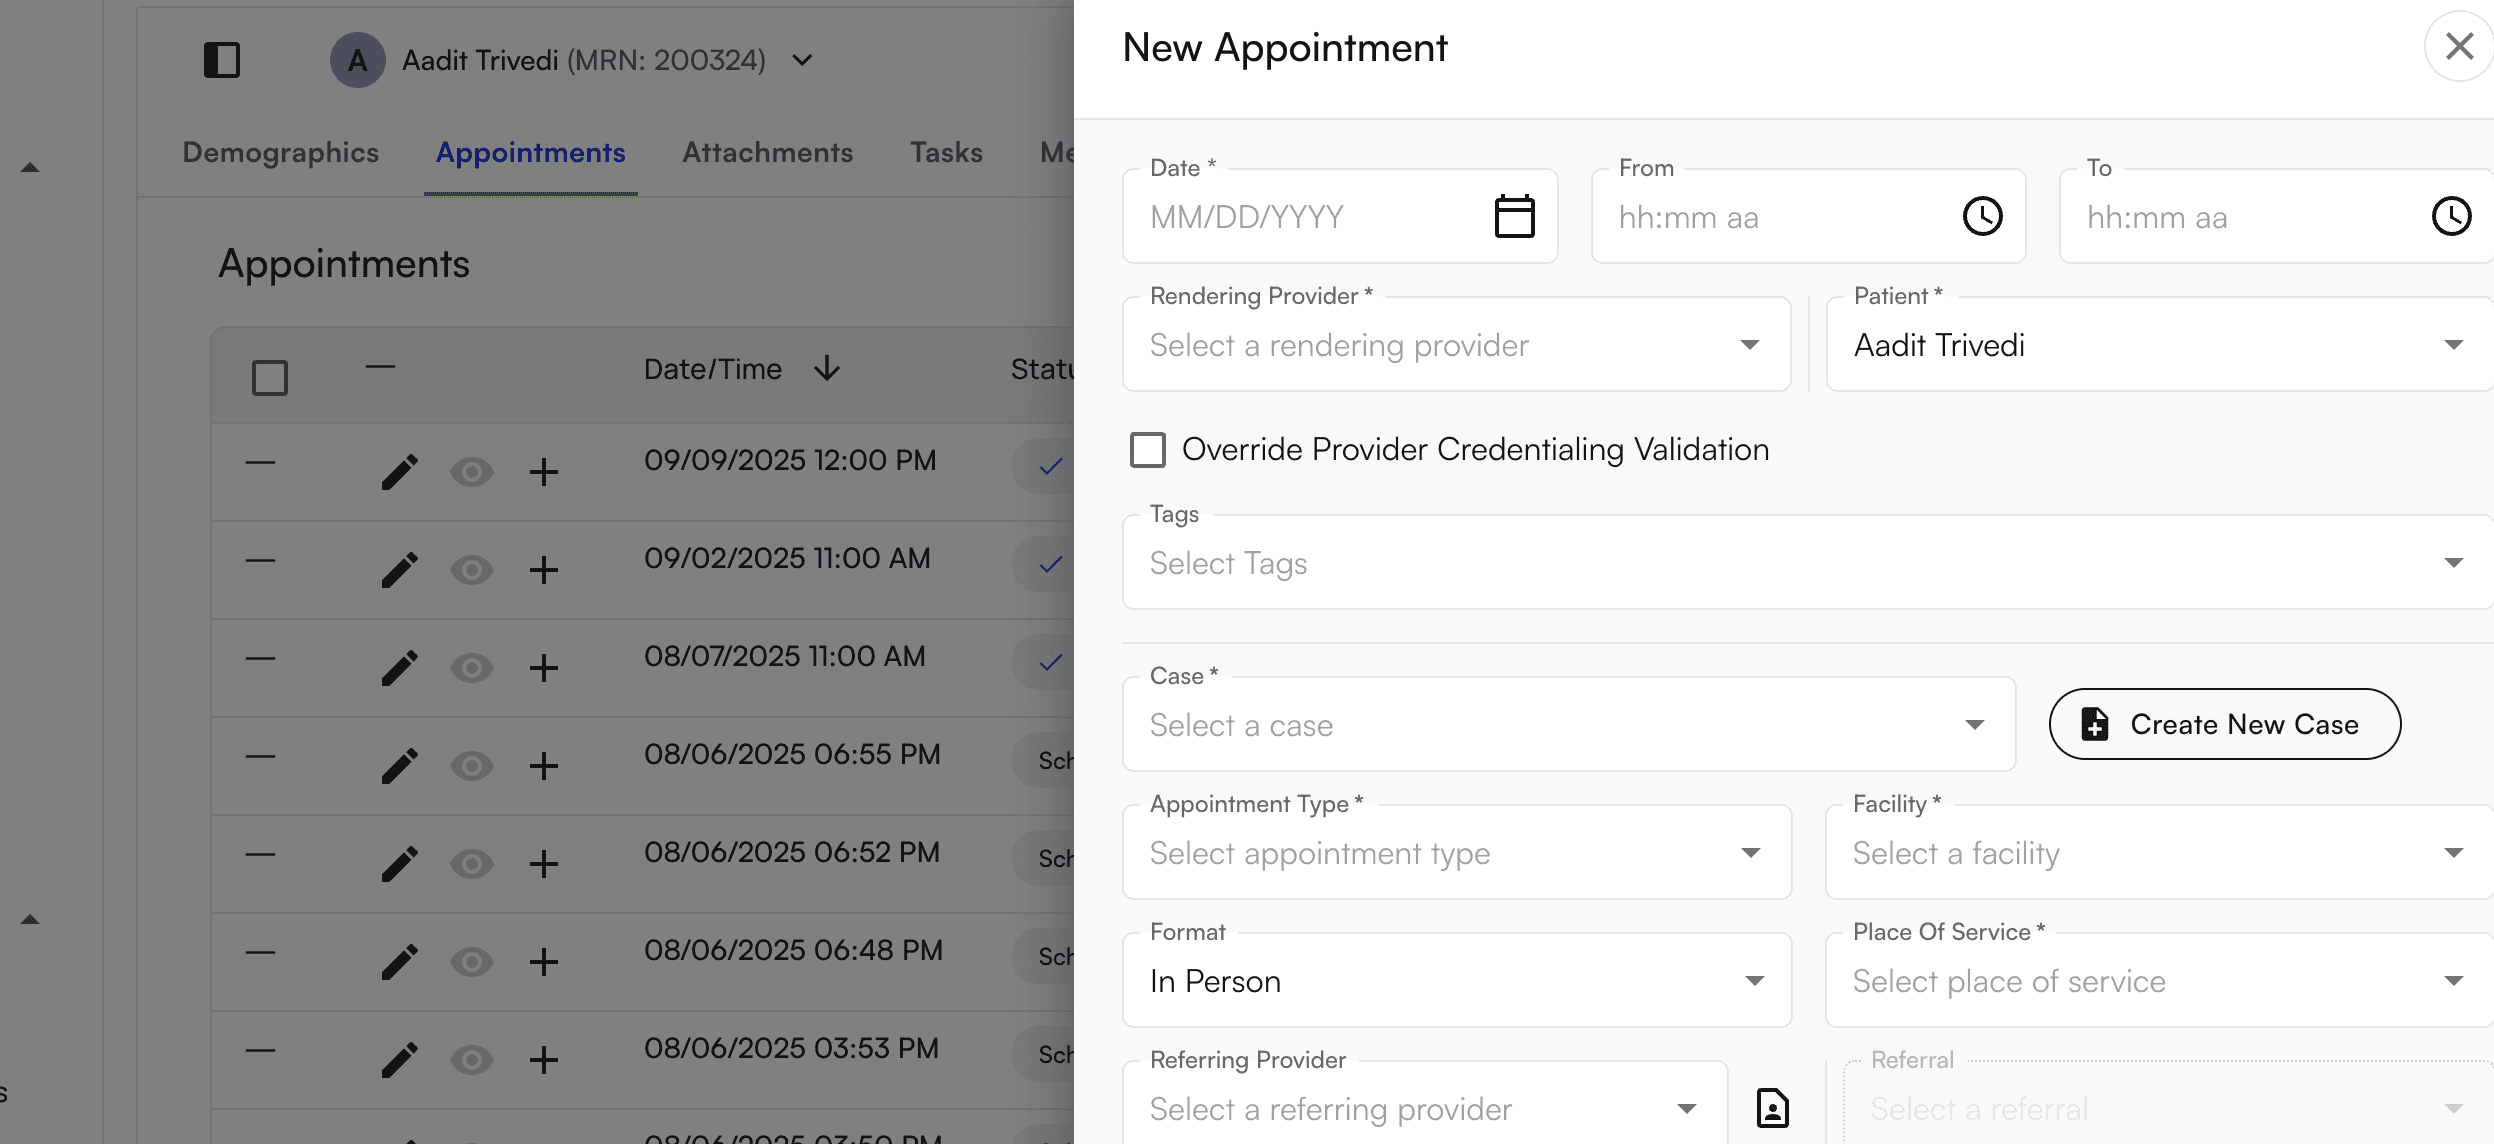 **Required fields:**
* Appointment Date
* Appointment Time
* Provider (Rendering)
* Patient
* Case
* Appointment Type
* Facility
* Format
**Optional fields:**
* Referring Provider
* Insurance priority for the appointment (you can sync this permanently to the case)
* Prior authorizations per insurance
**Required fields:**
* Appointment Date
* Appointment Time
* Provider (Rendering)
* Patient
* Case
* Appointment Type
* Facility
* Format
**Optional fields:**
* Referring Provider
* Insurance priority for the appointment (you can sync this permanently to the case)
* Prior authorizations per insurance
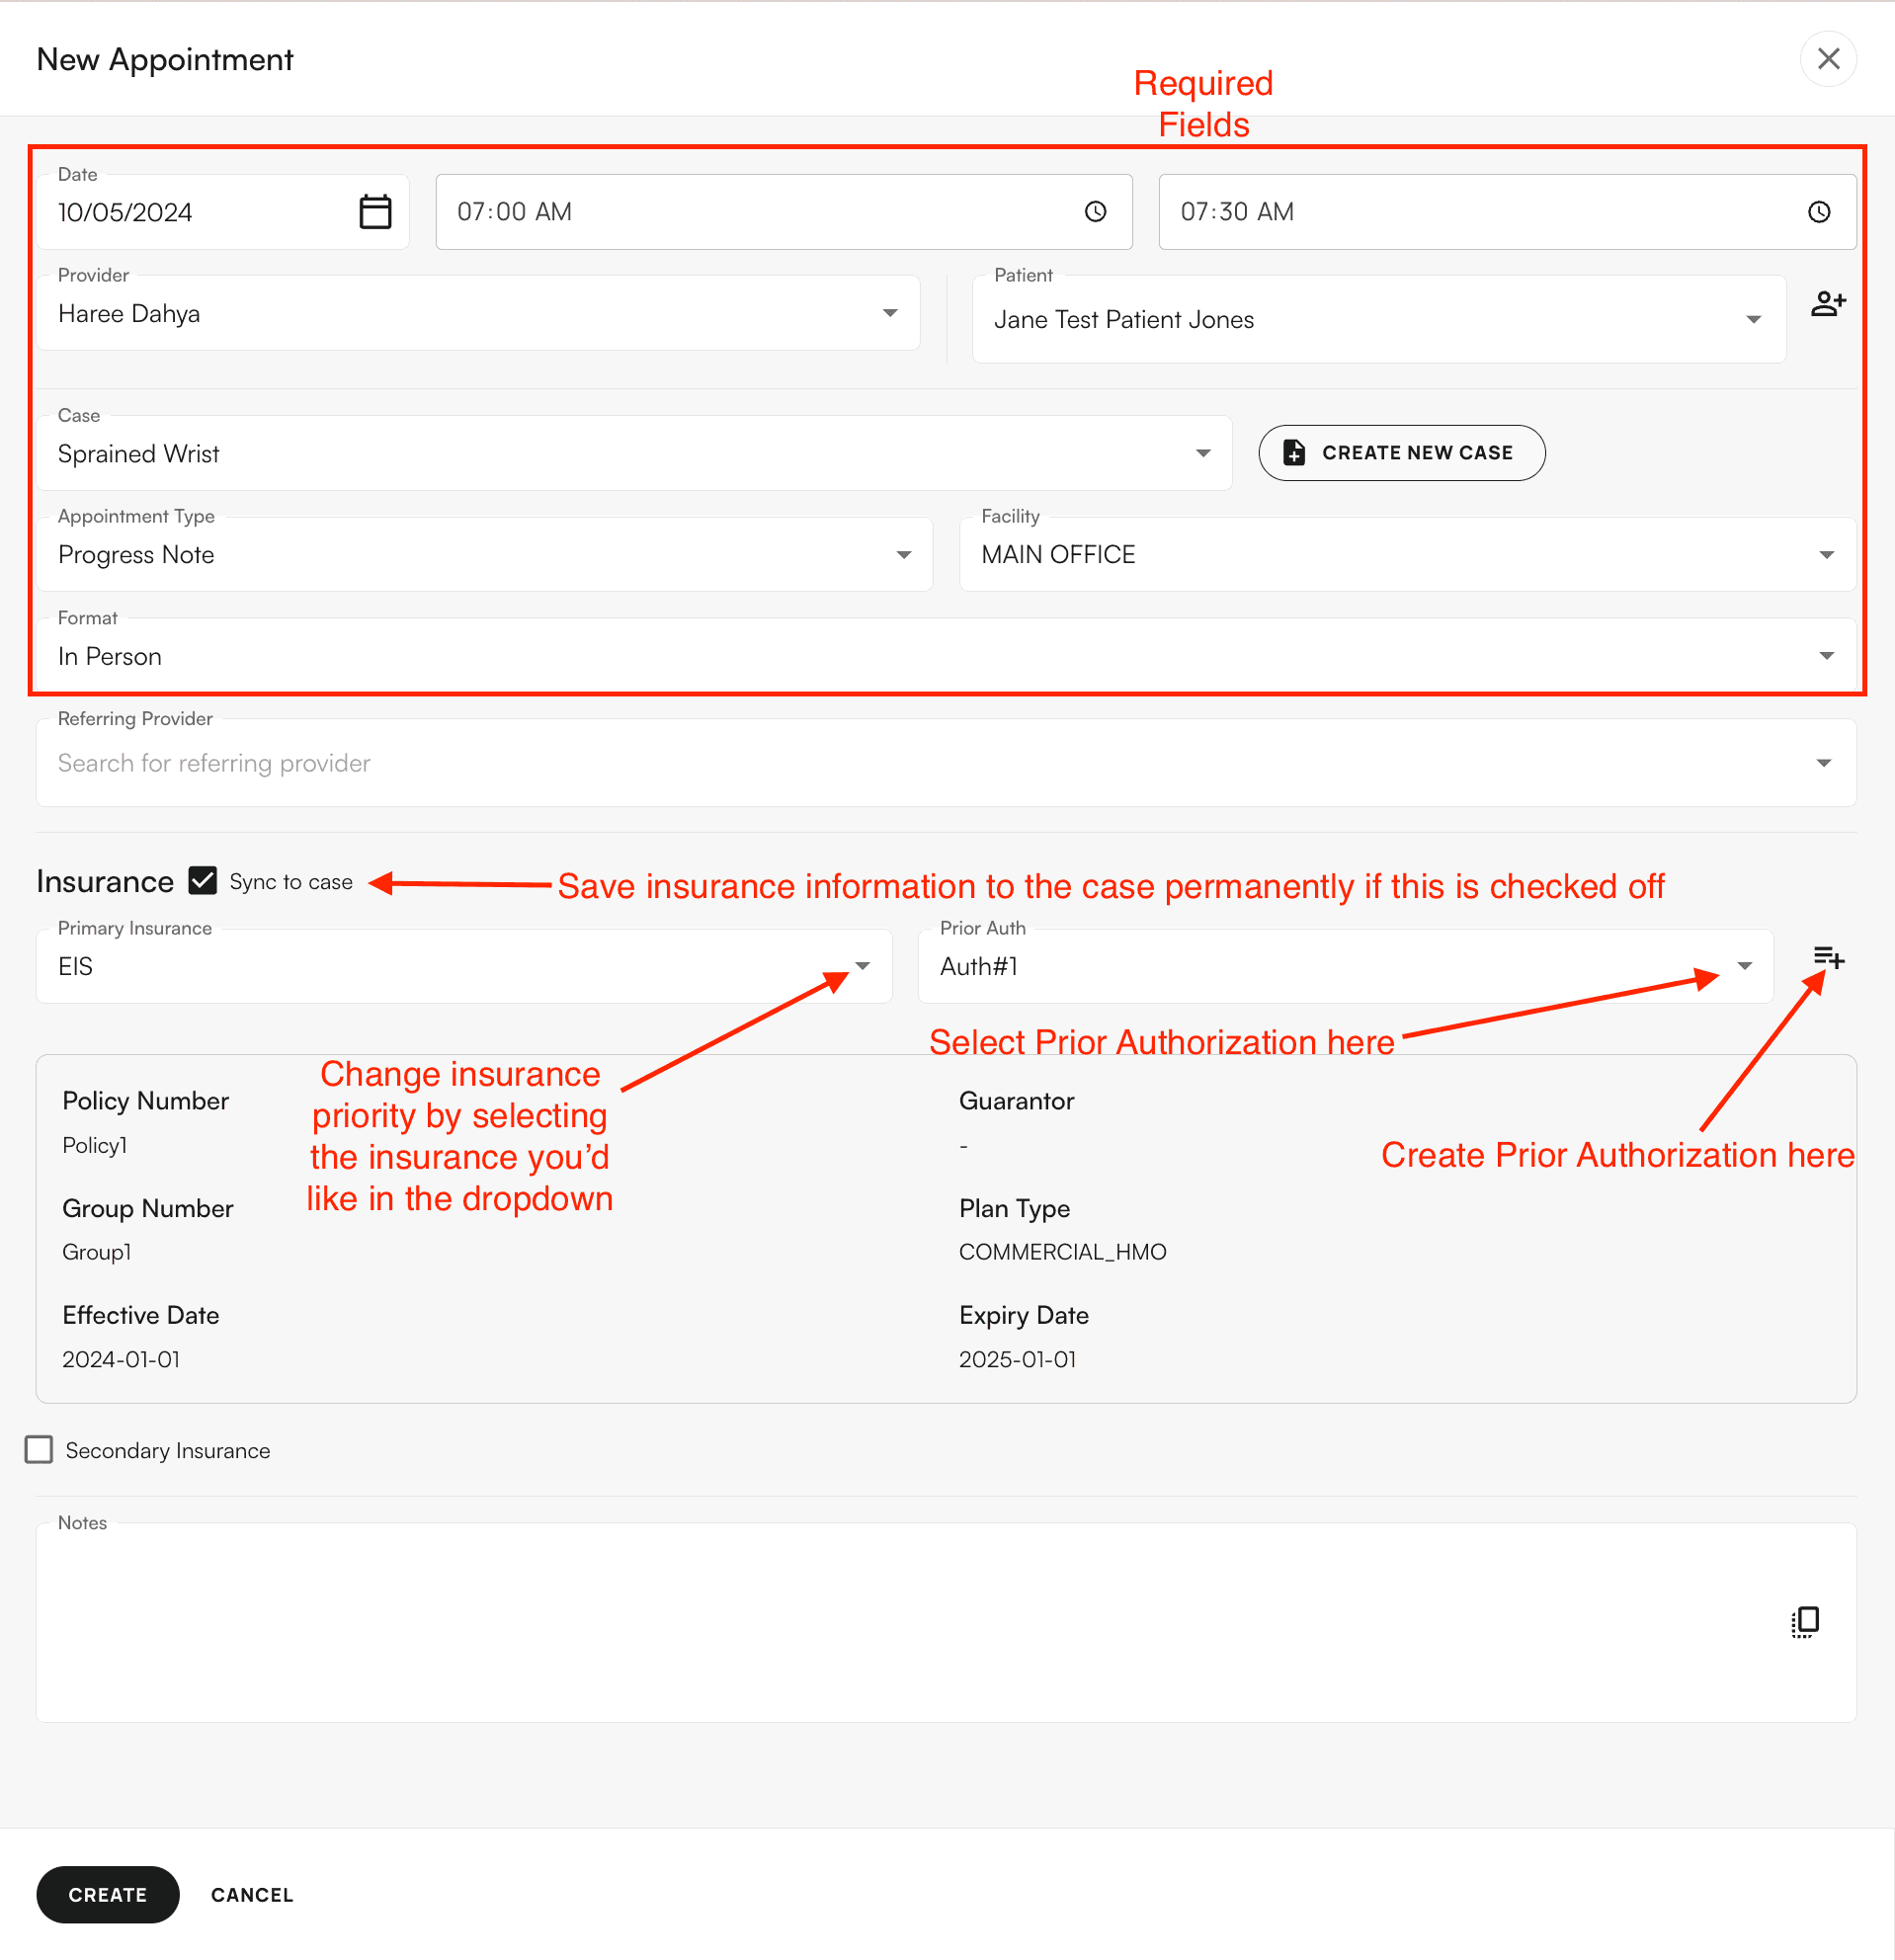 **Adding a referring provider:** The system uses the NPI registry to find and add referring providers. Type their NPI number into the search field and their information populates automatically.
 Click "Create" at the bottom of the side panel to create the appointment.
## Faxing
You can bulk fax and download PDFs from the appointments table. All completed appointments have a checkbox next to them. You can:
* Check the box at the top of the appointments table to select all
* Uncheck any appointments you don't want to download or fax
* Check individual boxes next to specific appointments you want to download or fax
Click "Create" at the bottom of the side panel to create the appointment.
## Faxing
You can bulk fax and download PDFs from the appointments table. All completed appointments have a checkbox next to them. You can:
* Check the box at the top of the appointments table to select all
* Uncheck any appointments you don't want to download or fax
* Check individual boxes next to specific appointments you want to download or fax

 ### Using the dedicated faxing page
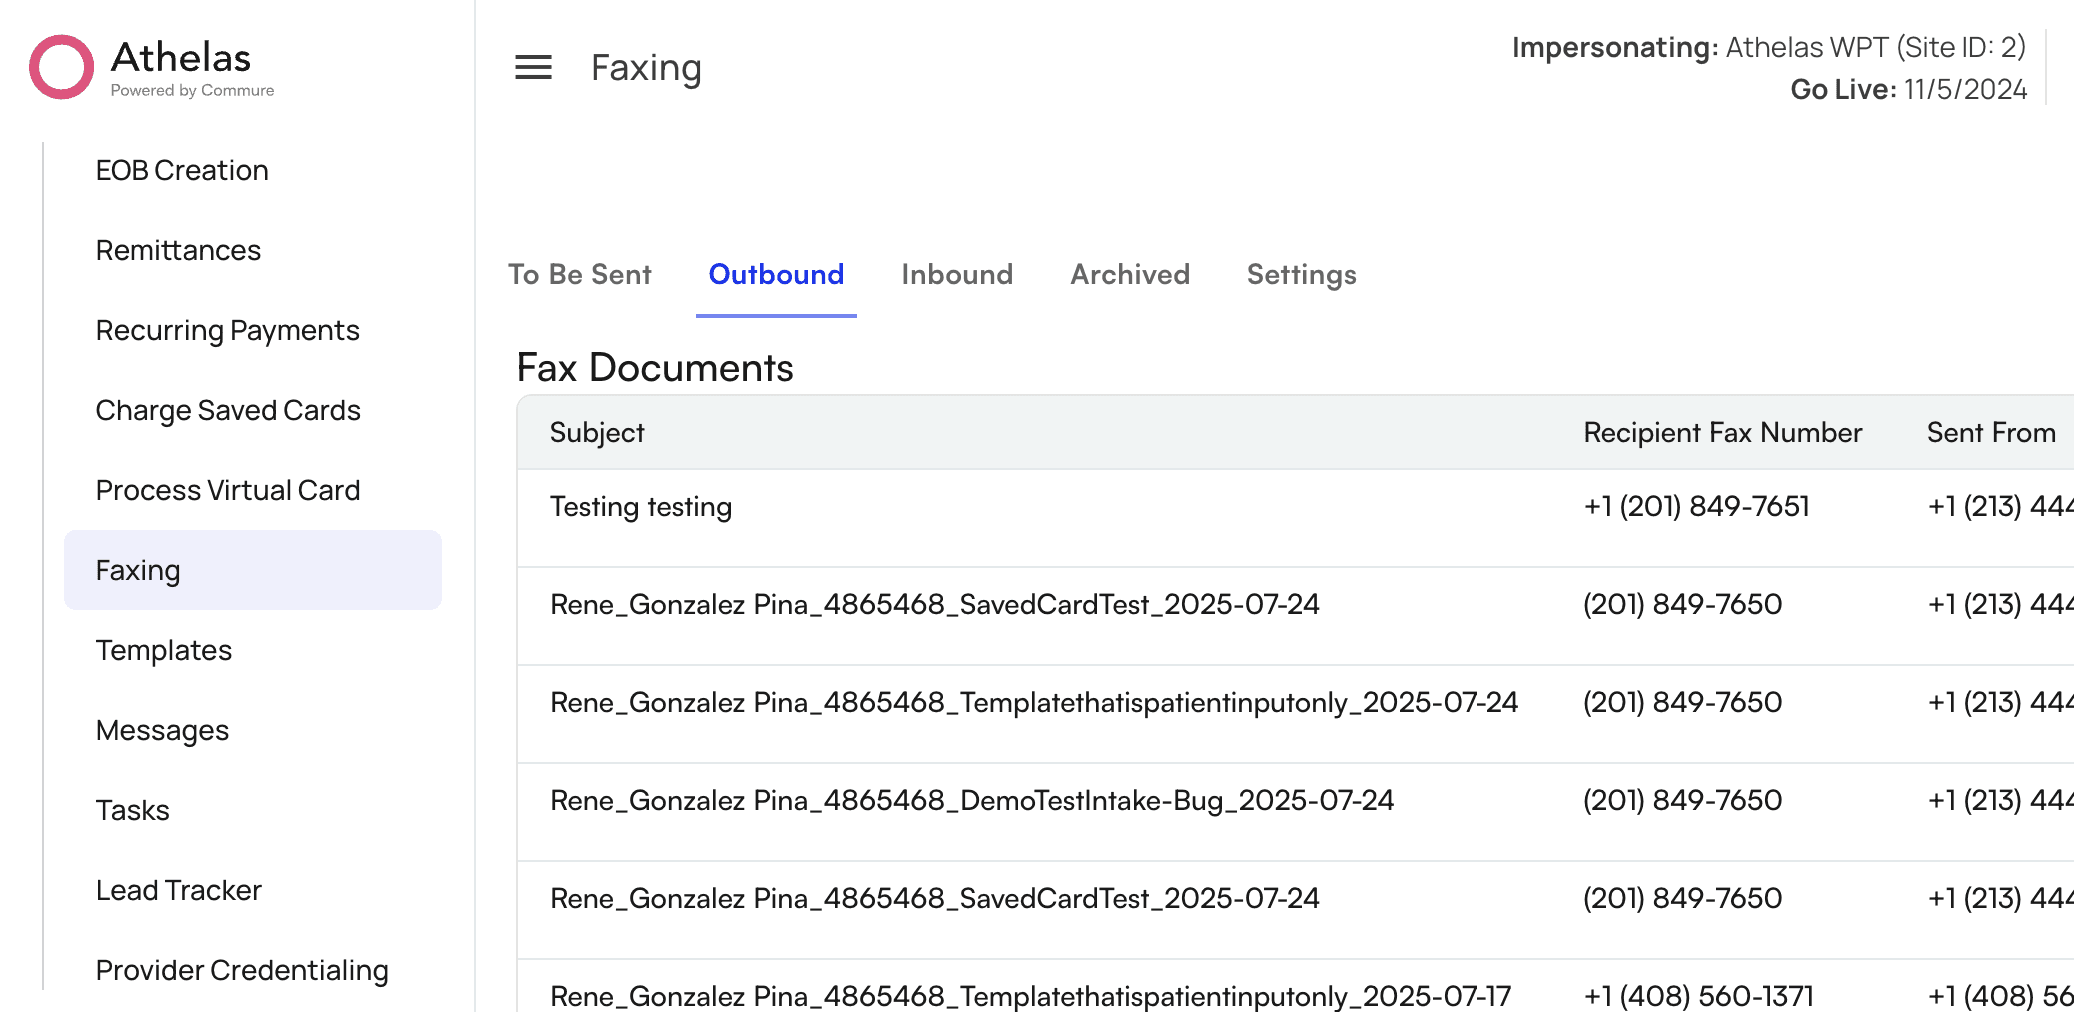
While you can fax through the patient profile, there's also a dedicated faxing page for sending and receiving faxes. To access it:
1. Click **Utilities** in the left-hand menu
2. Select the **Faxing** section
### Using the dedicated faxing page
While you can fax through the patient profile, there's also a dedicated faxing page for sending and receiving faxes. To access it:
1. Click **Utilities** in the left-hand menu
2. Select the **Faxing** section
 ### FAQ
Click the "+" button next to the insurance section to add additional insurance policies. You can add as many as needed for each patient.
You need the NPI number to search for referring providers in the system. If you don't have it, you can look it up on the [NPI Registry](https://npiregistry.cms.hhs.gov/) website before adding the referring provider.
Yes. Click on the appointment in the calendar, then click the pencil icon in the Appointment Detail side menu to edit the appointment details.
When you mark an appointment as No Show, it updates the appointment status. You can still view the appointment details and take other actions like rescheduling or adding notes.
Click the filters icon in the top right corner of the calendar, then select the providers you want to view. You can select multiple providers and facilities at once.
Intake forms automatically appear in the patient's Attachments tab. You can access this tab from the patient demographics page.
### FAQ
Click the "+" button next to the insurance section to add additional insurance policies. You can add as many as needed for each patient.
You need the NPI number to search for referring providers in the system. If you don't have it, you can look it up on the [NPI Registry](https://npiregistry.cms.hhs.gov/) website before adding the referring provider.
Yes. Click on the appointment in the calendar, then click the pencil icon in the Appointment Detail side menu to edit the appointment details.
When you mark an appointment as No Show, it updates the appointment status. You can still view the appointment details and take other actions like rescheduling or adding notes.
Click the filters icon in the top right corner of the calendar, then select the providers you want to view. You can select multiple providers and facilities at once.
Intake forms automatically appear in the patient's Attachments tab. You can access this tab from the patient demographics page.