> ## Documentation Index
> Fetch the complete documentation index at: https://docs.athelas.com/llms.txt
> Use this file to discover all available pages before exploring further.
# Organizing Your Claims Worklist
### At a Glance
The Claims Page can hold thousands of claims at once, so the difference between a slow day and a productive one is how well you organize the list. This guide covers the tools that turn the full claim list into a focused, prioritized worklist: **default views**, **grouping**, **display settings**, **selection**, and **date filters**.
For the basics of filtering and saving your own views, see [Getting Started with the Claims Page](/insights_biller/claim_details/claim_details_page). To act on many claims at once from a group, see the bulk actions in [How to Resubmit Claims in Bulk](/insights_biller/claim_details/how_to_resubmit_claims_in_bulk).
## Start from a Default View
Every user starts with three built-in views on the left side of the Claims Page. They are a good starting point before you build your own.
| **View** | **What it shows** |
| :------------------ | :----------------------------------------------------------------------------------------------------- |
| **All Claims** | Every claim, with no filters applied. |
| **Workable Claims** | Claims that are your site's responsibility, sit in an actionable work queue, and are **not** deferred. |
| **My Claims** | Workable claims that are assigned to you. |
✨**Smart Tip:** Start your day in **My Claims** to see only the work assigned to you, then switch to **Workable Claims** when you're ready to pull more.
Your own saved views appear alongside the defaults. Views are stored per user and **follow you across sessions, devices, and sites** — set one up once and it's there tomorrow, no matter where you log in.
## Grouping Claims
Grouping breaks a long, flat list into collapsible buckets so you can see the shape of your work and attack it in order.
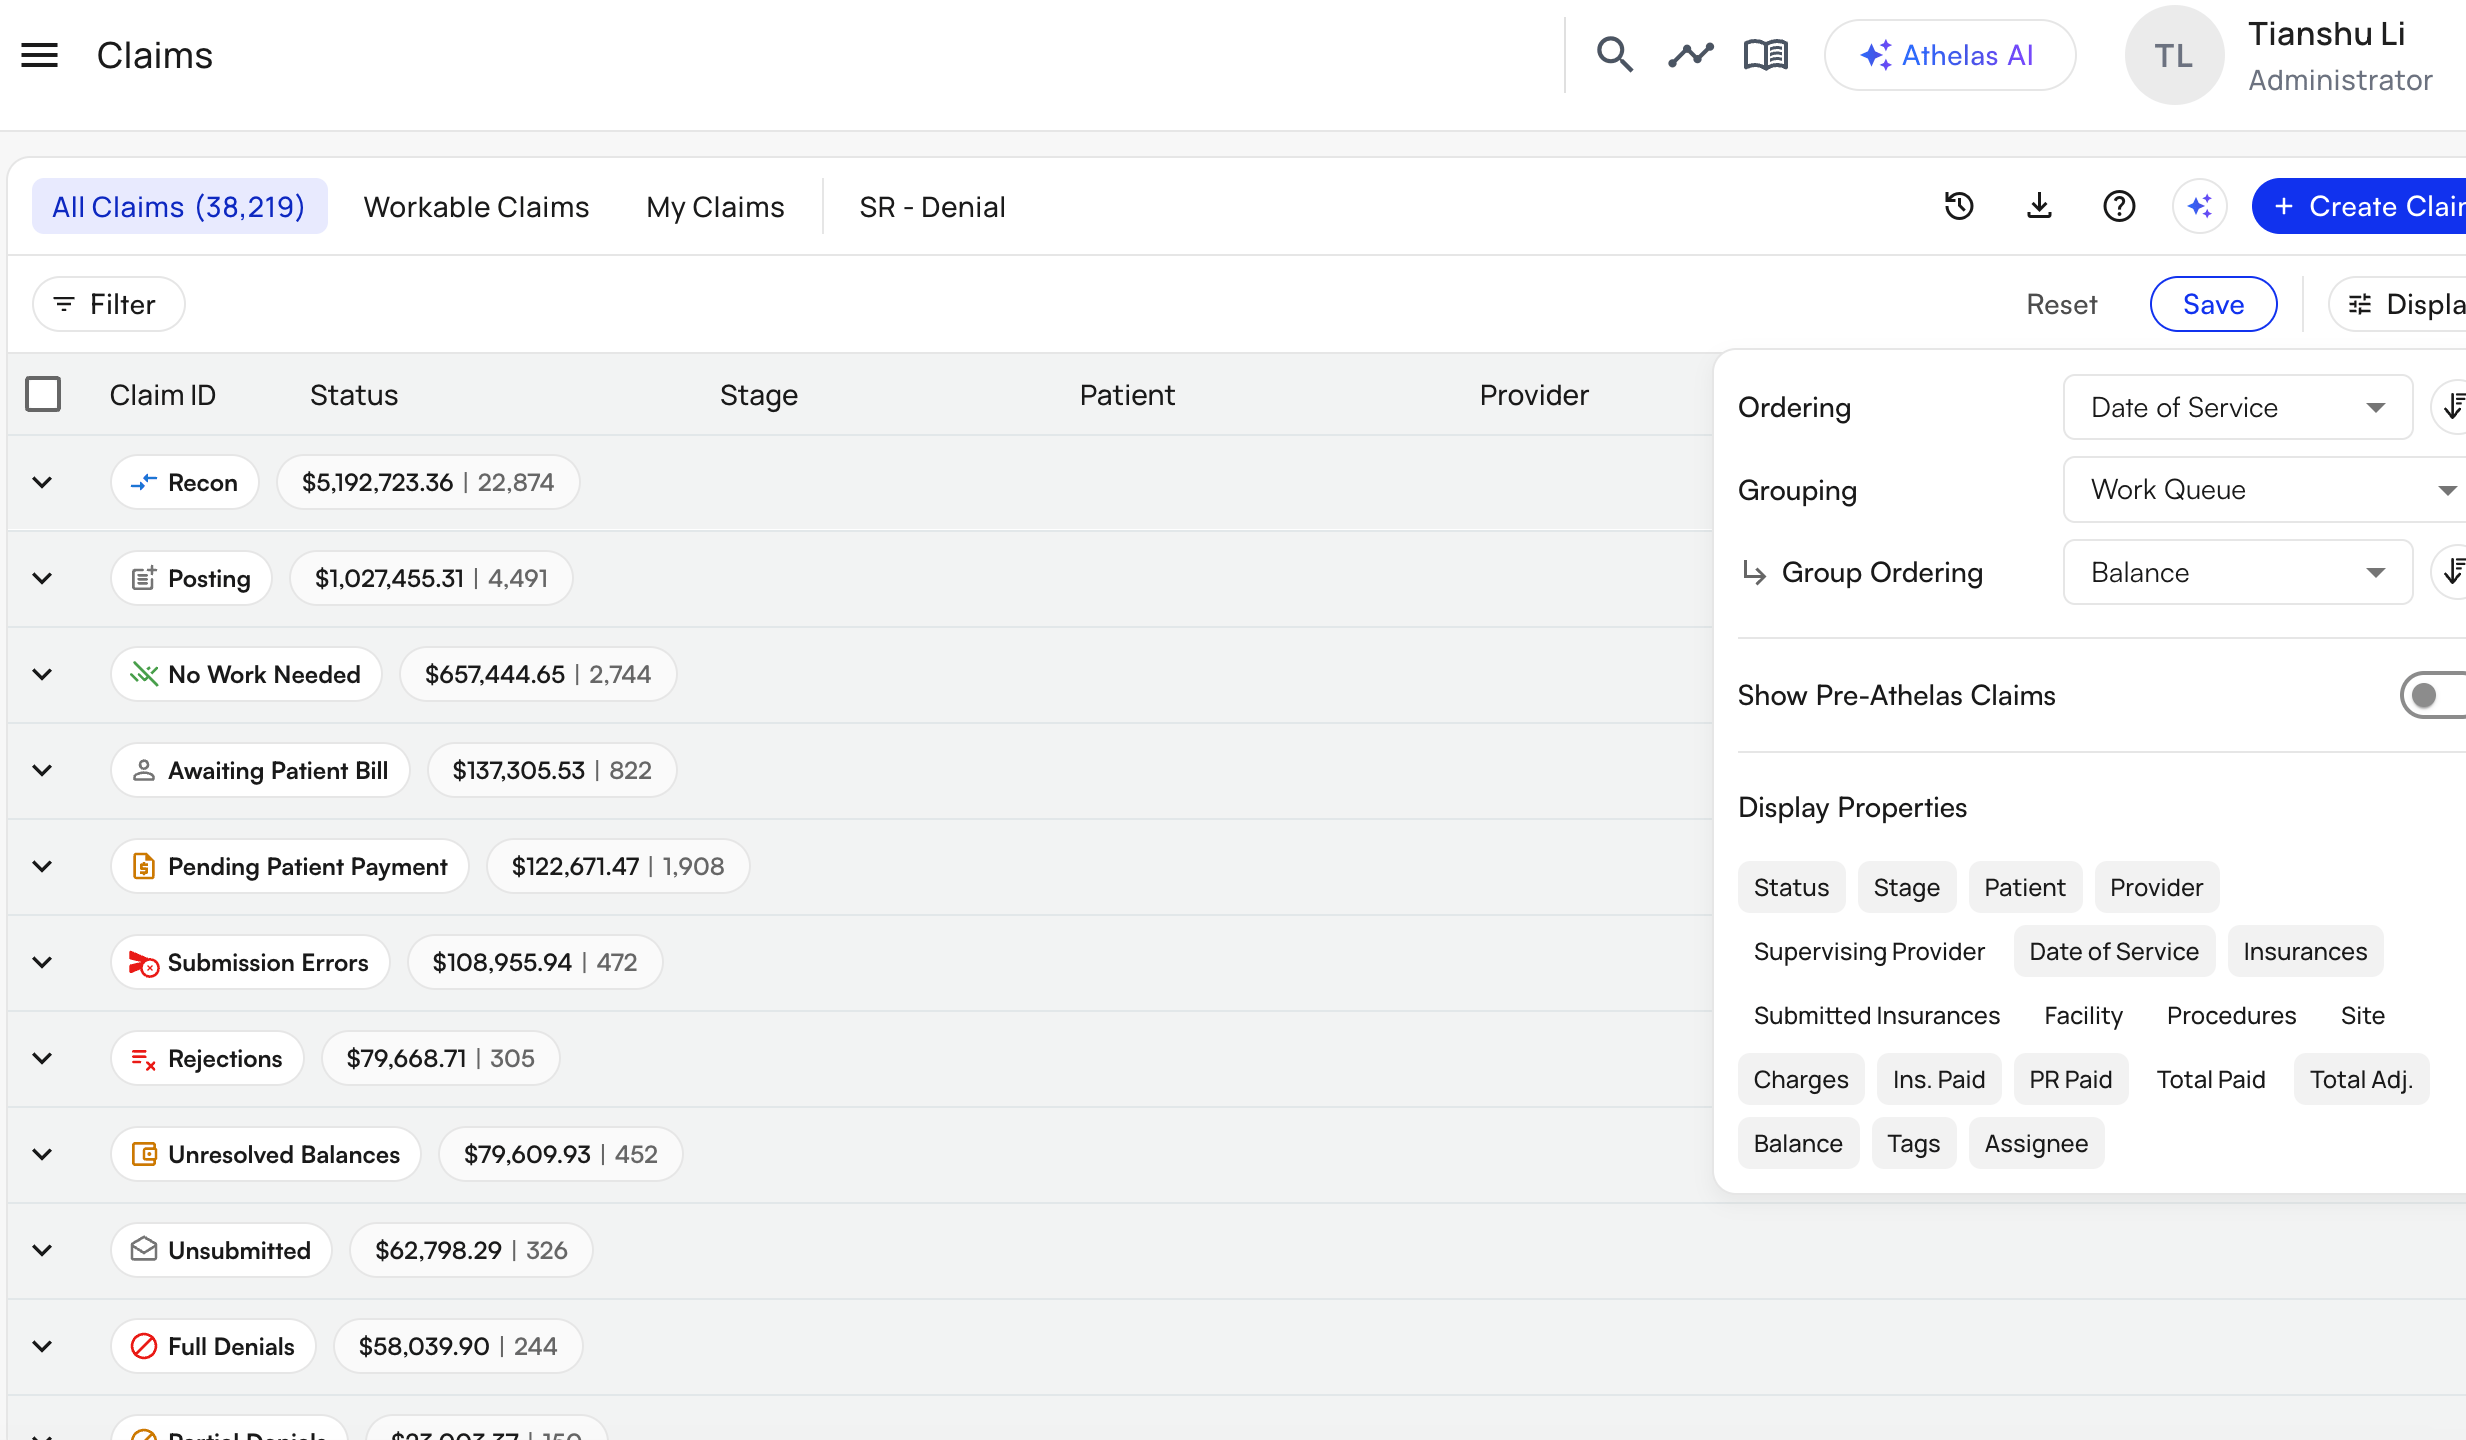 You can group by **work queue**, **reason**, **site**, and other fields. Within a grouped list you can:
* **Order groups by count or balance** — sort by balance to work the biggest-dollar buckets first.
* **Collapse a group** — right-click a group header to collapse all groups and scan the buckets at a glance.
**Group by Reason** is the most powerful option for daily work. It merges submission errors, rejections, and denials into a single prioritized worklist, with each reason broken out into its own bucket — so you no longer bounce between separate lists.
You can group by **work queue**, **reason**, **site**, and other fields. Within a grouped list you can:
* **Order groups by count or balance** — sort by balance to work the biggest-dollar buckets first.
* **Collapse a group** — right-click a group header to collapse all groups and scan the buckets at a glance.
**Group by Reason** is the most powerful option for daily work. It merges submission errors, rejections, and denials into a single prioritized worklist, with each reason broken out into its own bucket — so you no longer bounce between separate lists.
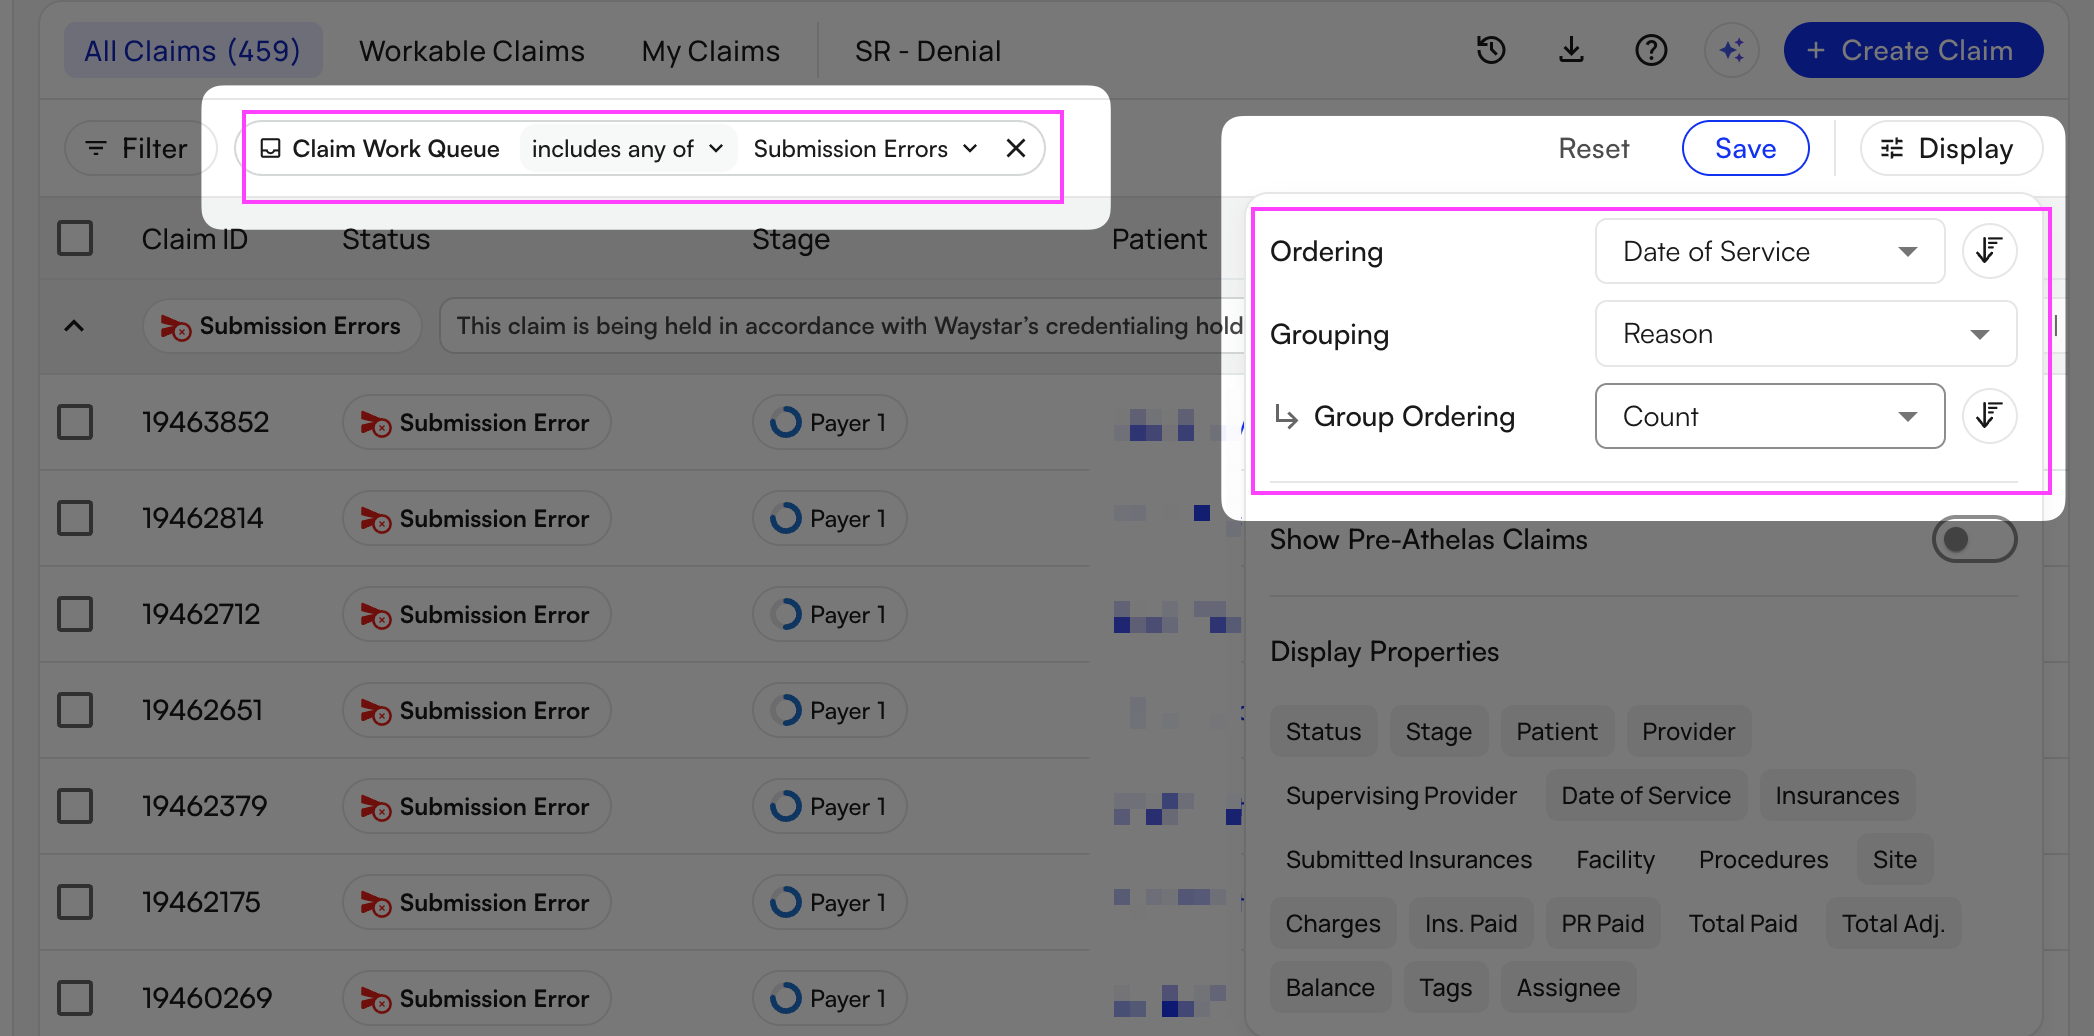 ✨**Smart Tip:** A common team setup — **managers** group **all claims by work queue** and order by balance to see the full revenue funnel; **individual billers** filter to one work queue, **group by reason**, order by count or balance, and save that as a view so they always work the highest-leverage bucket first.
### Acting on a Whole Group
Once a bucket is worth a repeatable action, you can act on the whole group at once:
1. **Right-click** the empty space in the group and choose **Select all in the group**.
2. Open **More Actions** at the bottom of the screen.
3. Choose the action — for example, update insurance, submit, or edit prior authorization — to apply it to every selected claim.
✨**Smart Tip:** A common team setup — **managers** group **all claims by work queue** and order by balance to see the full revenue funnel; **individual billers** filter to one work queue, **group by reason**, order by count or balance, and save that as a view so they always work the highest-leverage bucket first.
### Acting on a Whole Group
Once a bucket is worth a repeatable action, you can act on the whole group at once:
1. **Right-click** the empty space in the group and choose **Select all in the group**.
2. Open **More Actions** at the bottom of the screen.
3. Choose the action — for example, update insurance, submit, or edit prior authorization — to apply it to every selected claim.
 ## Choosing Which Columns to Show
Use the **Display** button to control which columns appear in the table. Several useful columns are hidden by default, including:
* **Site** — visible in both the table and the individual claim view, which helps when you work out of a parent site across multiple child sites.
* **Supervising provider**
* **Submitted insurance**
Turn on the **Show Pre-Athelas Claims** toggle (off by default) to include historical claims from before your practice's go-live date.
## Selecting Claims
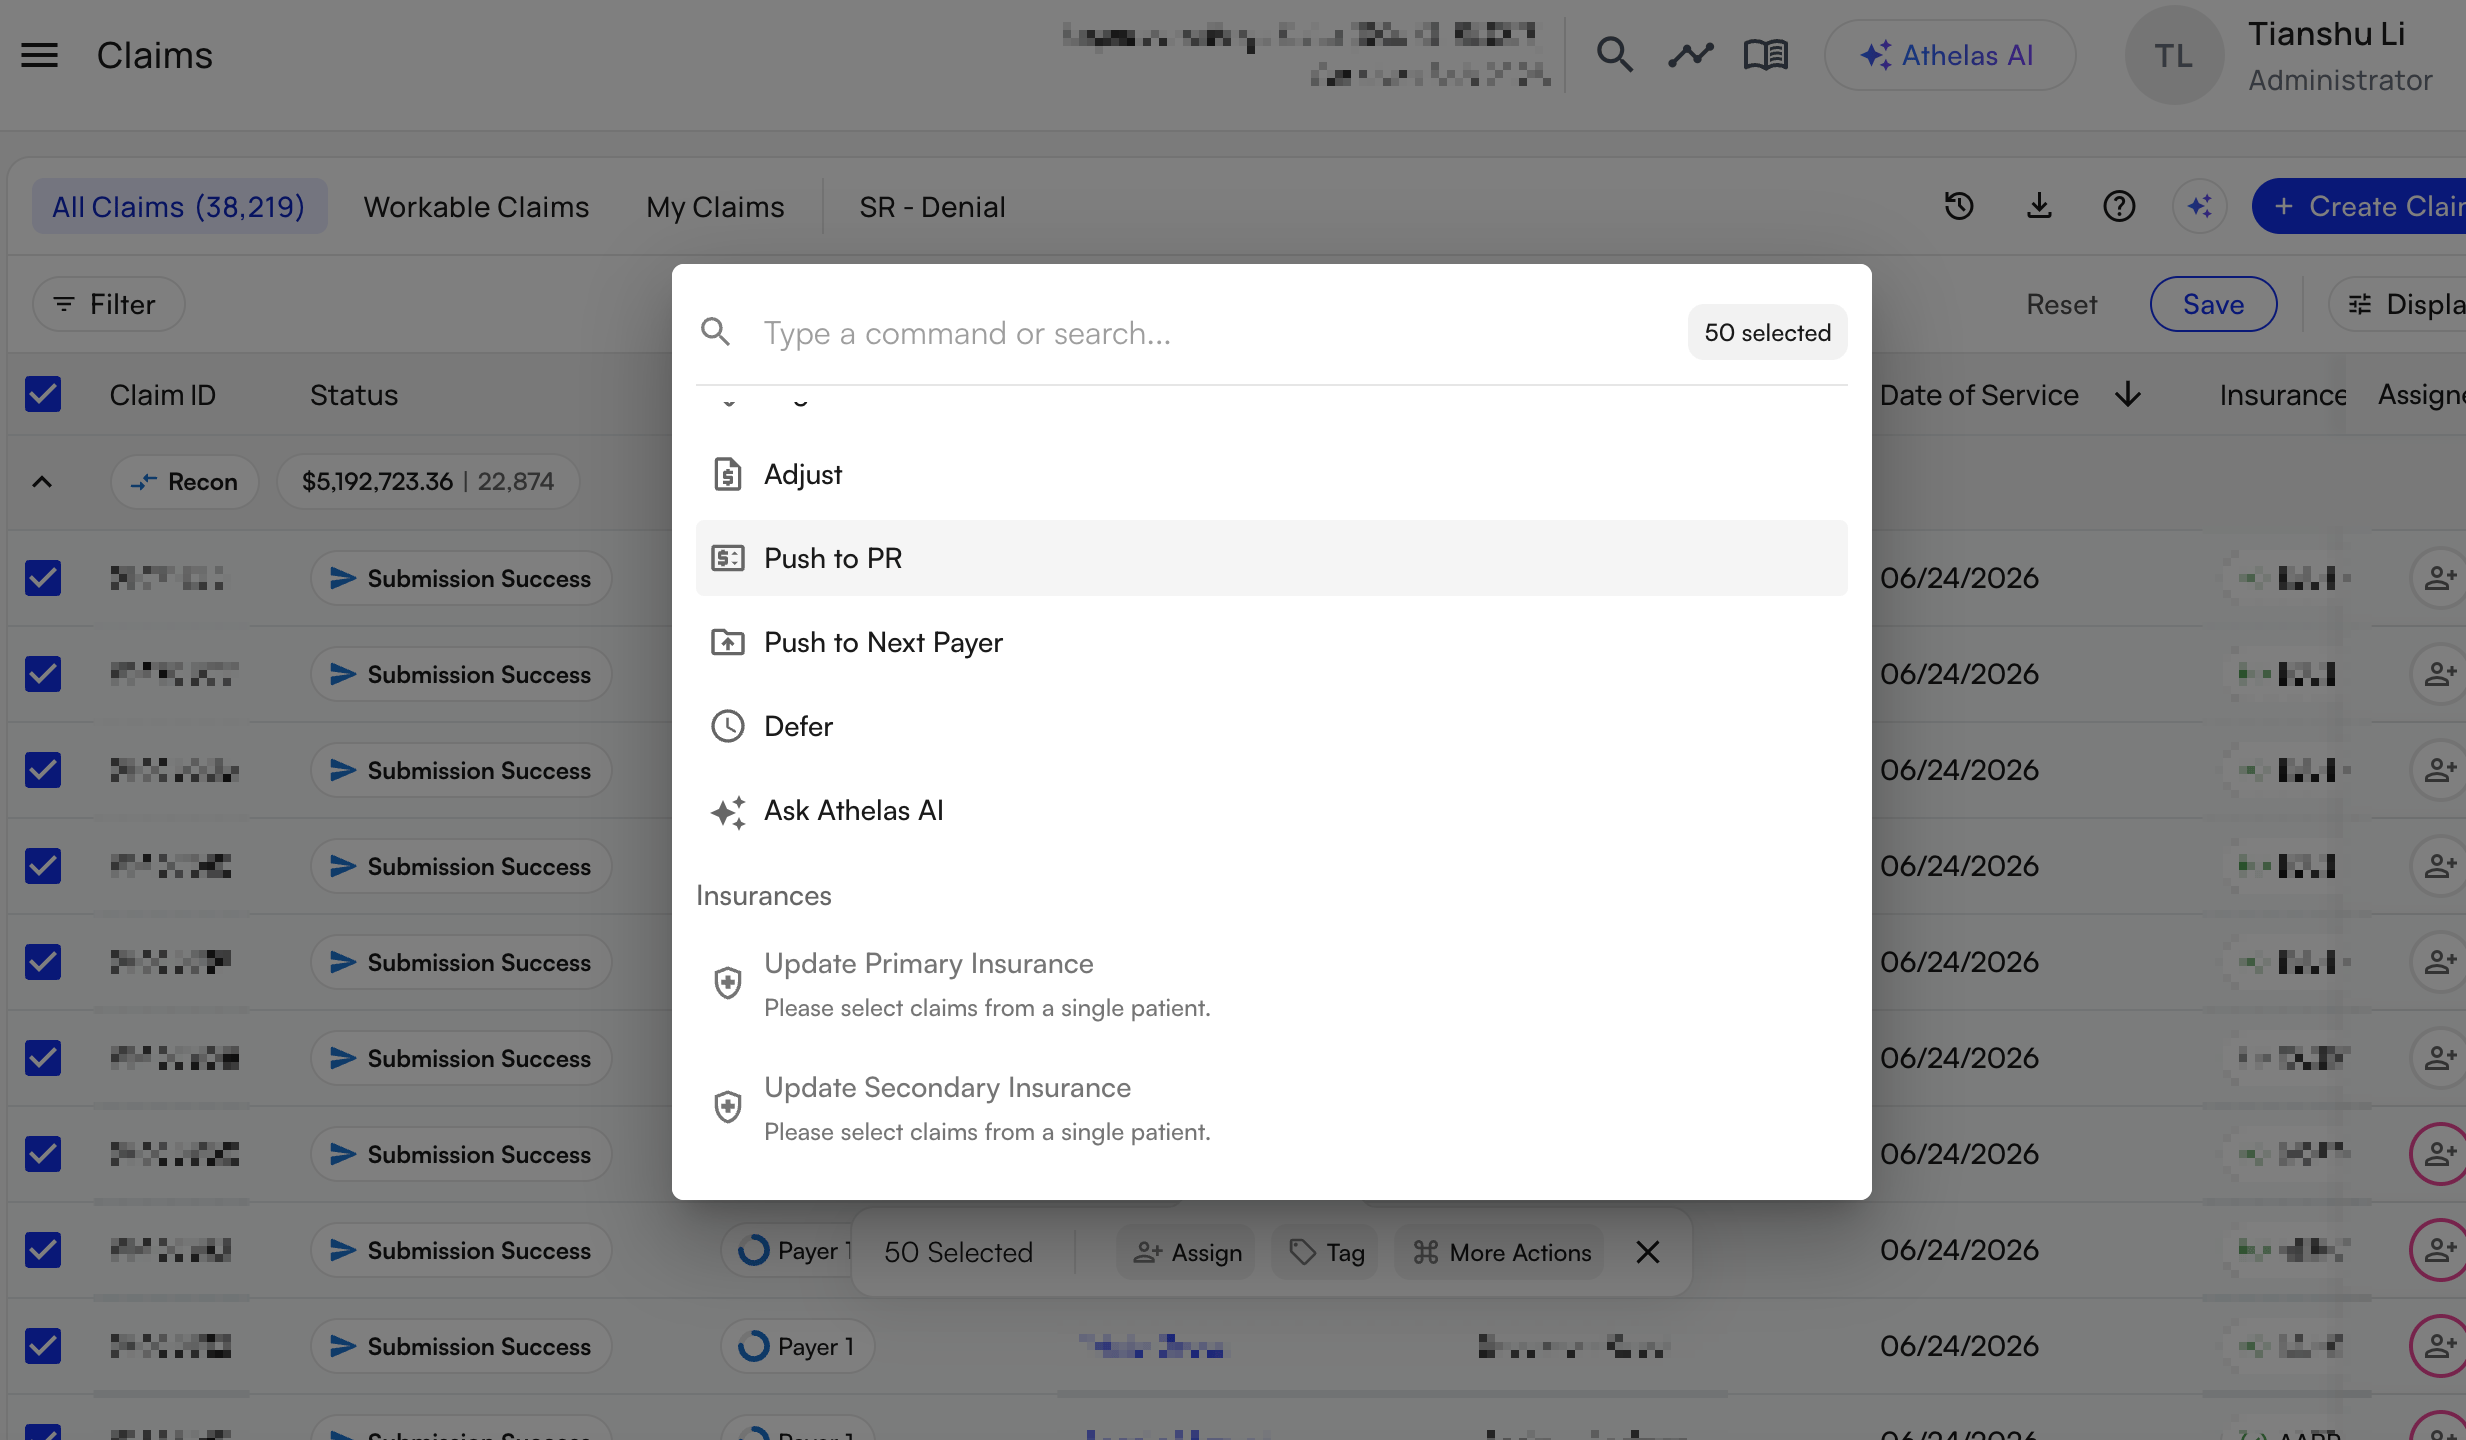
You can select up to **50 claims at a time** — a deliberate performance limit so the page stays fast, even on lower-powered machines.
To work a larger bucket, scroll down to load more rows first, then select. Each time you re-select, the page grabs everything currently loaded — so scroll to the bottom of a group, then select all to capture it in one pass.
## Filtering by Submission and Remittance Dates
When your list of claims and remittances grows into the thousands, date filters are the fastest way to zero in on a specific window. Open the filter panel to find four date filters: **Submission before**, **Submission after**, **Remittance before**, and **Remittance after**.
## Choosing Which Columns to Show
Use the **Display** button to control which columns appear in the table. Several useful columns are hidden by default, including:
* **Site** — visible in both the table and the individual claim view, which helps when you work out of a parent site across multiple child sites.
* **Supervising provider**
* **Submitted insurance**
Turn on the **Show Pre-Athelas Claims** toggle (off by default) to include historical claims from before your practice's go-live date.
## Selecting Claims
You can select up to **50 claims at a time** — a deliberate performance limit so the page stays fast, even on lower-powered machines.
To work a larger bucket, scroll down to load more rows first, then select. Each time you re-select, the page grabs everything currently loaded — so scroll to the bottom of a group, then select all to capture it in one pass.
## Filtering by Submission and Remittance Dates
When your list of claims and remittances grows into the thousands, date filters are the fastest way to zero in on a specific window. Open the filter panel to find four date filters: **Submission before**, **Submission after**, **Remittance before**, and **Remittance after**.
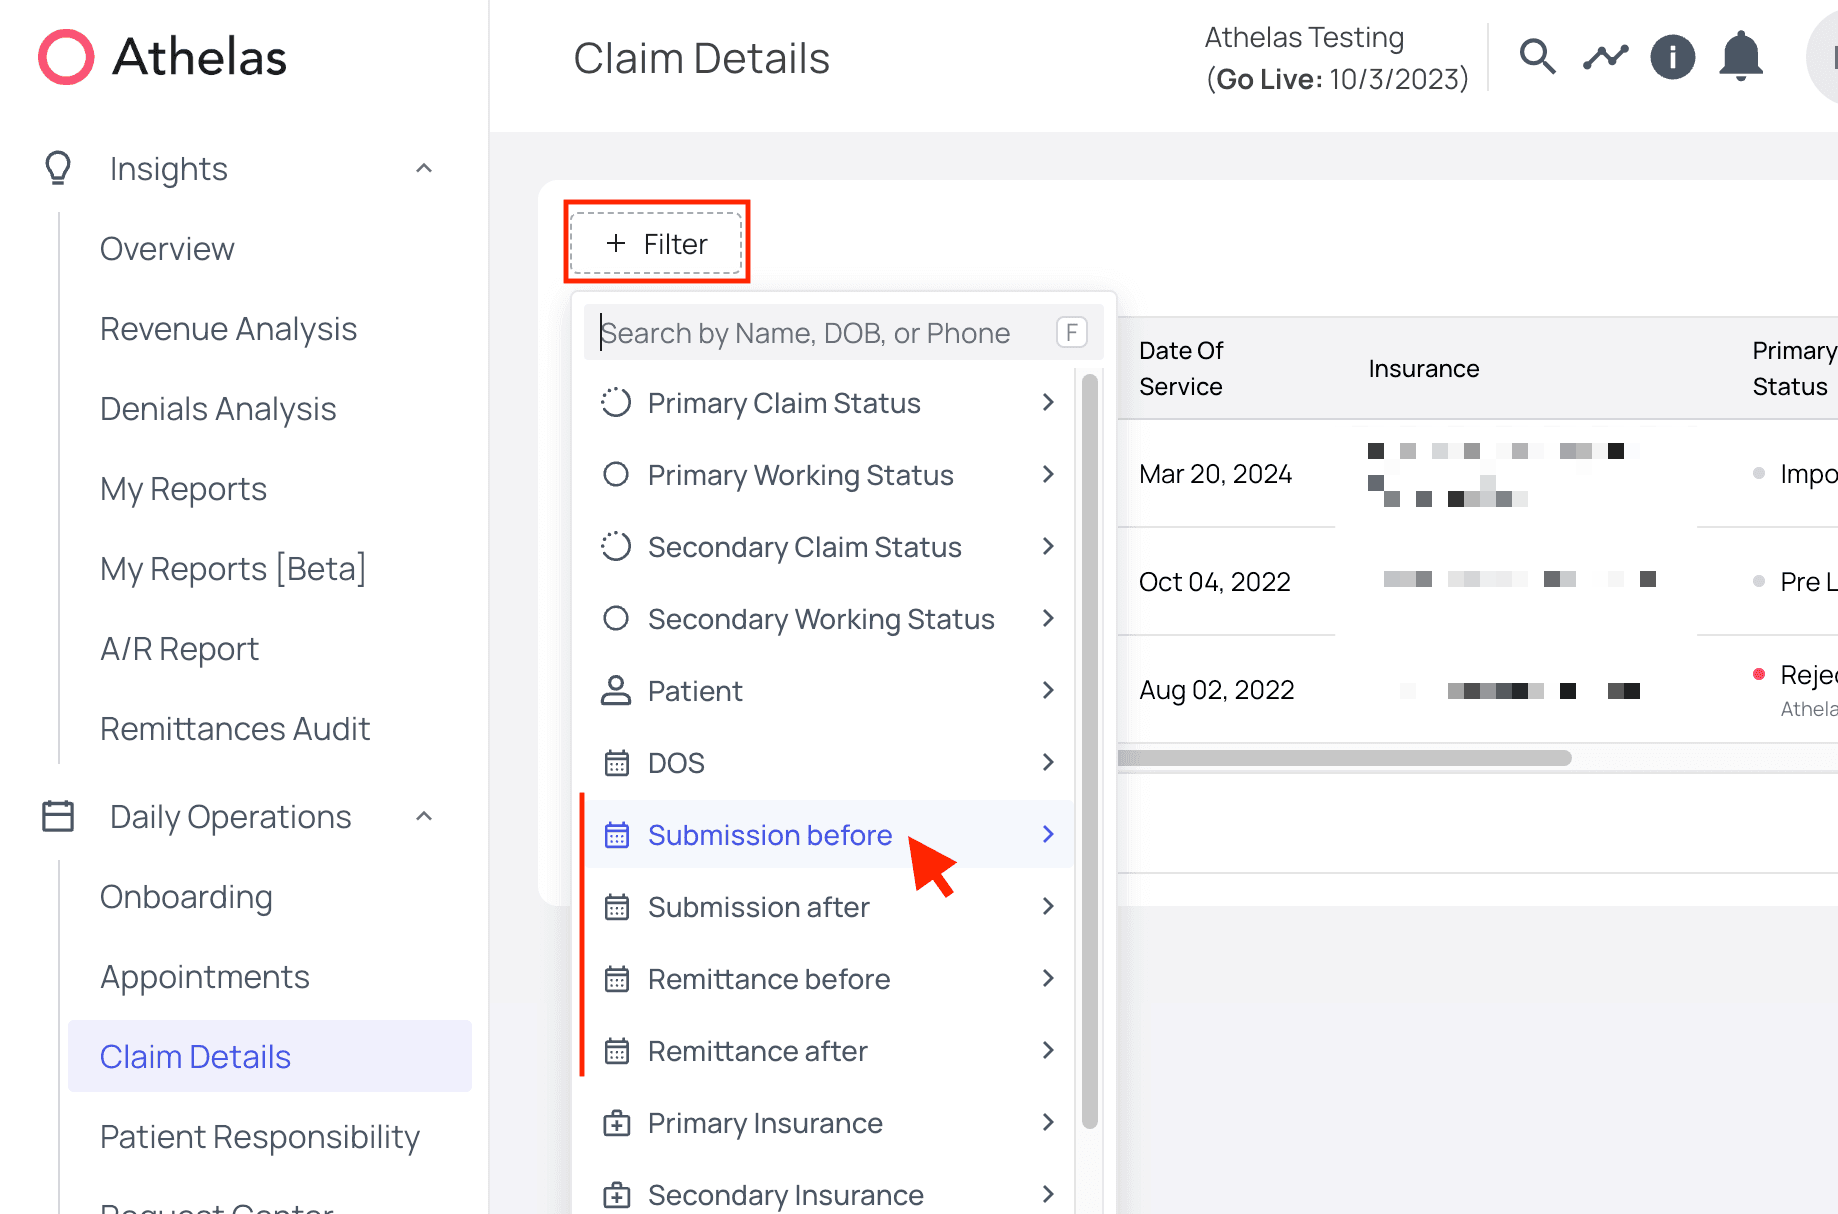 The process is the same for all four. For example, click **Submission before** and pick a date.
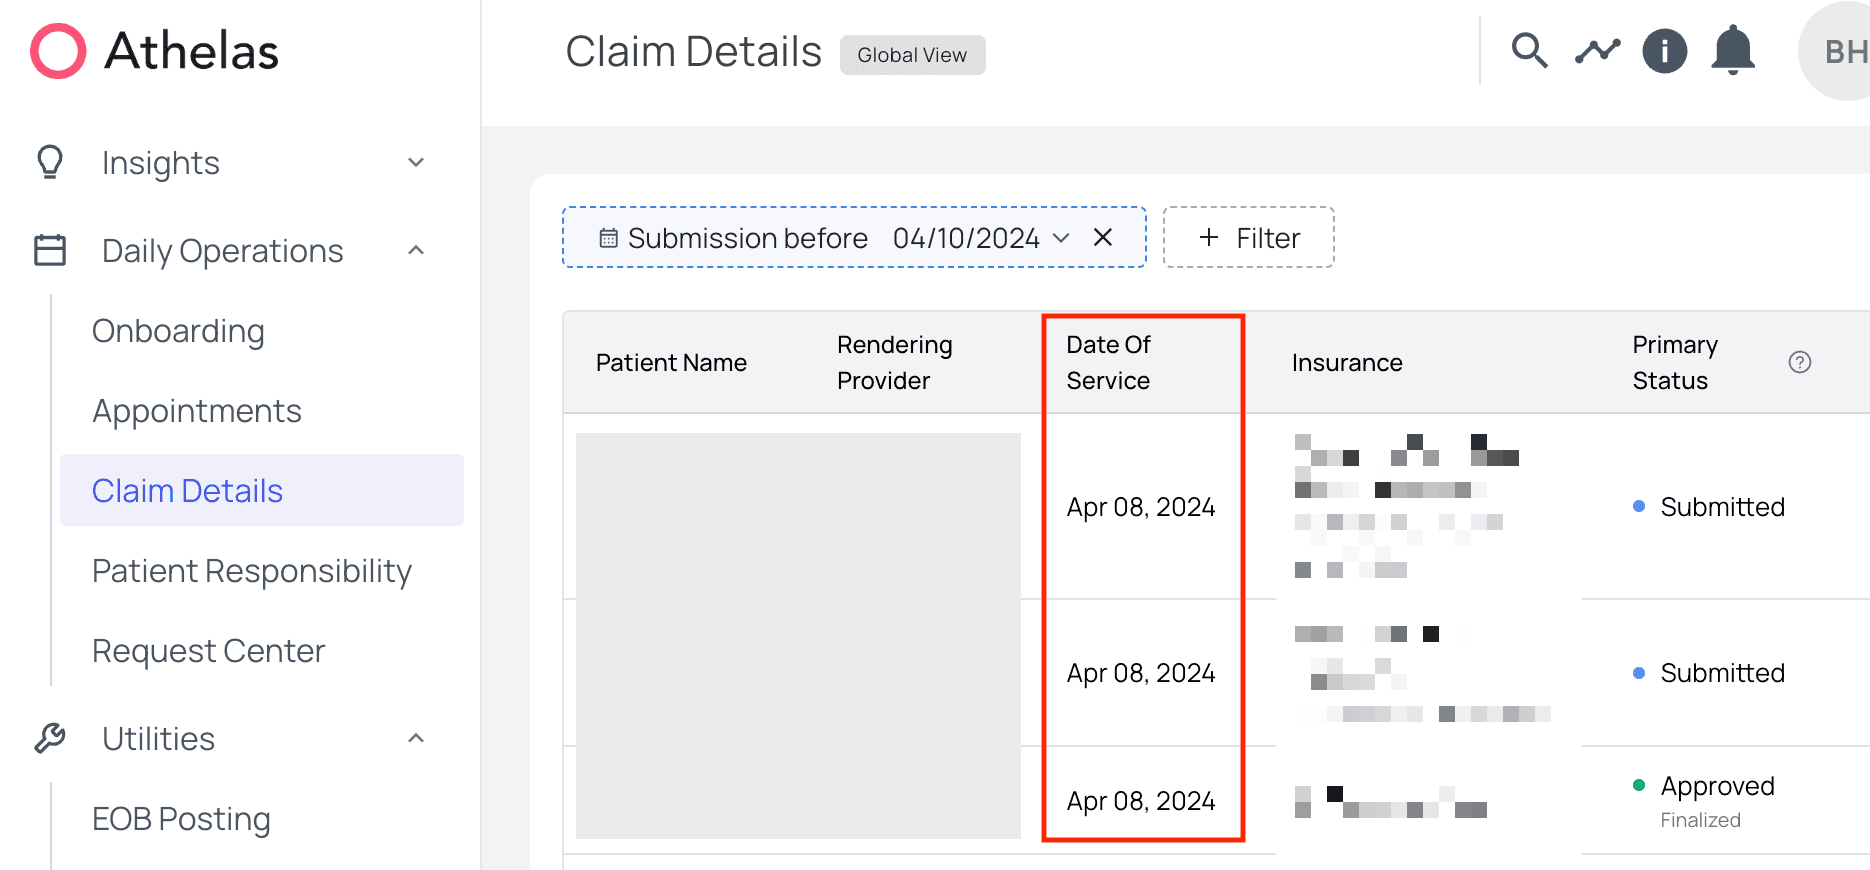
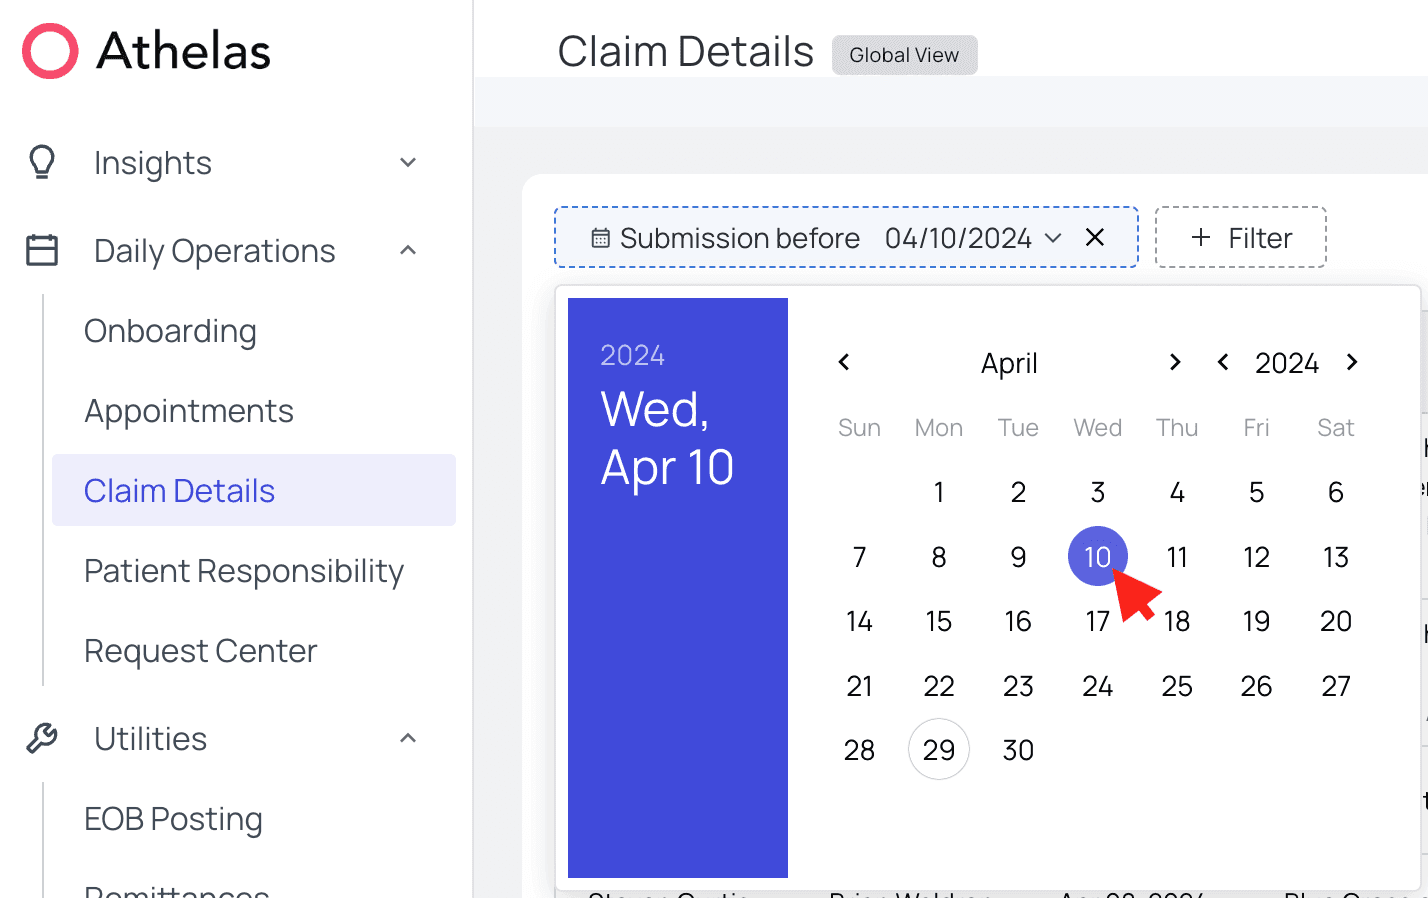 The list updates to show every claim submitted before your chosen date, starting with the submission closest to that date. Filtering by **Submission after** instead begins the list with the most recent submission.
 ✨**Smart Tip:** Combine a date filter with **Group by Reason** and save it as a view — for example, "Denials, last 30 days" — to build a repeatable, time-boxed worklist.