> ## Documentation Index
> Fetch the complete documentation index at: https://docs.athelas.com/llms.txt
> Use this file to discover all available pages before exploring further.
# Getting Started with the Claims Page
### **Getting Started with the Claims Page**
The Claims Page is where you manage your billing workflow in Insights. It centralizes claim review, validation, assignment, and submission in one interface, helping you process claims faster and catch errors before they become rejections.
We're transitioning from "encounters" to "claims" terminology to better match industry standards—the underlying data remains the same.
## **What is the Claims Page?**
The Claims Page gives you a unified view of all claims requiring review or action. You can filter claims by status, insurance, or age, assign work to team members, review AI validation flags, and submit claims—all without switching between tools.
**Key capabilities:**
* **Filter and save views** to focus on specific claim types, providers, or deadlines
* **Assign claims** individually or in bulk to balance team workload
* **Review AI validation** that flags errors and suggests corrections before submission
* **Collaborate with your team** through comments and activity tracking
* **Submit with the correct form** — Claims automatically generate in the appropriate format (CMS-1500, UB-04, or ADA) based on the selected payer(s)
* **Export claims as CSV** — download all claims in the current view, including a Facility column, for offline analysis or reporting
* **Duplicate views** — right-click any saved view to copy it as a starting point for a new one
## **Getting Started**
### **Accessing the Claims Page**
Log in to Insights at **[insights.athelas.com](https://insights.athelas.com/)** and navigate to **Claims** from the Daily Operations tab. The page opens with your most recent view, or a default table showing all active claims.
Press **Ctrl-K** (Windows) or **Command-K** (Mac) anywhere in Insights to quickly search for specific claims, patients, or navigate to different pages.
When you first access the page, a guided tour will walk you through the key areas of the Claims Page automatically. After the tour, you’ll see a table of claims with columns for patient name, date of service, insurance, claim amount, status, and assigned team member. Click any claim to open the detail view.
## **Working with Claims**
### **Organizing Your Workflow with Filters**
The filter bar at the top of the table lets you narrow your view by any combination of attributes: claim status, insurance provider, claim amount, age, assigned team member, provider, date range, Submission ID, Insurance Billing Type (Workers’ Comp, Auto, or Commercial), and CARC/RARC denial reason codes.
Press `F` to open the filter panel instantly without reaching for your mouse.
**Creating custom views:**
1. Apply filters that match your workflow (e.g., filter for claims older than 85 days with status “Ready to Submit”)
2. Sort by the column that matters most (typically date of service for timely filing)
3. Click **Save View** and name it (e.g., “In Progress”)
4. Click **Save** one more time and the view will appear in the view dropdown
Right-click any existing saved view and select **Duplicate** to create a new view pre-loaded with that view’s filters — a fast way to build variations without starting from scratch.
**Custom views are personal by default**, meaning your saved views won't be seen by anyone else.
### **Assigning Claims to Your Team**
Claims work best when someone owns them. Use assignment to designate responsibility and prevent duplicate effort.
**To assign claims:**
* **Single claim:** Click the claim row, then select a team member from the **Assigned To** dropdown in the detail view
* **Bulk assignment:** Select multiple claims using checkboxes, then click **Bulk Actions > Assign** and choose the team member
Managers can filter by assigned team member to view individual workloads and redistribute claims when needed. You can also filter to show only unassigned claims for easy morning triage.
### **Reviewing Claims with AI Validation**
When you open a claim, Athelas AI automatically scans for common submission errors: missing modifiers, incorrect diagnosis codes, invalid addresses, and clearinghouse rule violations.
**How validation appears:**
Issues are flagged directly on the relevant fields with a red indicator. Click any flagged field to see the specific problem and recommended fix.
When you preview the submission, you'll see a sparkles icon (✨) next to fields that were automatically adjusted by billing rules to meet payer requirements (e.g., changing Place of Service code from 11→12).
### **Collaborating Through Comments**
The activity feed at the bottom of the claim shows all team member comments, and also files attached to the comments.
**Using comments effectively:**
* Leave context for the next person who reviews the claim
* Use @mentions to notify specific team members (e.g., “@Sarah can you verify this diagnosis code?”)
* Check the feed before working on a claim to see if someone already identified issues
Comments persist across sessions, so your team maintains context even when claims change hands.
### **Using Athelas Assistant**
Athelas Assistant is your AI-powered copilot inside every claim. Open it by clicking the **Athelas AI** button in the top navigation bar while viewing a claim. It understands the context of the claim you’re working on and can take action on your behalf.
**What Athelas Assistant can do on a claim:**
* **Submit or resubmit a claim** — ask it to submit the current claim or trigger a resubmission after corrections
* **Fetch the financial summary** — get a quick breakdown of charges, payments, and outstanding balances for the claim
* **Update patient and claim information** — edit demographics, insurance, or claim fields without leaving the Assistant panel
* **Review against CCI and billing rules** — ask it to check the claim for Correct Coding Initiative (CCI) edits and billing rule violations before submission
### **Submitting Claims**
The submission detail panel lets you work with the claim data and preview the formatted output simultaneously, giving you confidence before you submit. When previewing a submission, the form type (Professional, Institutional, or Dental) is displayed in the top right corner so you can confirm the correct format at a glance.
Use the **Go to…** link on the claim edit screen to quickly jump to the related page in Claim Details, Patient Responsibility, Posting Tool, or Remittances — without losing your place.
Press `CMD` + `.` on Mac or `CTRL` + `.` on Windows to instantly copy the Claim ID to your clipboard. `CMD/CTRL` + `C` copies a direct link to the claim.
**Working with side-by-side preview:**
1. **Review the claim** in the Claim Details panel on the left - this shows all your claim data fields
2. **Click Preview Submission** to see the formatted form (CMS-1500, UB-04, or ADA) on the right
* The preview displays exactly how the claim will appear when submitted to the payer
* The submission type (Professional/Institutional/Dental) is shown in the top right of the preview panel
* Work with both views open to verify your claim data translates correctly to the final format
3. **Make changes to the claim** as needed - when you edit claim fields, the preview becomes semi-transparent and shows "Not Synced" to indicate it needs to be refreshed. This occurs because the submission hasn't run through billing rules since your last update, making the preview stale relative to the current claim state.
4. **Save your edits to the claim** to refresh the preview and see your changes reflected in the formatted submission
5. Review the Claim Details panel to confirm all fields are correct
6. Click **Preview PDF** to see the formatted CMS-1500, UB-04, or ADA form exactly as it will submit
**Editing the submission directly:**
Edits made directly to the submission will NOT go through billing rules. These edits only affect the submission output and bypass the normal billing rules engine.
After billing rules are applied, you can make final adjustments to the submission itself:
1. Click the **pencil icon** in the submission preview to edit specific fields
2. These edits only affect this submission and don't change the underlying claim data
**Working with diagnosis code pointers:**
You can drag and drop diagnosis code pointers within the Procedures table to reorder them quickly — no need to delete and re-add.
**Final submission:**
Once you’ve verified everything looks correct:
1. Review patient, insurance, diagnosis, and procedure information one final time
2. Click **Submit** when ready — if the claim has been submitted before, the button will say **Resubmit** instead
3. The claim moves to “Submitted” status and appears in your submission history
### FAQ
Review the AI validation flags in the Claim Details panel. Claims are ready to submit when:
* All required fields are filled in
* No critical validation errors are present (red indicators)
* The preview submission shows the correct format for your payer
* Patient, insurance, diagnosis, and procedure information is accurate
**Note:** You can still submit claims with warnings, but it's recommended to resolve validation issues first to avoid rejections.
When you edit the claim in the Claim Details panel, your changes go through billing rules and update the underlying claim data. This ensures consistency and proper rule application.
When you edit the submission directly (using the pencil icon in the preview), your changes bypass billing rules and only affect that specific submission output. The underlying claim data remains unchanged.
**Note:** Direct submission edits should be used sparingly for final adjustments only, as they don't go through the normal billing rules engine.
Custom views are personal by default and won't be visible to other team members. Each user can create and save their own views based on their workflow needs.
However, you can **duplicate** any of your saved views by right-clicking on it and selecting **Duplicate**. This makes it easy to share a starting point with a teammate — simply set up the view, duplicate it, and walk them through recreating it, or use it as a personal template for building variations.
Once a claim moves to "Submitted" status, you'll need to work with your billing team to make adjustments. The claim will appear in your submission history, and you may need to resubmit or make corrections depending on your practice's workflow.
Use the filter bar at the top of the table to apply multiple filters simultaneously. You can combine filters for claim status, insurance provider, claim amount, age, assigned team member, provider, date range, Submission ID, Insurance Billing Type, and CARC/RARC denial reason codes. Once you've set up your ideal filter combination, save it as a custom view for quick access later.
**Tip:** Press `F` to open the filter panel without using your mouse.
Press `CMD` + `.` on Mac or `CTRL` + `.` on Windows while viewing a claim to instantly copy the Claim ID to your clipboard. You can then paste it into any other tool, message, or search field.
Press `CMD/CTRL` + `C` to copy a direct link to the claim instead — useful for sharing with a teammate.
Open the filter panel (press `F` or click **Filter**) and select the **CARC** or **RARC** filter. Enter the specific denial reason code you want to focus on, and the table will update to show only claims with that code.
This is especially useful for identifying denial patterns and prioritizing which denial types to work first.
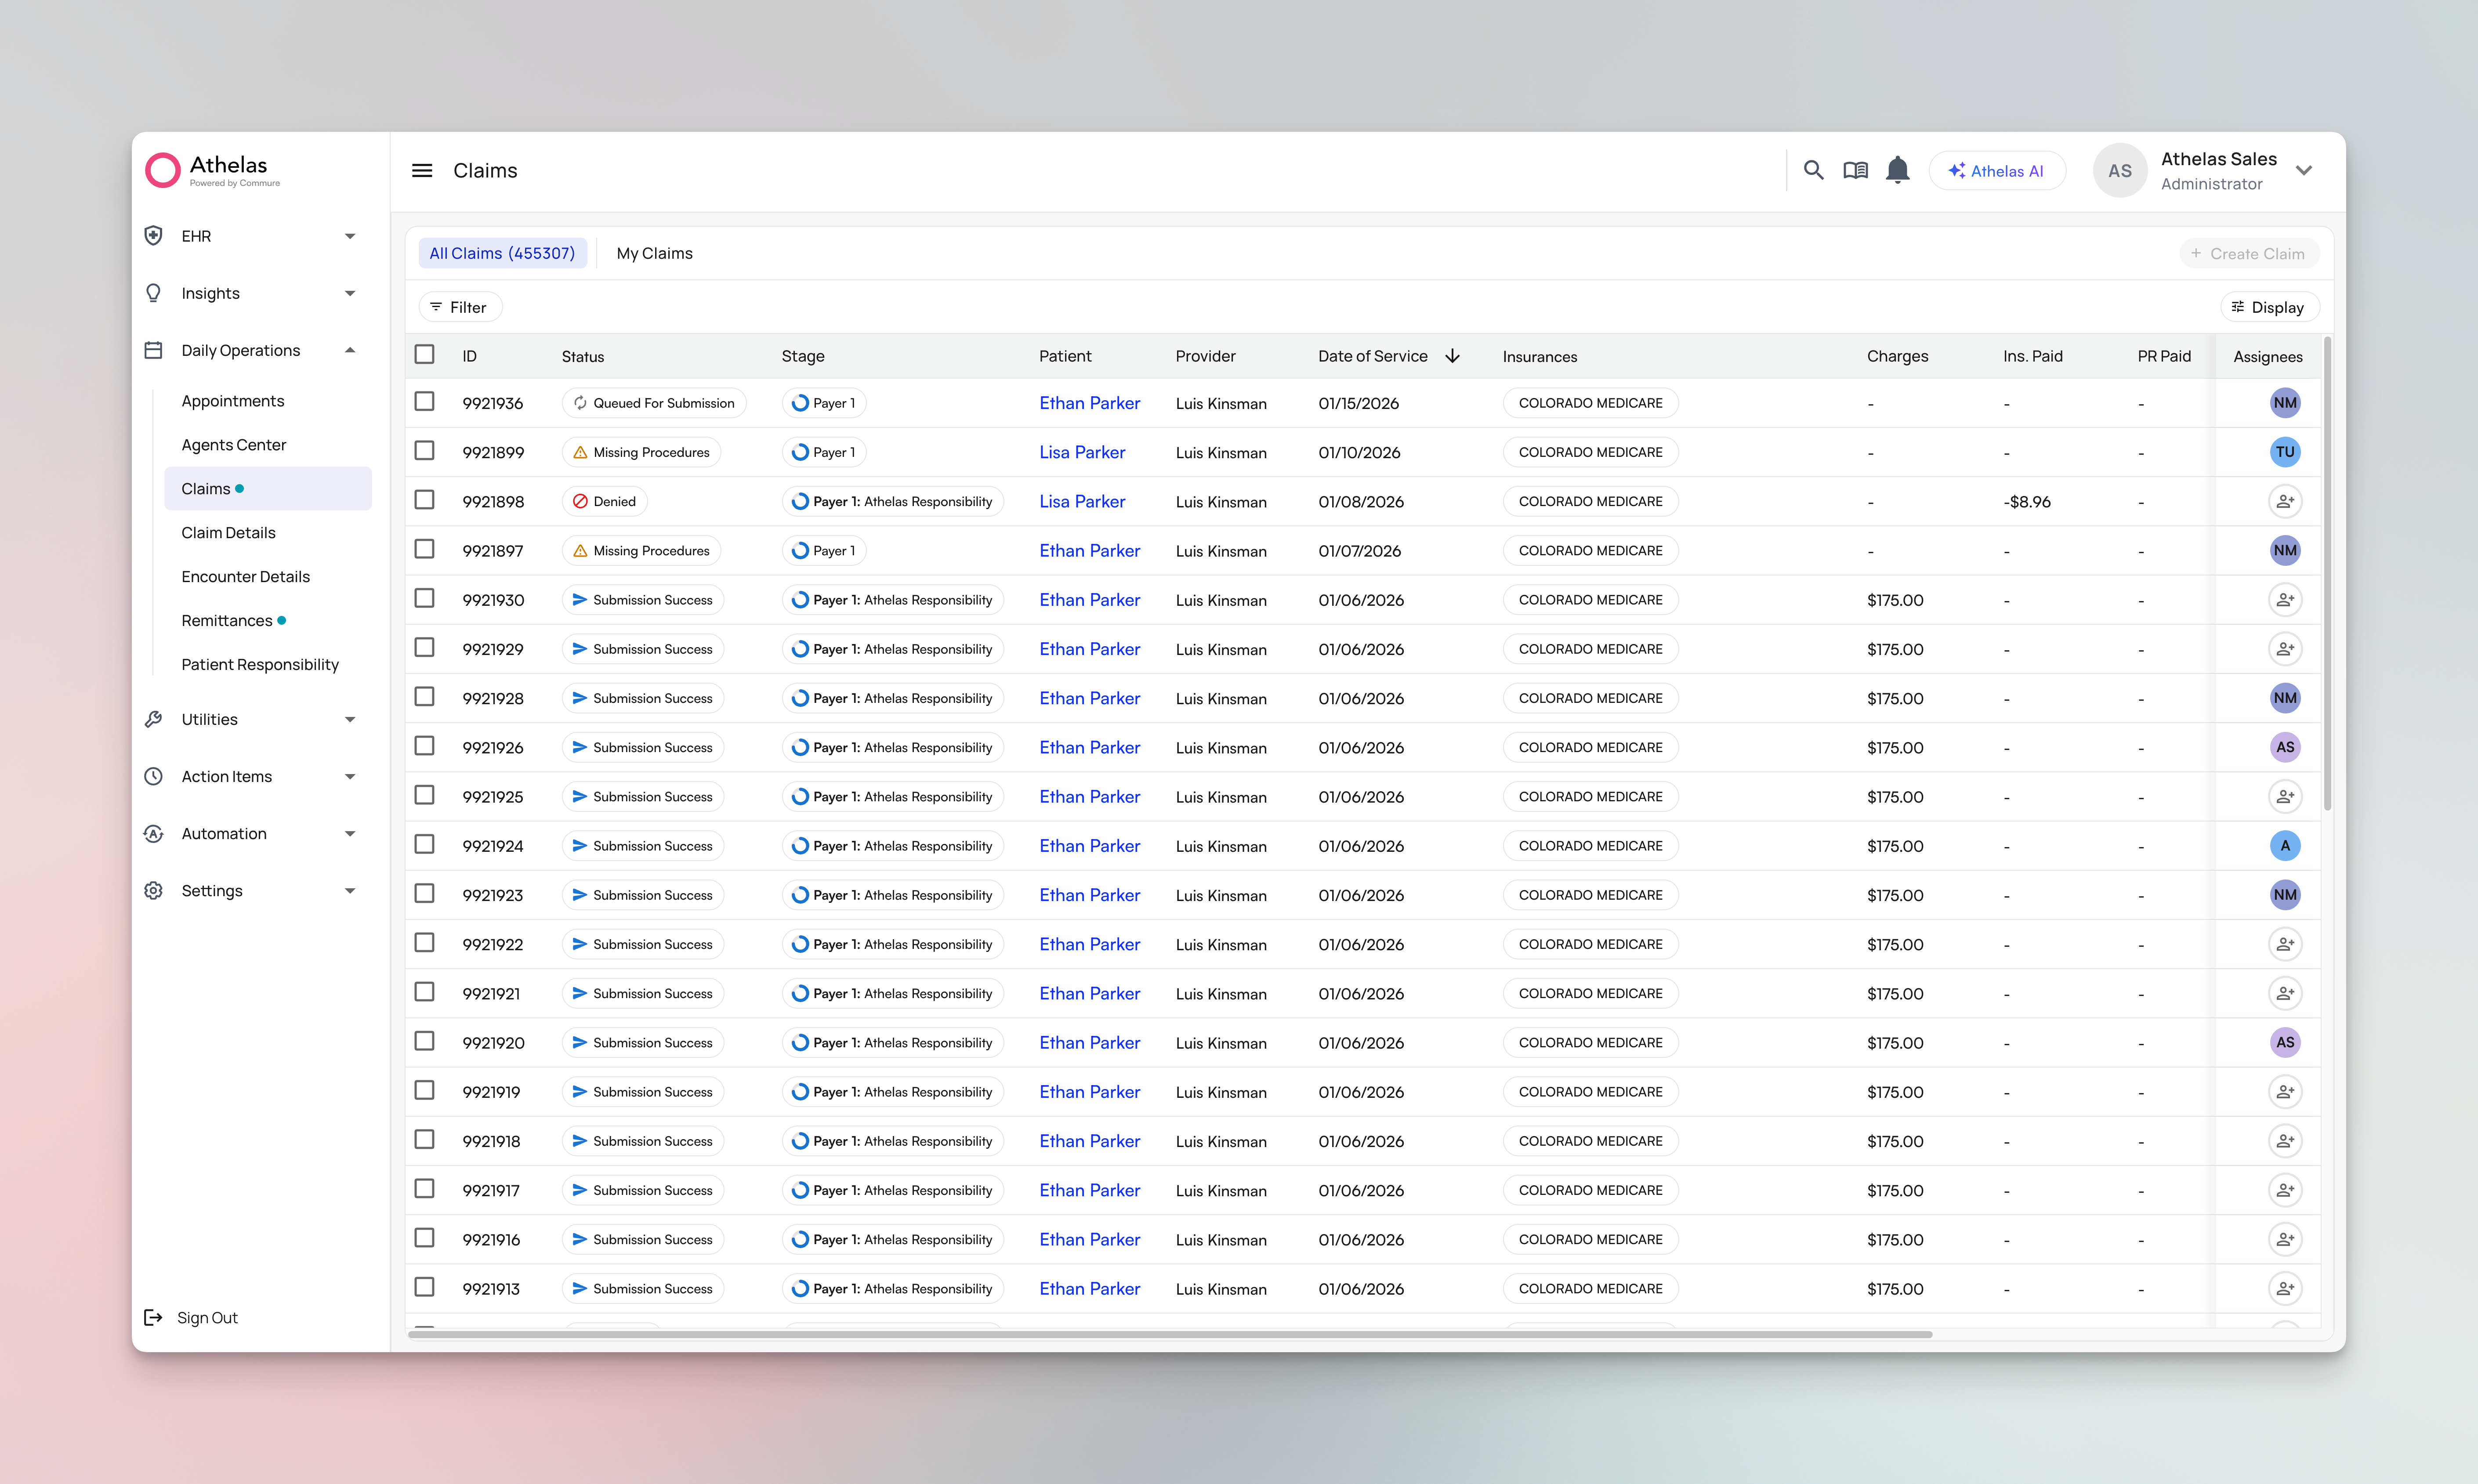
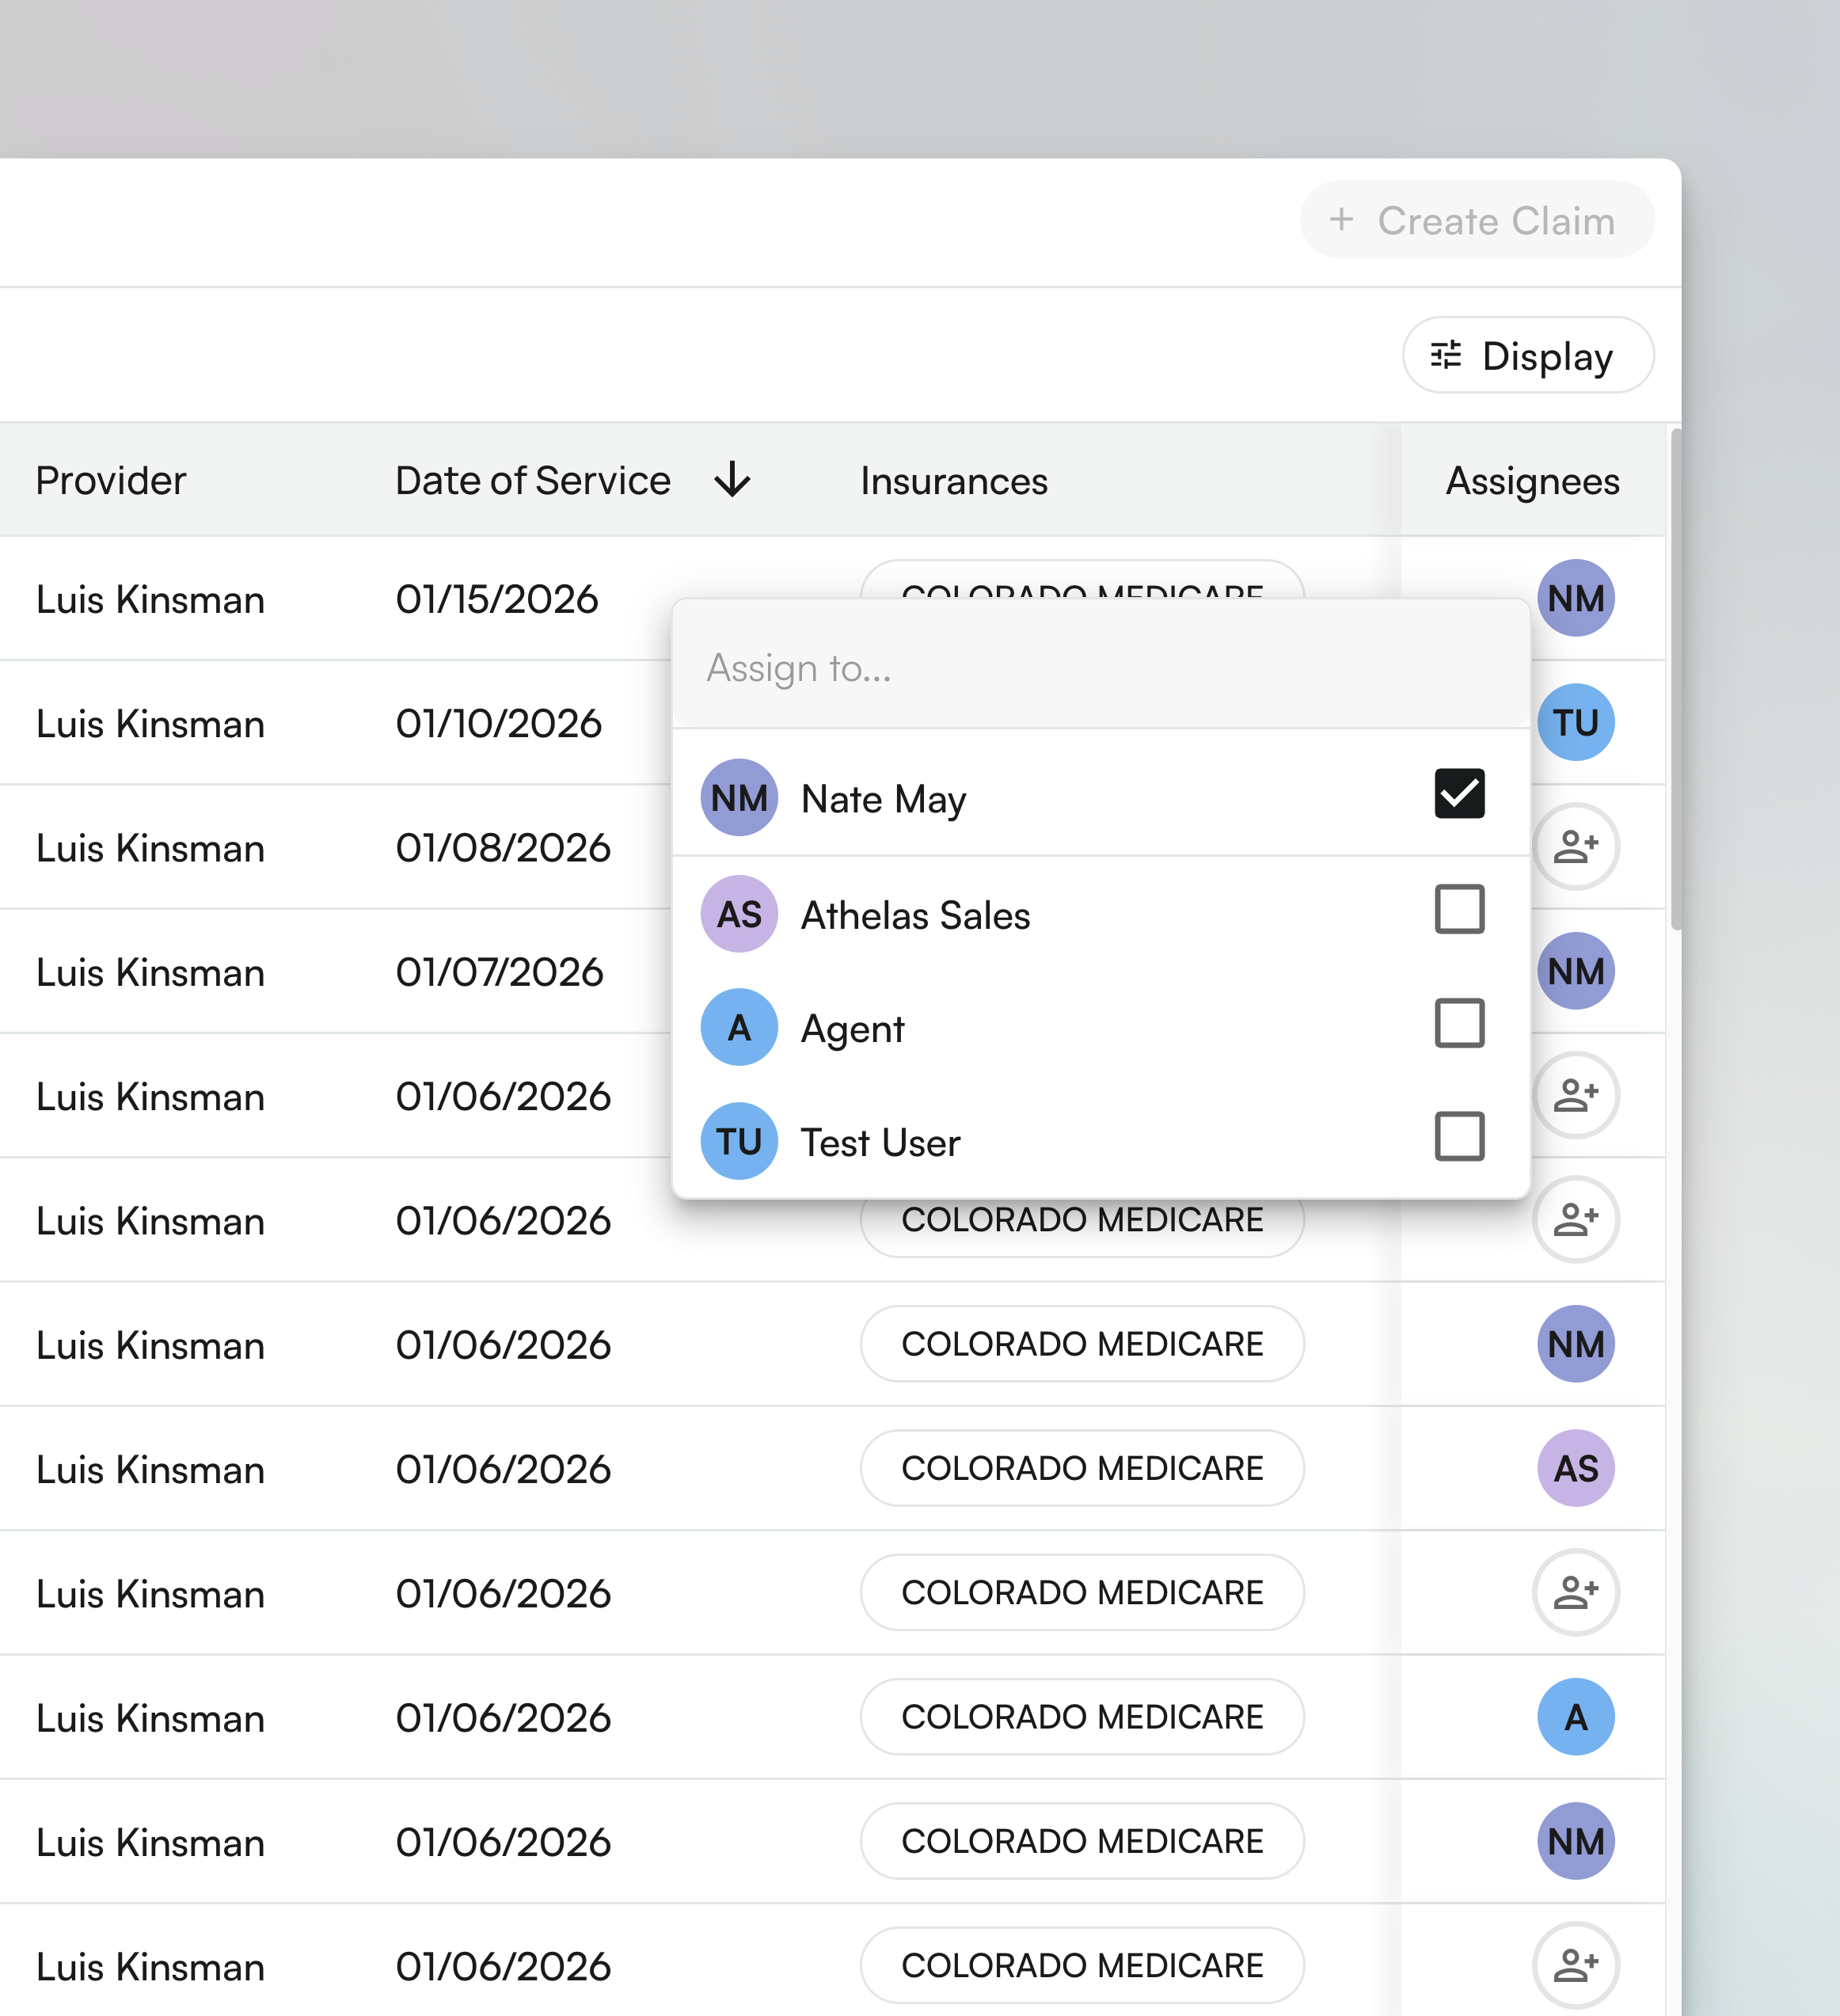 The filter bar at the top of the table lets you narrow your view by any combination of attributes: claim status, insurance provider, claim amount, age, assigned team member, provider, date range, Submission ID, Insurance Billing Type (Workers’ Comp, Auto, or Commercial), and CARC/RARC denial reason codes.
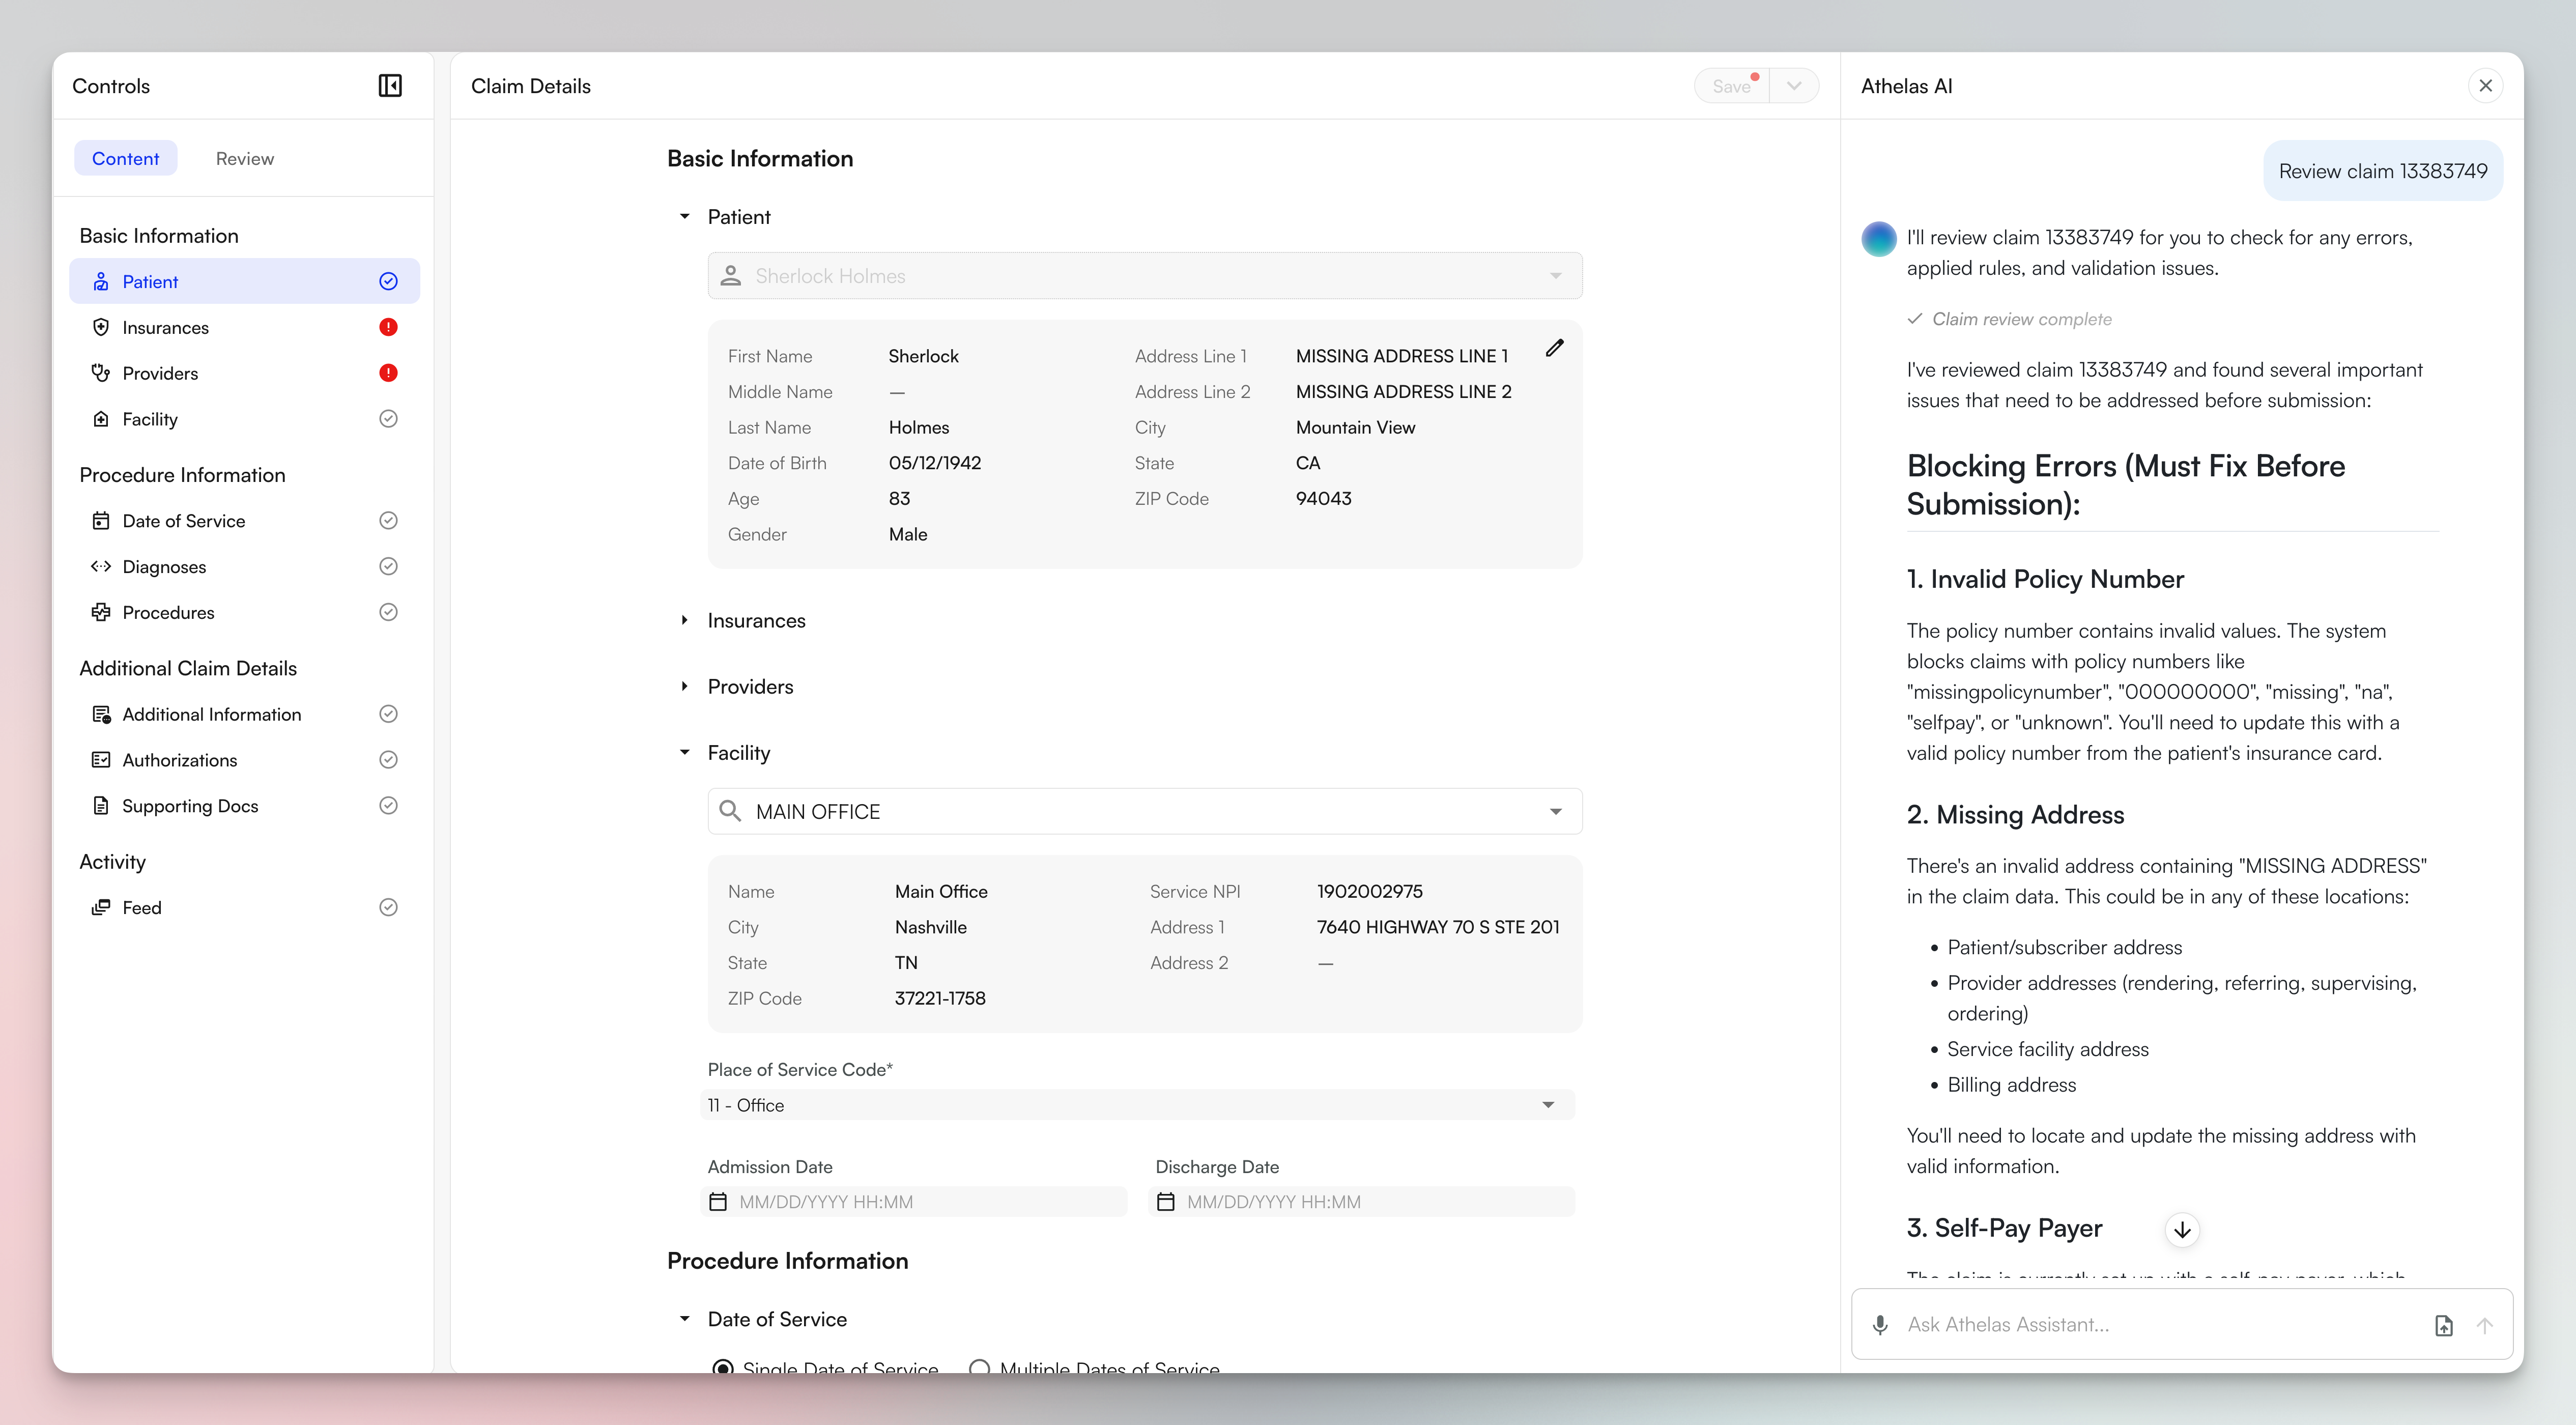 When you open a claim, Athelas AI automatically scans for common submission errors: missing modifiers, incorrect diagnosis codes, invalid addresses, and clearinghouse rule violations.
**How validation appears:**
Issues are flagged directly on the relevant fields with a red indicator. Click any flagged field to see the specific problem and recommended fix.
When you preview the submission, you'll see a sparkles icon (✨) next to fields that were automatically adjusted by billing rules to meet payer requirements (e.g., changing Place of Service code from 11→12).
### **Collaborating Through Comments**
When you open a claim, Athelas AI automatically scans for common submission errors: missing modifiers, incorrect diagnosis codes, invalid addresses, and clearinghouse rule violations.
**How validation appears:**
Issues are flagged directly on the relevant fields with a red indicator. Click any flagged field to see the specific problem and recommended fix.
When you preview the submission, you'll see a sparkles icon (✨) next to fields that were automatically adjusted by billing rules to meet payer requirements (e.g., changing Place of Service code from 11→12).
### **Collaborating Through Comments**
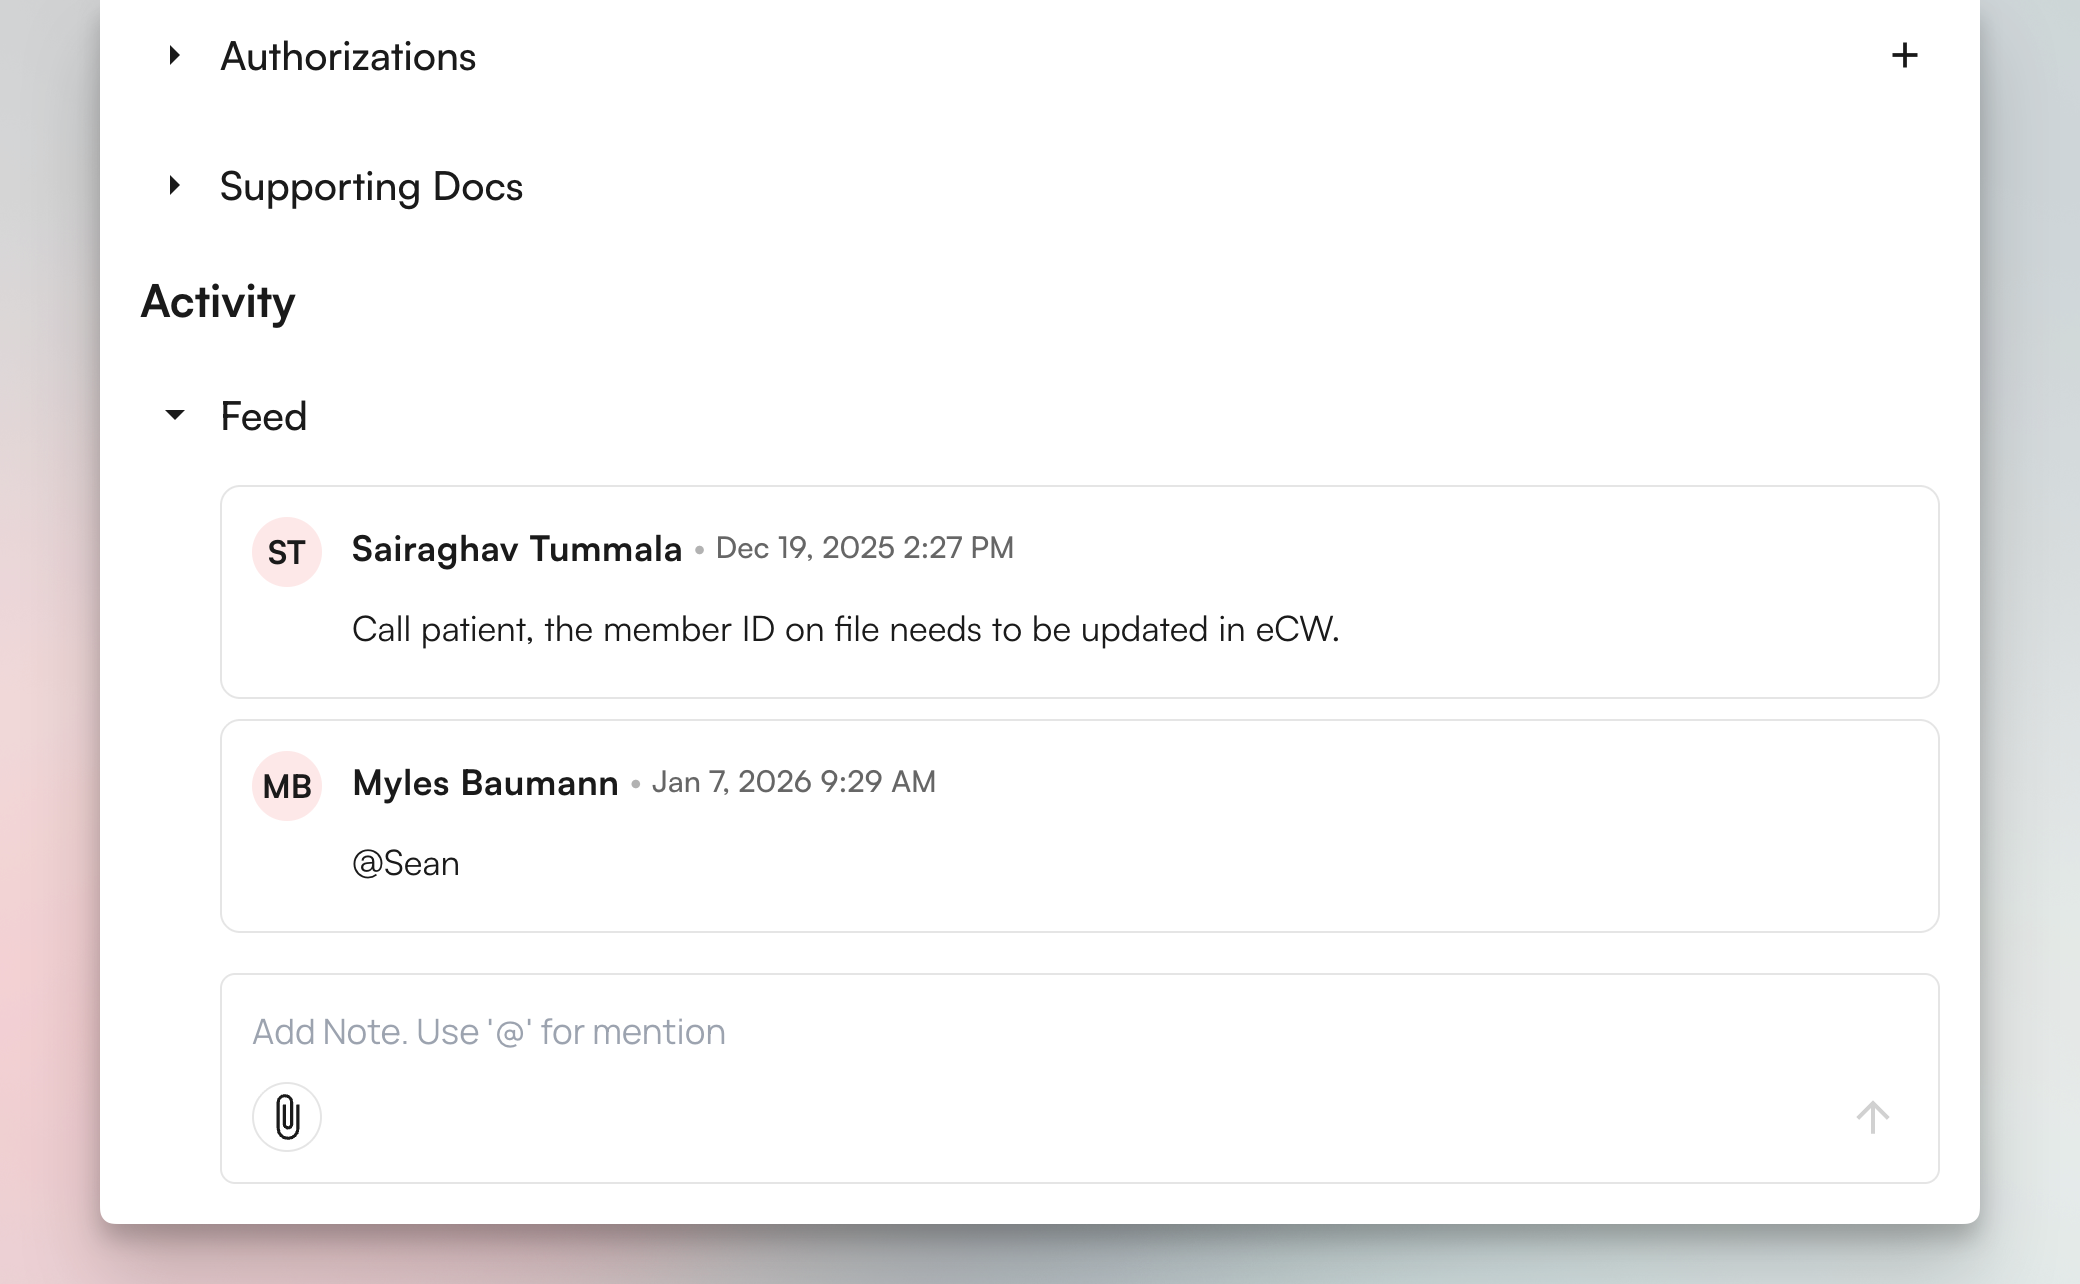 The activity feed at the bottom of the claim shows all team member comments, and also files attached to the comments.
**Using comments effectively:**
* Leave context for the next person who reviews the claim
* Use @mentions to notify specific team members (e.g., “@Sarah can you verify this diagnosis code?”)
* Check the feed before working on a claim to see if someone already identified issues
Comments persist across sessions, so your team maintains context even when claims change hands.
### **Using Athelas Assistant**
Athelas Assistant is your AI-powered copilot inside every claim. Open it by clicking the **Athelas AI** button in the top navigation bar while viewing a claim. It understands the context of the claim you’re working on and can take action on your behalf.
**What Athelas Assistant can do on a claim:**
* **Submit or resubmit a claim** — ask it to submit the current claim or trigger a resubmission after corrections
* **Fetch the financial summary** — get a quick breakdown of charges, payments, and outstanding balances for the claim
* **Update patient and claim information** — edit demographics, insurance, or claim fields without leaving the Assistant panel
* **Review against CCI and billing rules** — ask it to check the claim for Correct Coding Initiative (CCI) edits and billing rule violations before submission
### **Submitting Claims**
The activity feed at the bottom of the claim shows all team member comments, and also files attached to the comments.
**Using comments effectively:**
* Leave context for the next person who reviews the claim
* Use @mentions to notify specific team members (e.g., “@Sarah can you verify this diagnosis code?”)
* Check the feed before working on a claim to see if someone already identified issues
Comments persist across sessions, so your team maintains context even when claims change hands.
### **Using Athelas Assistant**
Athelas Assistant is your AI-powered copilot inside every claim. Open it by clicking the **Athelas AI** button in the top navigation bar while viewing a claim. It understands the context of the claim you’re working on and can take action on your behalf.
**What Athelas Assistant can do on a claim:**
* **Submit or resubmit a claim** — ask it to submit the current claim or trigger a resubmission after corrections
* **Fetch the financial summary** — get a quick breakdown of charges, payments, and outstanding balances for the claim
* **Update patient and claim information** — edit demographics, insurance, or claim fields without leaving the Assistant panel
* **Review against CCI and billing rules** — ask it to check the claim for Correct Coding Initiative (CCI) edits and billing rule violations before submission
### **Submitting Claims**
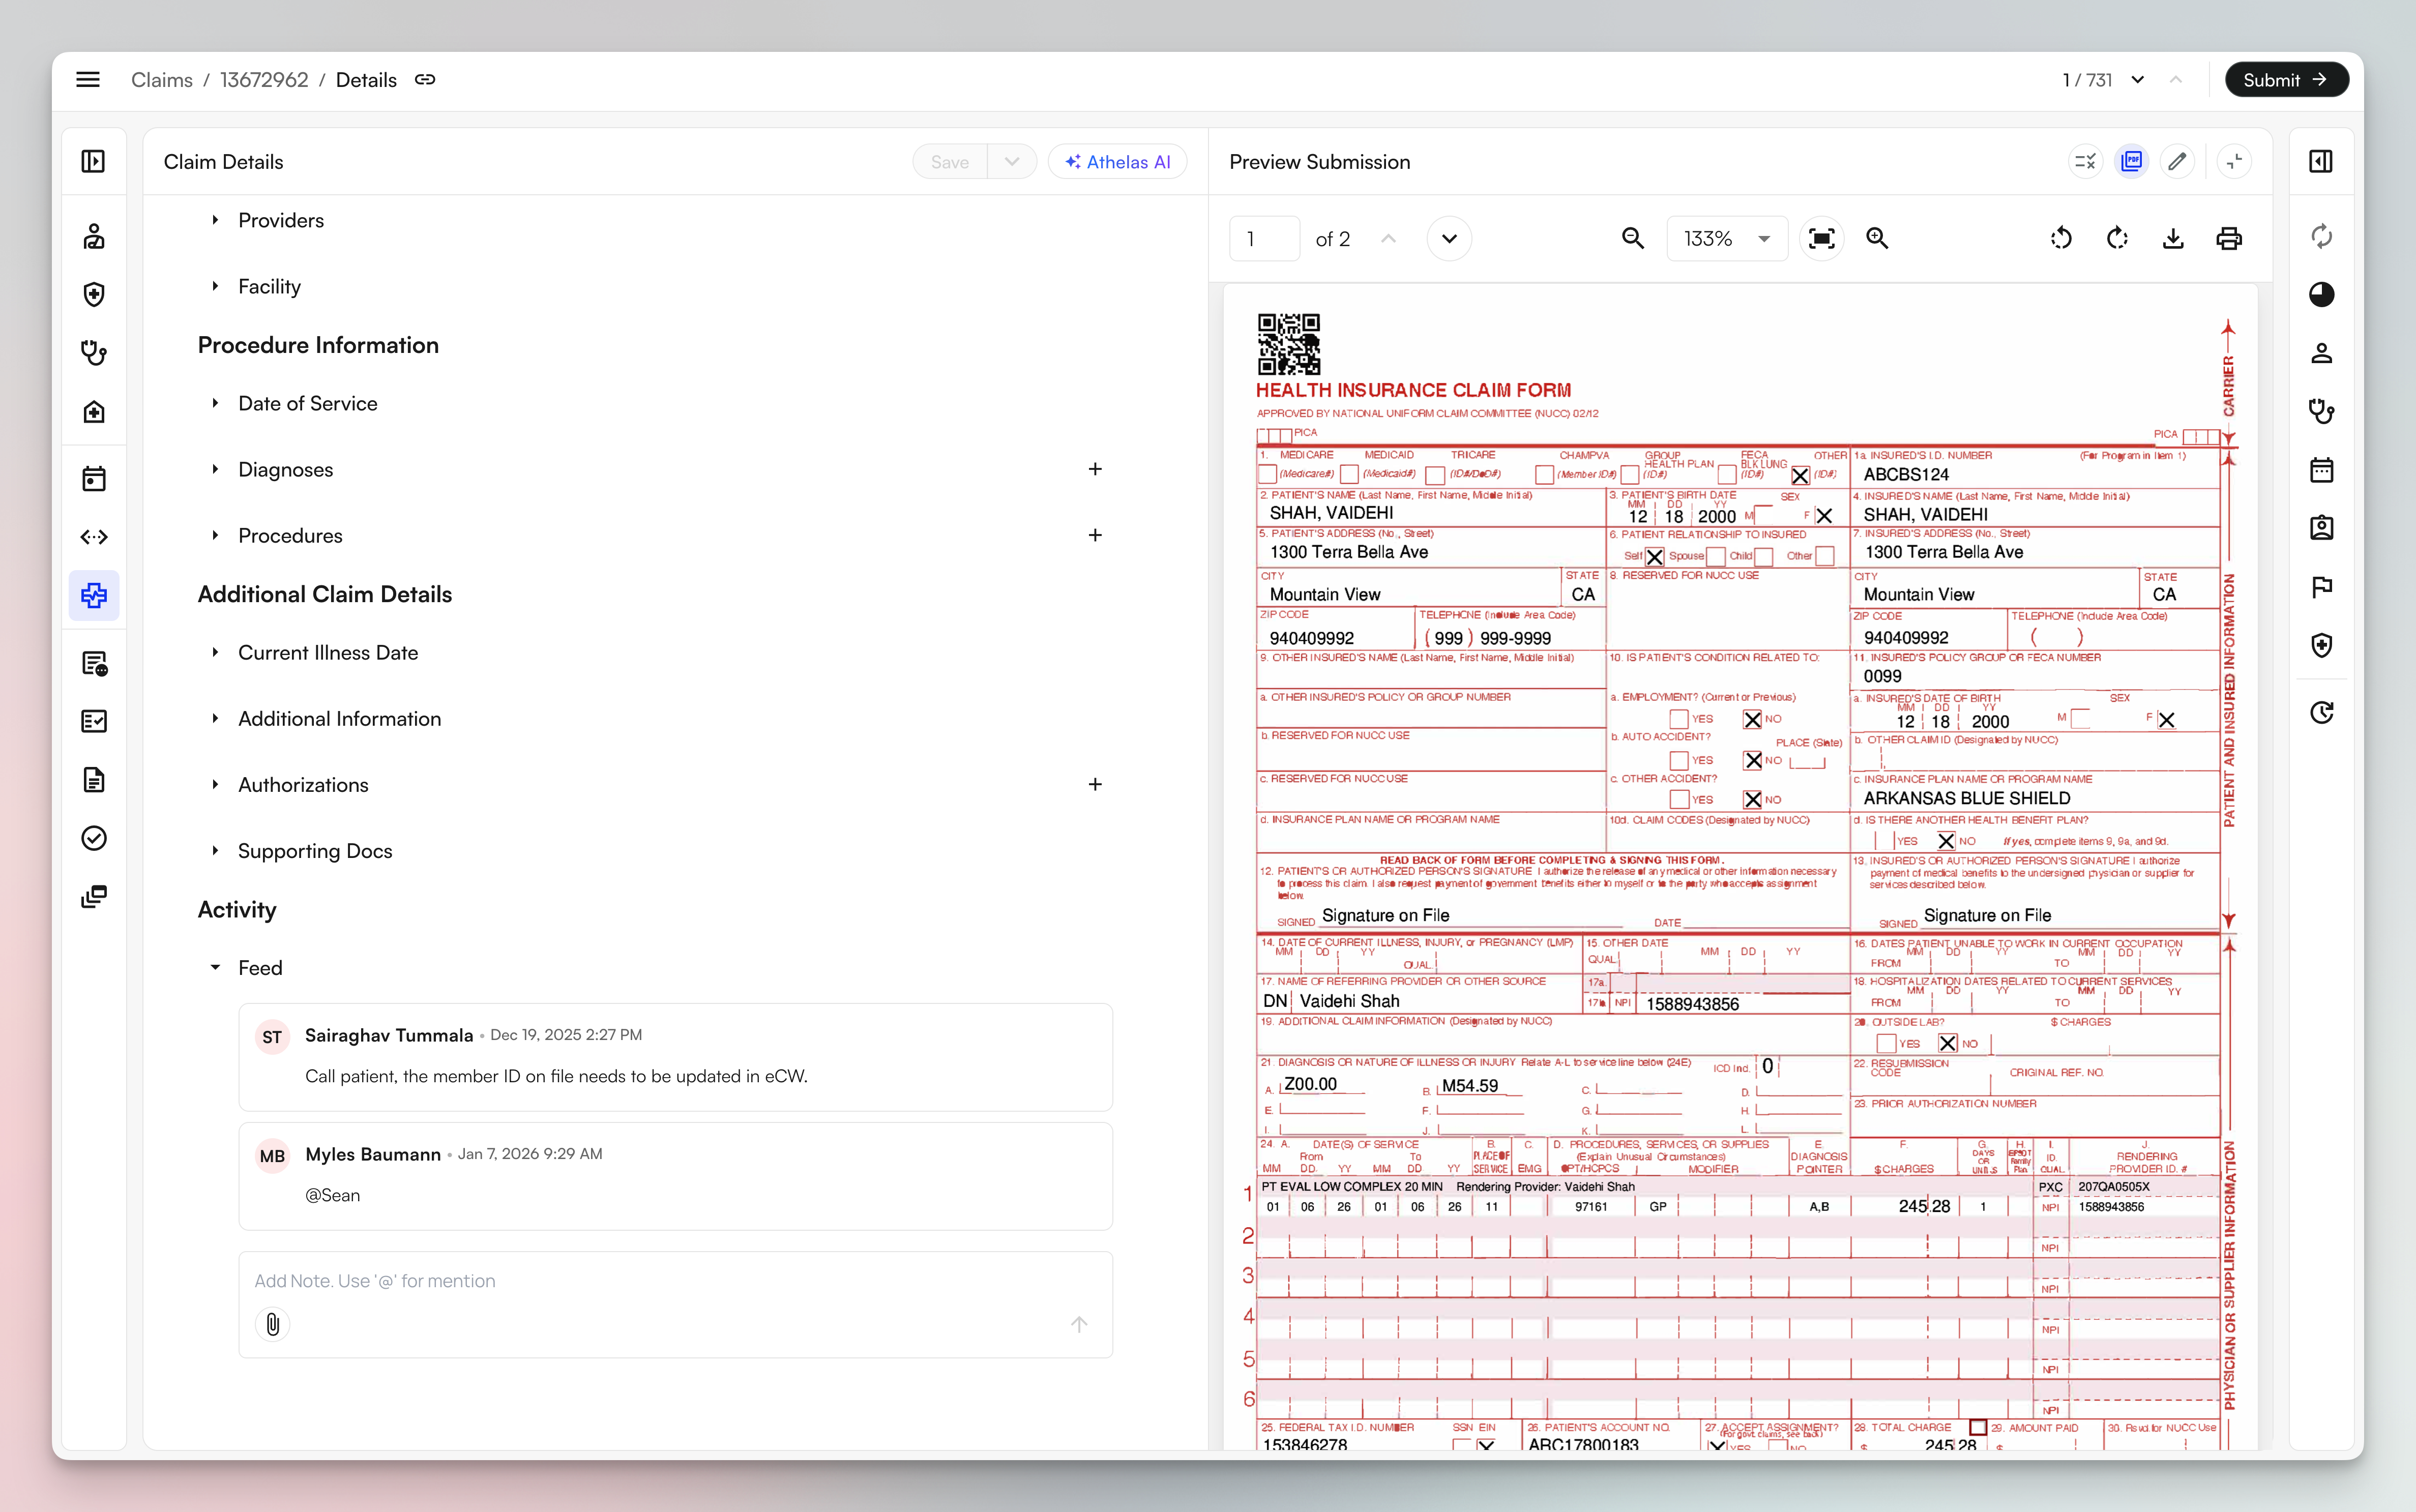 The submission detail panel lets you work with the claim data and preview the formatted output simultaneously, giving you confidence before you submit. When previewing a submission, the form type (Professional, Institutional, or Dental) is displayed in the top right corner so you can confirm the correct format at a glance.