
Navigating to faxes
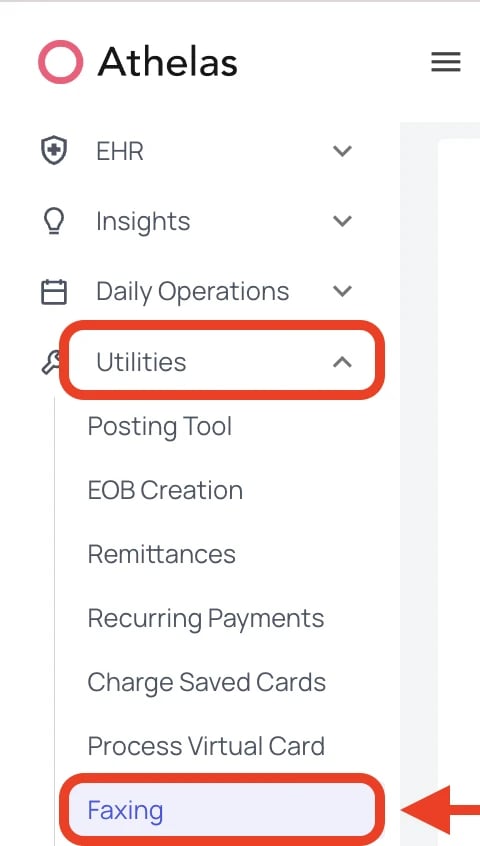
There are two ways to open the Faxing page:- Click Utilities → Faxing in the left sidebar.
- Press ⌘K (Mac) or Ctrl+K (Windows), type Faxes, and press Enter.
- Outbound – view and manage faxes you’ve sent.
- Inbound – view received faxes (with filters for All, Unprocessed, and Processed).
- Tasks – attach follow-ups and track progress directly from any fax.
Outbound faxes
The Outbound tab shows every fax your organization has sent, along with its current delivery status. Faxes sent from chart notes and from the Attachments tab both appear here, correctly attributed to the sending facility and provider.Sending an Outbound Fax
- Click Send Document in the top-right corner.
- Fill out the Send Fax side panel:
- Recipient Fax Number – enter the number you’re faxing to.
- Subject – title of the fax.
- Send From – choose a fax line from your organization’s dropdown.
- Facility / Provider [Optional] – assign context.
- Choose Files – upload one or more PDFs.
- Click Send Document.
- The fax will now appear in your Outbound list. You can track the status of the fax.
Resend a failed fax
If a fax fails, you don’t need to start over:- Find the failed fax in the Outbound tab.
- Click Resend.
- Confirm or modify the recipient, fax number, or attachments in the Send Fax Drawer, then send.
Automatic failure tasks
When a fax fails to deliver, Air automatically creates a task in your Tasks queue so nothing gets missed. The task includes a reference to the original fax.Track documents sent via email and text
Documents sent from Patient Attachments via email or text message also appear in the Outbound tab. You can see the delivery status, timestamp, and recipient for each — no manual follow-up needed to confirm receipt.Inbound faxes
Your inbox
The Inbound tab is split into two sub-tabs:- Unprocessed — faxes that haven’t been acted on yet.
- Processed — faxes you’ve reviewed and handled. A fax moves here automatically once you manually assign a patient and document type.
Process an inbound fax
When you open a fax from the Unprocessed queue, the PDF loads side-by-side with the edit panel so you can read and categorize at the same time — no more switching views.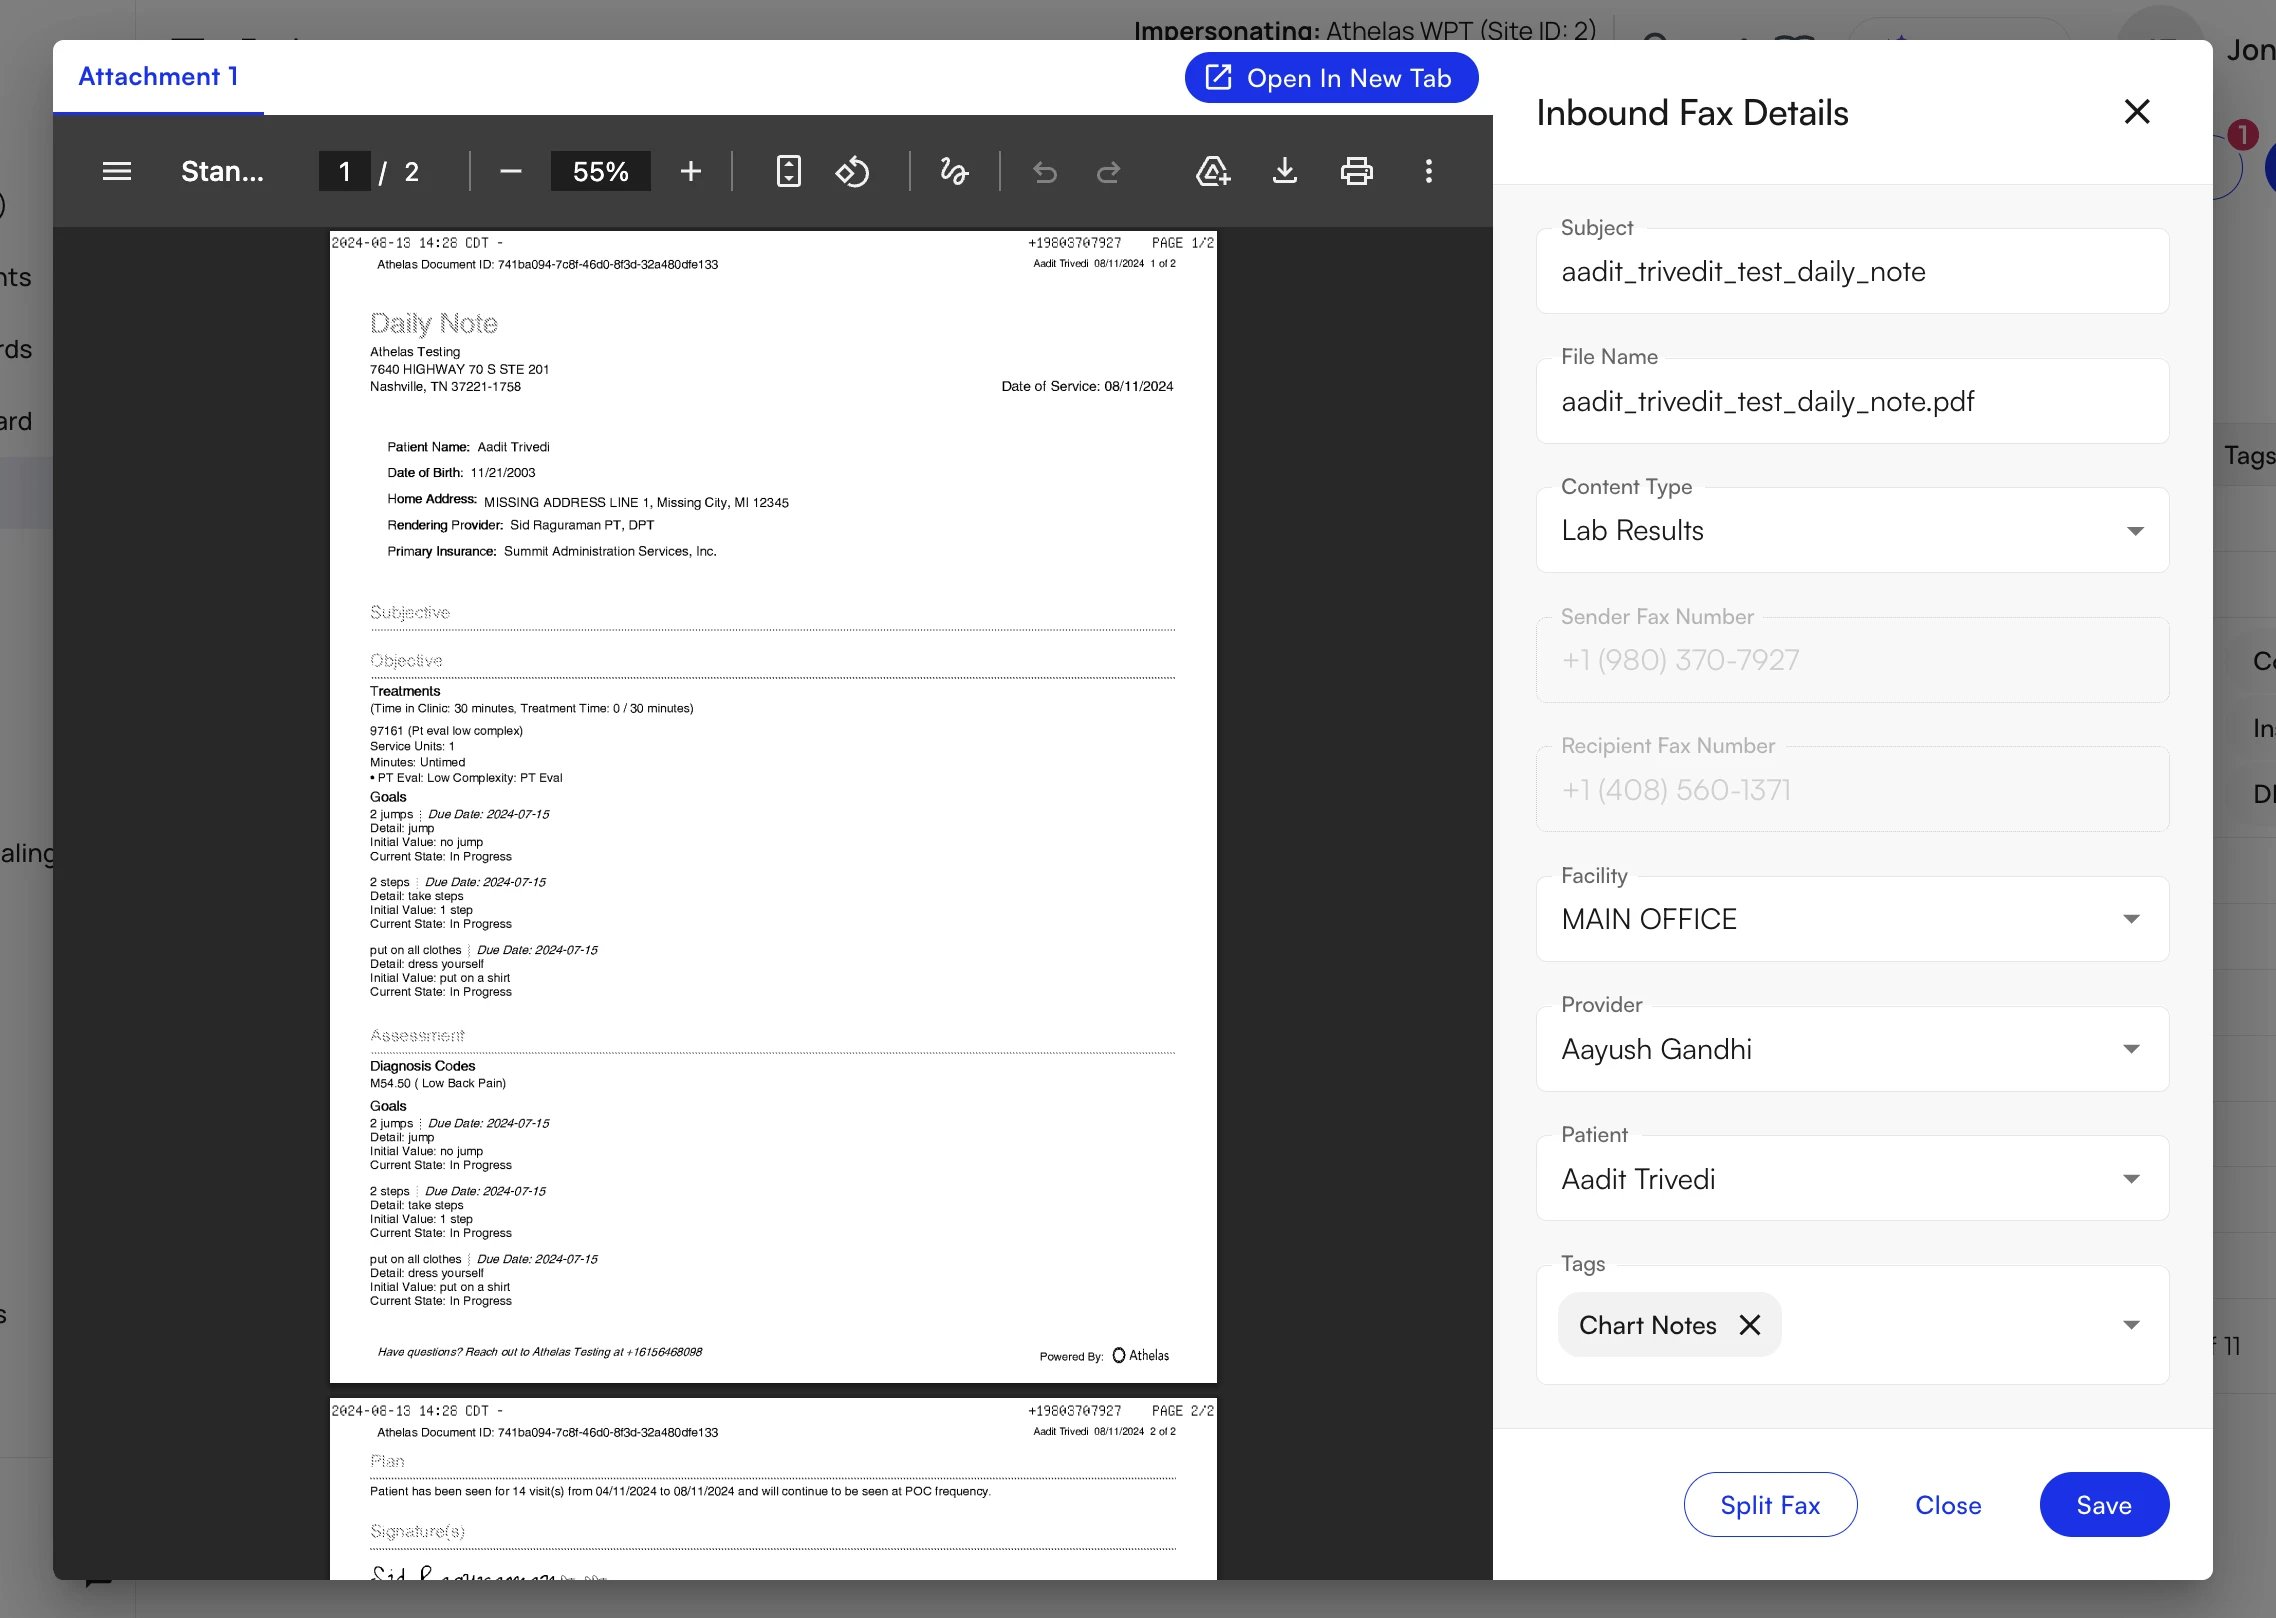
- Link to a patient — Search by name (including preferred name) to associate the fax with a patient’s chart. Once linked, the fax appears in that patient’s record.
- Assign a document type — Select a content category (e.g., “Prior Authorization”, “Insurance Card”, “Referral”). Admins can create and manage available types — see Fax settings.
- Add tags — Apply tags to organize the fax. Tags sync with Patient Attachments, so anything you apply here carries over automatically when the fax is linked to a patient record.
- Split the fax — Break a compound document into multiple fax entries that can be separately assigned patients, document types, and tags.
Create a lead from an inbound fax
When an inbound fax is a referral, you can create a patient lead directly from the fax detail view — no need to leave the faxing workflow.- Open the fax from the Inbound tab.
- Click Create Lead in the action panel.
- The Lead Creation drawer opens alongside the fax — fill in referral type, patient details, and any notes.
- Save — the lead appears in Lead Tracker, and a reference is stored on the fax record.
Split a combined fax
Providers sometimes send one fax containing records for multiple patients. You can split it into separate documents:- Open the fax and select Split Fax.
- Define the page ranges for each individual fax (e.g., pages 1–4 for Patient A, pages 5–9 for Patient B).
- Set a subject, patient, and document type for each segment before saving.
- Each segment is saved as its own independent fax and can be linked to the appropriate patient separately.
Sending a fax
From the Send Fax Drawer
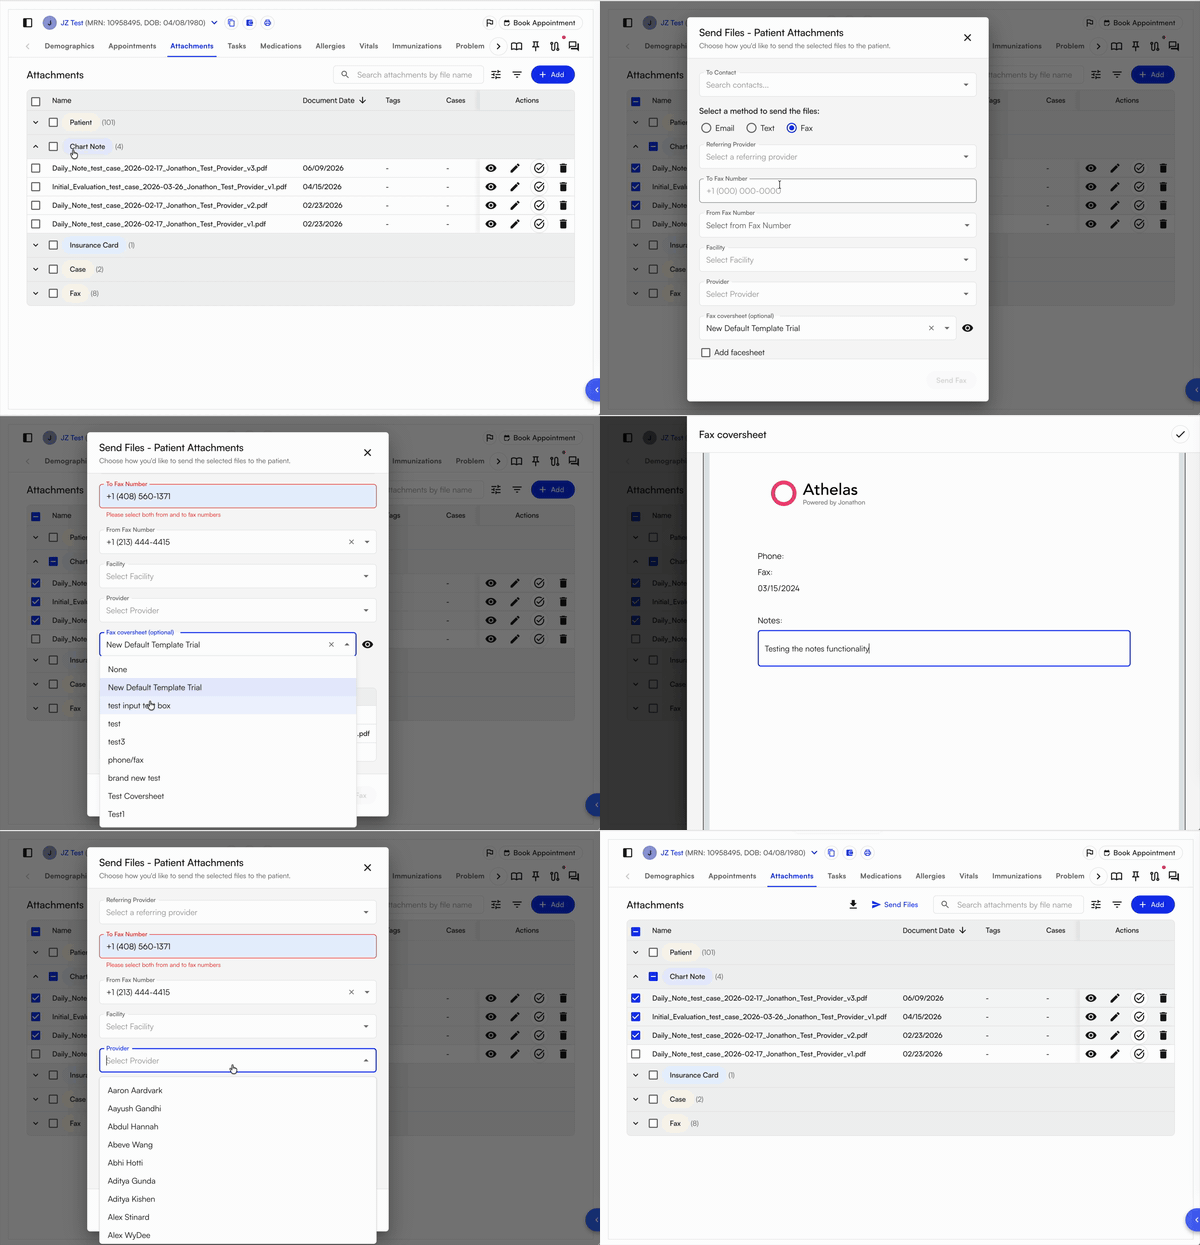
The Send Fax Drawer is available any time you initiate a fax — from the queue, from a patient’s chart, or from an order. Key features:- Multiple documents — Add as many files as needed. Air validates file type and size before sending to prevent delivery failures.
- Reorder by dragging — Drag documents into the order you want them to appear. The final fax PDF reflects the order you set.
- Address book — Start typing a name or fax number in the recipient field to search saved contacts. Some organizations maintain a read-only contact list for standardized workflows.
- Cover sheet — Choose from your saved templates, use the system default, or skip the cover sheet (see Cover sheets). When enabled on the cover sheet, you can also add free-text notes with context or instructions (e.g., “Medical records request — received 06/15”), which appear on the cover sheet.
Cover sheets
Every fax can include a cover sheet. Air provides a system default, and admins can build fully custom templates from Utilities → Faxing → Settings → Fax coversheet templates.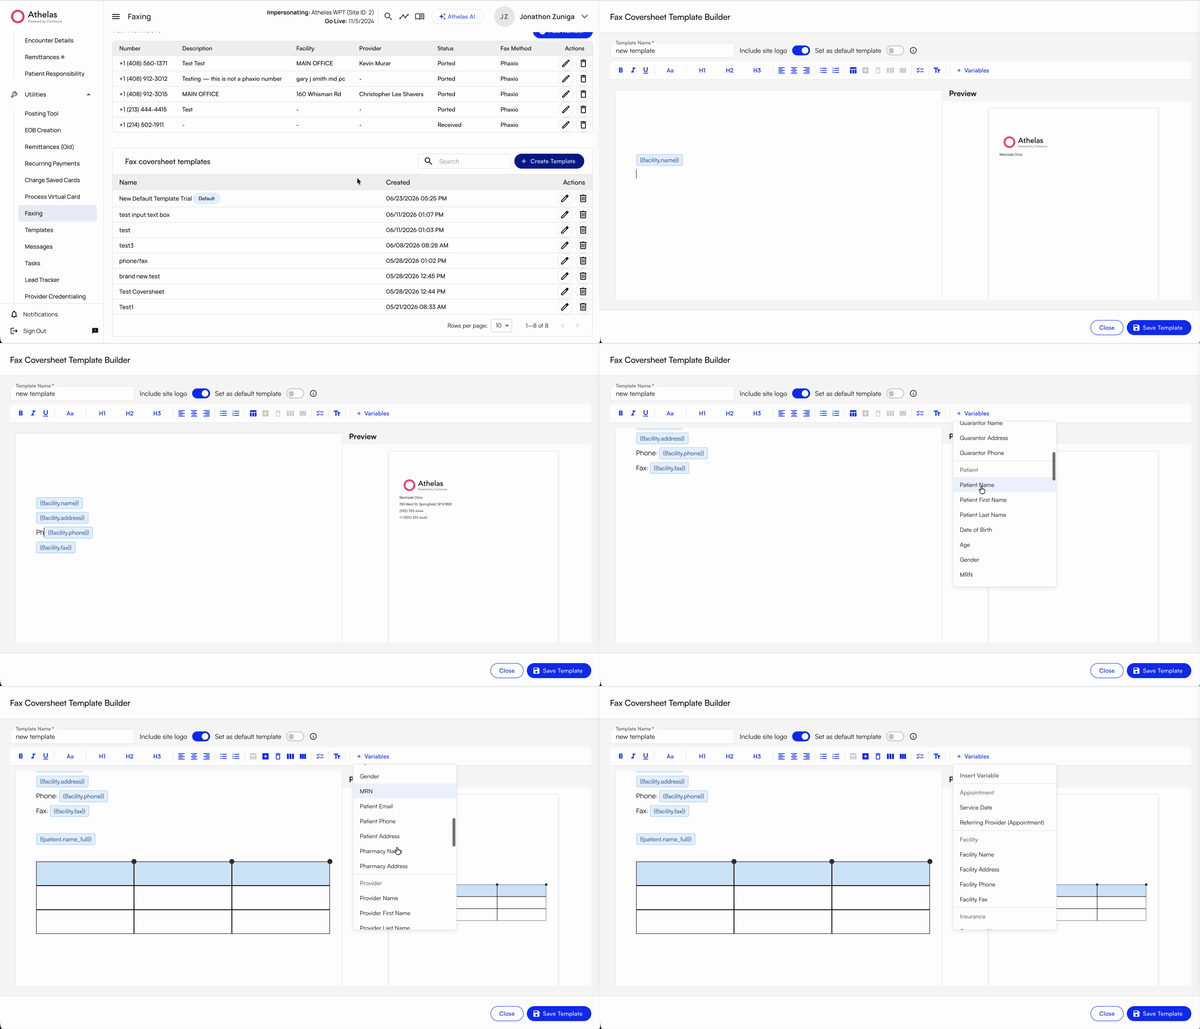
{{patient.name}}, {{provider.npi}}, {{facility.fax}}, and more. Staff don’t have to fill these in; Air resolves them at send time.
Set a default cover sheet. Admins can designate one template as the site default. Air attaches the default automatically whenever a fax is sent without a manual selection — most importantly when auto-faxing fires (e.g., a provider signs a chart note and Air automatically sends it to the referring provider).
From within a patient workflow
Faxing is integrated throughout Air so you can send without leaving what you’re doing:- Chart note — When a provider signs a note, Air can automatically queue it for the referring provider (see Fax settings to configure this). To send the same note to a wider care team by fax and email, see Care Team Communications.
- Patient Attachments — Open a patient → Attachments → click Send as Fax on any document.
- Imaging or Referral Orders — The order modal includes a fax send step with the referring provider’s number pre-filled.
Fax settings
Open Faxing → Settings to configure fax behavior for your organization:- Fax numbers — Your organization’s fax numbers are tied to specific facilities. Contact your Athelas account team to add, change, or deactivate a number.
- Cover sheets — Build and manage custom cover sheet templates. Use rich text formatting, insert dynamic variables (patient, provider, facility, recipient), add your organization’s logo, and set a site-wide default template. Staff can choose or override the template at send time.
- Fax contacts — View and search the address book. Admins can manage the contact list from this tab.
- General → Auto-faxing on chart note sign — Enable or disable automatic queueing when providers sign chart notes, configurable by note type (initial eval, progress note, discharge) and by facility. When on, Air defaults to the patient’s referring provider as the recipient.
- Faxing → Content types — Create, rename, and delete the document type categories used when tagging faxes (e.g., “Prior Authorization”, “Insurance Card”, “Referral”). Add or remove categories any time.
- Tags — Manage the shared tag taxonomy used across both the Faxing page and Patient Attachments. Tags are unified — a tag applied while processing an inbound fax carries over to the patient’s attachment record automatically.
Troubleshooting
FAQ
Where do faxes I send from a chart note or patient attachment show up?
Where do faxes I send from a chart note or patient attachment show up?
All outbound faxes — including those sent from chart notes and from Patient Attachments — appear in the Outbound tab with their delivery status, timestamp, and recipient, attributed to the sending facility and provider.
What happens if a fax fails to deliver?
What happens if a fax fails to deliver?
Air automatically creates a task in your Tasks queue referencing the original fax, so the failure isn’t missed. You can click Resend on the failed fax to try again — the original and resent records stay linked for a full audit trail.
How does Air decide which facility an inbound fax belongs to?
How does Air decide which facility an inbound fax belongs to?
Air scans the incoming PDF for a facility name. If none is found, it falls back to the patient’s most recently associated facility. For new patients with no prior visits, no facility is assumed, which prevents incorrect routing.
Can one inbound fax cover multiple patients?
Can one inbound fax cover multiple patients?
Yes. Use Split Fax to divide a combined document into separate faxes by page range, then assign each segment its own subject, patient, and document type. Each segment becomes an independent fax.
Why can't I set my cover sheet template as the default?
Why can't I set my cover sheet template as the default?
A default cover sheet is used during auto-faxing, which runs without a person reviewing the send. Because of that, defaults can’t contain editable text box fields — only dynamic variables and fixed content. Remove the text box fields, or select that template manually at send time instead.