> ## Documentation Index
> Fetch the complete documentation index at: https://docs.athelas.com/llms.txt
> Use this file to discover all available pages before exploring further.
# Adding an Implantable Device
Air lets you record, change, and access a patient's **implantable devices** from their **Problem List**. This supports ONC Health IT certification criterion **§170.315(a)(14) Implantable Device List**.
You only need the device's **Unique Device Identifier (UDI)**. Air looks the UDI up through the **NLM AccessGUDID API** and automatically populates the remaining device details for you.
## Navigate to Implantable Devices
### Open the patient's Problem List
1. From the left navigation, open the **Patients** tab and search for the patient by name or MRN.
2. On the patient's profile, open the **Problem List** tab.
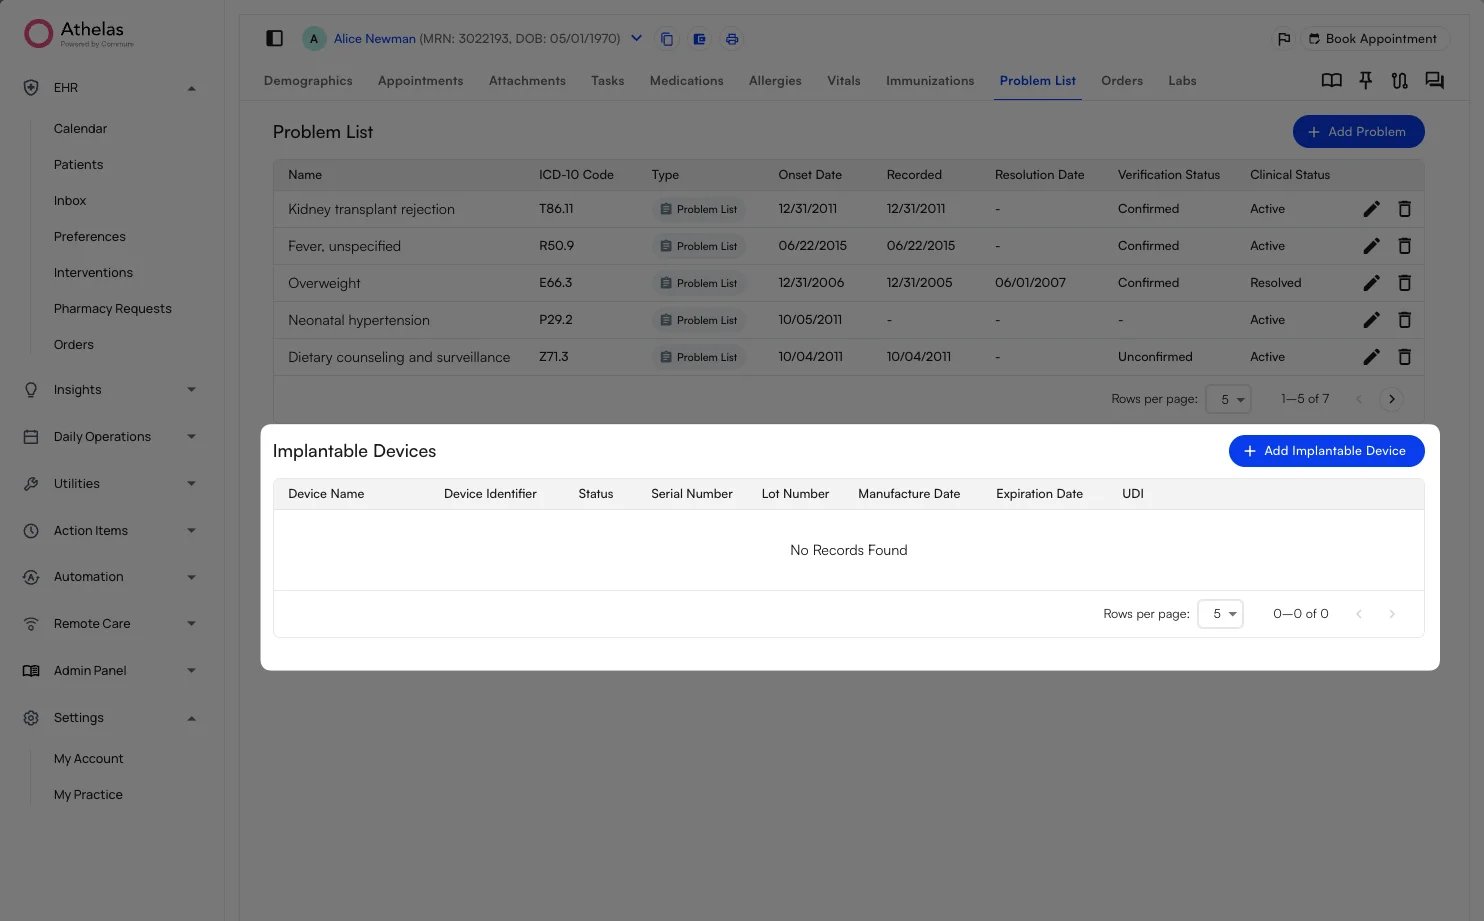
3. Scroll down past the **Problem List** table to the **Implantable Devices** section.
## Add an Implantable Device
### Look up a device by its UDI
1. In the **Implantable Devices** section, click the **+ Add Implantable Device** button.
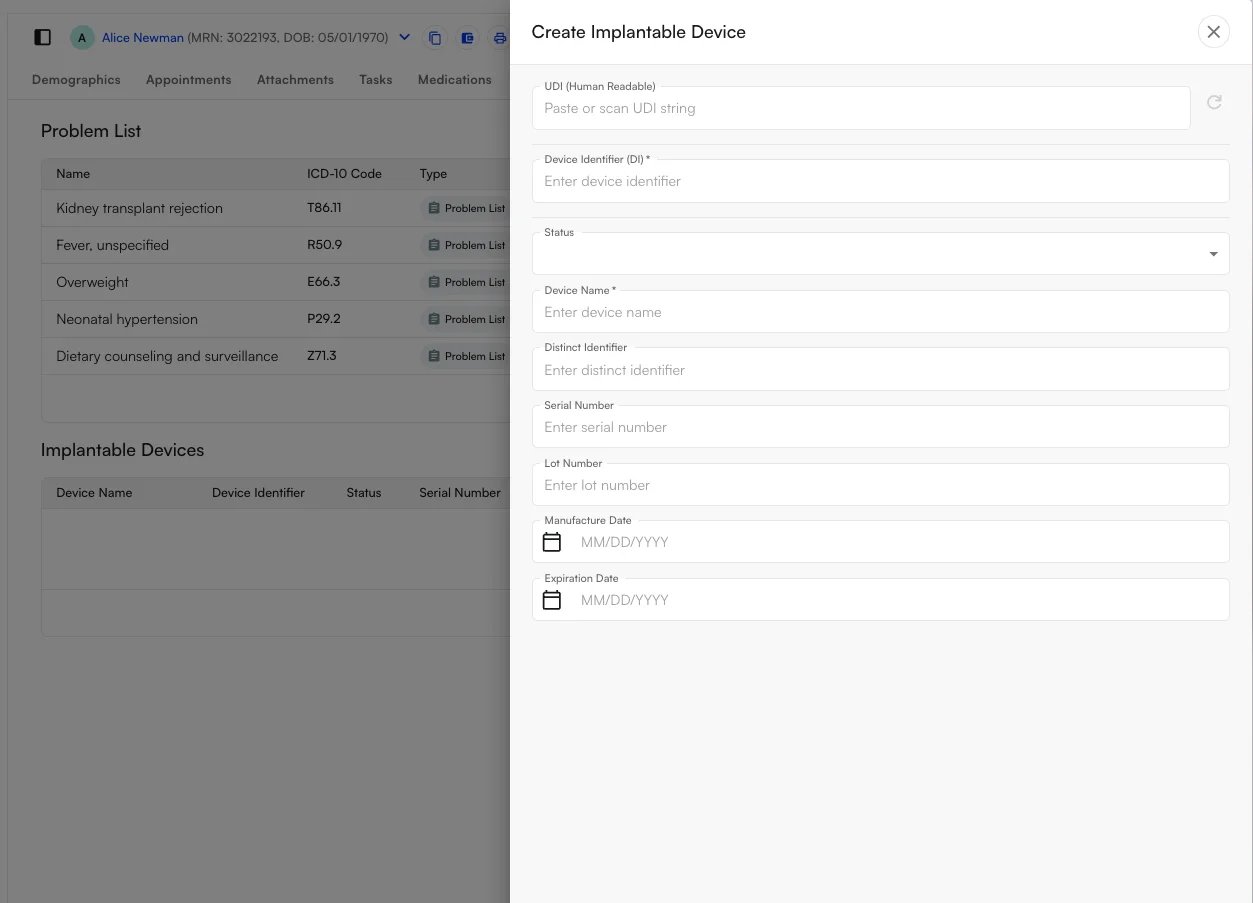
2. In the **Create Implantable Device** panel, paste or scan the device's UDI into the **UDI (Human Readable)** field, then run the lookup using the field's lookup icon.
As long as you enter a valid UDI, Air looks it up through the **NLM AccessGUDID API** and automatically populates the rest of the device fields:
| **Field** | **Description** |
| :------------------------- | :--------------------------------------------------------------------------- |
| **UDI (Human Readable)** | The device's Unique Device Identifier. Paste or scan it to drive the lookup. |
| **Device Identifier (DI)** | The portion of the UDI that identifies the device's make and model. |
| **Status** | The device's current status (for example, **Active**). |
| **Device Name** | The device's brand or model name. |
| **Distinct Identifier** | An additional identifier for the specific device, when applicable. |
| **Serial Number** | The device's serial number. |
| **Lot Number** | The device's lot or batch number. |
| **Manufacture Date** | The date the device was manufactured. |
| **Expiration Date** | The date the device expires. |
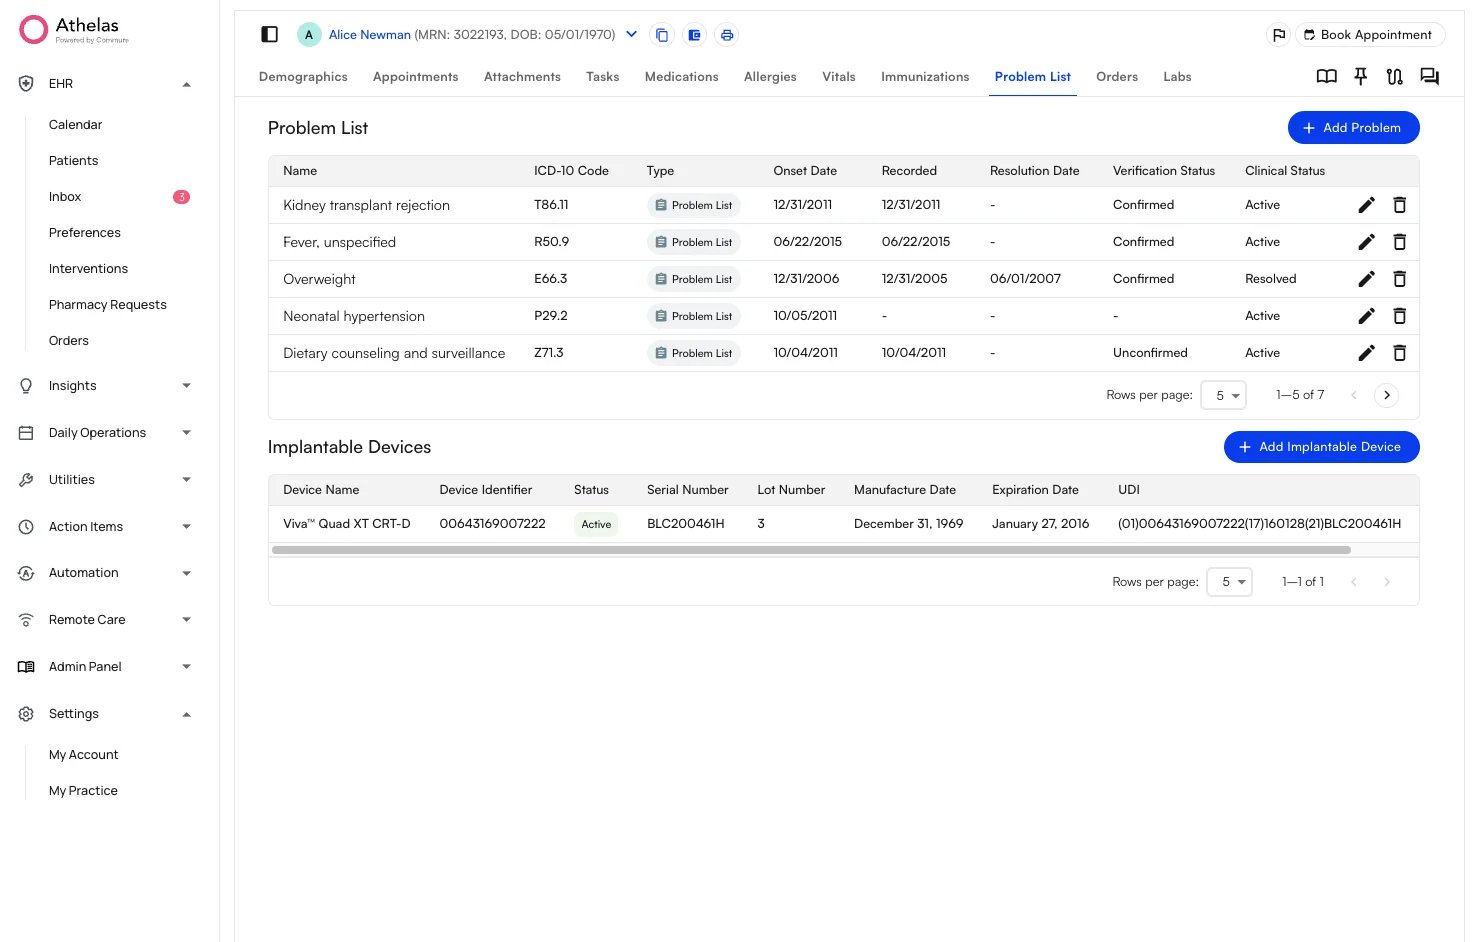
3. Review the populated fields and click **Save**. The device now appears in the **Implantable Devices** table, with its **UDI**, **Device Identifier**, **Status**, **Serial Number**, **Lot Number**, **Manufacture Date**, and **Expiration Date**.
✨**Smart Tip:** Scanning the UDI barcode directly into the **UDI (Human Readable)** field is the fastest way to add a device—the AccessGUDID lookup fills in the make, model, and dates so you don't have to type them.
## Edit or Delete an Implantable Device
### Update a saved device
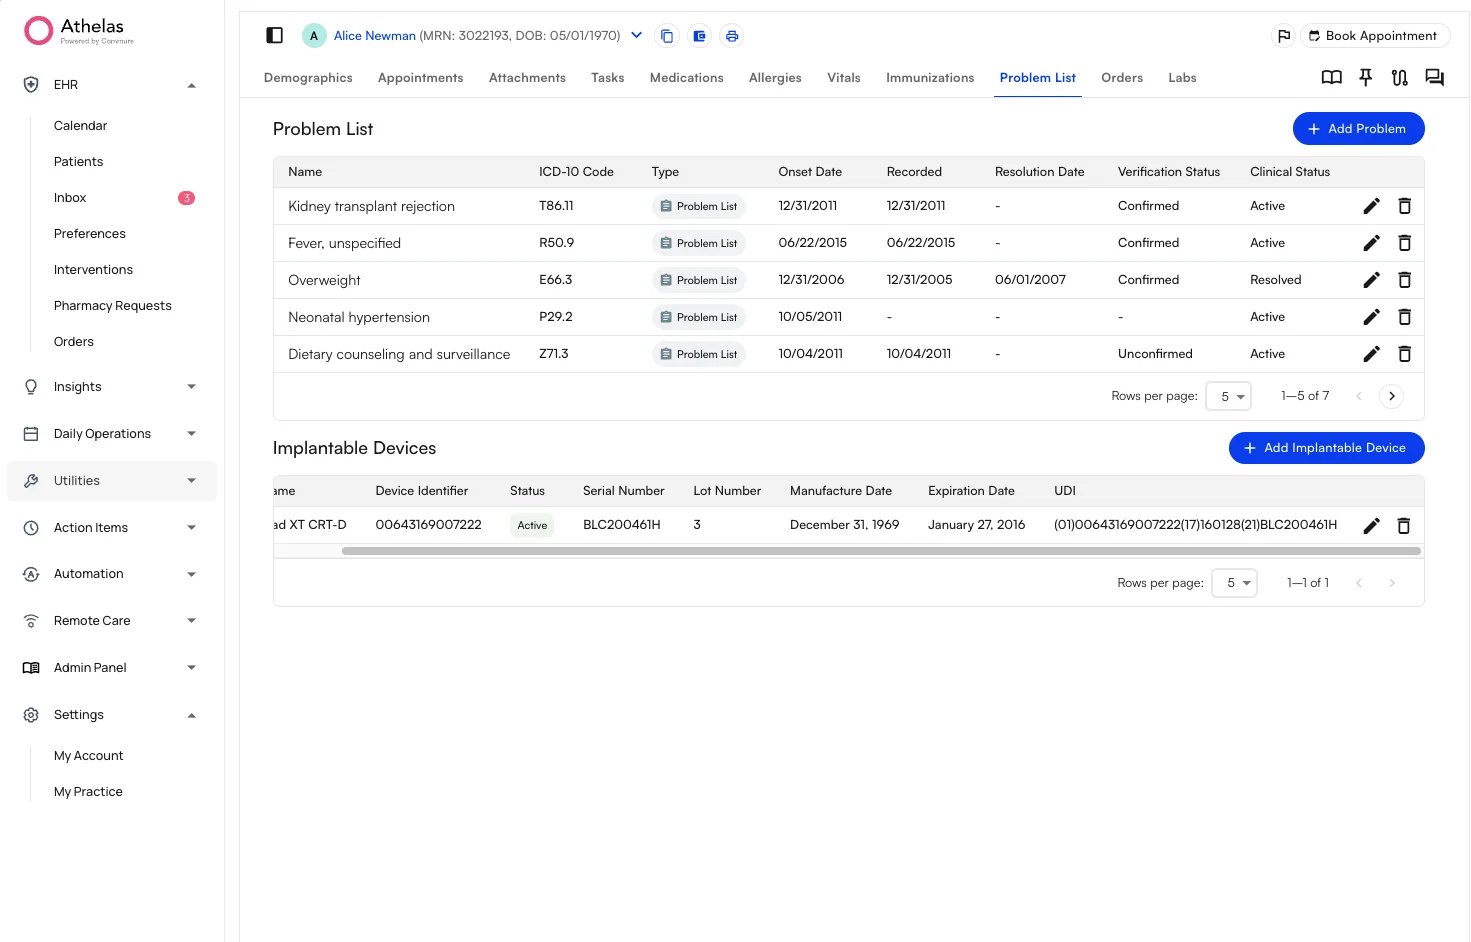
The action buttons sit at the far right of the **Implantable Devices** table.
1. Drag the table's horizontal scroll bar to the right to reveal the **pencil** (edit) and **trash** (delete) icons on the device's row.
2. Click the **pencil** icon to edit the device's details, or the **trash** icon to remove it.
### FAQ
Implantable devices live on the patient's **Problem List** tab, in the **Implantable Devices** section below the problem list itself.
No. Enter the device's **UDI** in the **UDI (Human Readable)** field and run the lookup. Air queries the **NLM AccessGUDID API** and automatically populates the Device Identifier, Device Name, Status, Serial Number, Lot Number, Manufacture Date, and Expiration Date.
Scroll the **Implantable Devices** table to the right to reveal the action icons on the device's row. Click the **pencil** icon to edit, or the **trash** icon to delete.
 ## Add an Implantable Device
###
## Add an Implantable Device
###  As long as you enter a valid UDI, Air looks it up through the **NLM AccessGUDID API** and automatically populates the rest of the device fields:
| **Field** | **Description** |
| :------------------------- | :--------------------------------------------------------------------------- |
| **UDI (Human Readable)** | The device's Unique Device Identifier. Paste or scan it to drive the lookup. |
| **Device Identifier (DI)** | The portion of the UDI that identifies the device's make and model. |
| **Status** | The device's current status (for example, **Active**). |
| **Device Name** | The device's brand or model name. |
| **Distinct Identifier** | An additional identifier for the specific device, when applicable. |
| **Serial Number** | The device's serial number. |
| **Lot Number** | The device's lot or batch number. |
| **Manufacture Date** | The date the device was manufactured. |
| **Expiration Date** | The date the device expires. |
3. Review the populated fields and click **Save**. The device now appears in the **Implantable Devices** table, with its **UDI**, **Device Identifier**, **Status**, **Serial Number**, **Lot Number**, **Manufacture Date**, and **Expiration Date**.
As long as you enter a valid UDI, Air looks it up through the **NLM AccessGUDID API** and automatically populates the rest of the device fields:
| **Field** | **Description** |
| :------------------------- | :--------------------------------------------------------------------------- |
| **UDI (Human Readable)** | The device's Unique Device Identifier. Paste or scan it to drive the lookup. |
| **Device Identifier (DI)** | The portion of the UDI that identifies the device's make and model. |
| **Status** | The device's current status (for example, **Active**). |
| **Device Name** | The device's brand or model name. |
| **Distinct Identifier** | An additional identifier for the specific device, when applicable. |
| **Serial Number** | The device's serial number. |
| **Lot Number** | The device's lot or batch number. |
| **Manufacture Date** | The date the device was manufactured. |
| **Expiration Date** | The date the device expires. |
3. Review the populated fields and click **Save**. The device now appears in the **Implantable Devices** table, with its **UDI**, **Device Identifier**, **Status**, **Serial Number**, **Lot Number**, **Manufacture Date**, and **Expiration Date**.
 ### FAQ