> ## Documentation Index
> Fetch the complete documentation index at: https://docs.athelas.com/llms.txt
> Use this file to discover all available pages before exploring further.
# User Management
This guide explains how to manage **who** uses your Athelas practice and **what** they can do. Three building blocks work together to give you precise control:
* **Users** are the individual team members who log in to the platform.
* **Roles** define what a user is allowed to do — which pages they can open and which actions they can perform.
* **Facilities, facility groups, and facility tags** define how your locations are organized, and **facility access** controls which of those facilities a user can see data for.
With these tools, an administrator can invite new team members and configure their access in a single flow, use predefined roles or create custom ones, scope each user to some or all facilities, and organize facilities into nested groups with tags for filtering and reporting.
**Roles** answer *"What can this user do?"* **Facility access** answers *"Whose data can this user see?"* Every user has both — together they form the full picture of what the user experiences in the app.
## Key concepts
### Users (team members)
A **team member** is anyone with a login to your practice. Every team member has:
| **Attribute** | **Description** |
| :----------------------- | :---------------------------------------------------------------------------------------------------------------------------------------- |
| **Full Name** | The user's display name. |
| **Email** | Used to sign in and receive invitations. Cannot be changed after the team member is created. |
| **Phone Number** | For contact purposes only. Not used for two-factor authentication. |
| **Location** | Optional free-text location. |
| **Roles** | One or more roles that determine what the user can do. A team member can hold multiple roles at once. |
| **Facility Access** | Which facilities, groups, or sites the user can see data for. |
| **Provider Credentials** | Optional. Links the team member to a clinical provider record (NPI, license, DOB, Tax ID, Medicare PTAN). |
| **Preferences** | Default Facility, Default Provider, and Default Card Reader. These are convenience defaults for filters — they do **not** control access. |
Team members are managed from **Settings → My Practice → Team Members**.
### Roles
A **role** is a named bundle of permissions, managed in the **Roles** sidebar of the Team Members page. There are two kinds:
* **Managed roles** are built-in roles provided by Athelas. They show a view icon (not an edit icon) and the message *"This role is managed by Athelas. It cannot be edited."* You can assign them and view exactly what they grant, but you cannot edit, rename, duplicate, or delete them.
* **Custom roles** are roles your administrators create. You can rename them, change their permissions, duplicate them, and delete them.
The standard managed roles are:
| **Role** | **Typical use** |
| :------------------ | :----------------------------------------------------------------------------------------------------------------------------------------- |
| **Administrator** | Full access to every feature of the platform, including team and practice administration. |
| **Billing Manager** | Access to billing, claims, denials, revenue reporting, and most operational pages. Cannot manage team members. |
| **Staff** | Day-to-day clinical and front-office work: calendar, patients, appointments, encounters, patient responsibility, virtual cards, templates. |
| **Single Provider** | Limited access for individual providers — primarily claim details, call center, and waitlist. |
When you create a custom role, you start from a **role template** that provides a sensible starting set of permissions. If a user has more than one role, their effective permissions are the **union** of all their roles:
* If **any** of their roles grants access to a page or feature, they have it.
* Removing one role only removes the permissions unique to that role; permissions granted by their other roles remain.
### Permissions
Permissions are organized into a tree, from broad to specific:
```text theme={null}
Permission package
└─ Page permission (a navigable screen, e.g. "Calendar", "Claims")
└─ Feature permission (a control within a page, e.g. "Modify Claim")
```
When you edit a role, the permission tree shows the top two levels in a checklist (left panel). Clicking a page reveals its sub-permissions (right panel), where you can fine-tune individual features.
* Use **Select all** / **Deselect all** at any level to quickly enable or disable an entire branch.
* A partially selected branch shows an indeterminate state — handy for spotting roles that "mostly" cover a section.
* Save your changes when done. The user's view updates after they refresh or log in again.
### Facilities
A **facility** is a physical location that belongs to your site, carrying identifying and billing information used across scheduling, claims, and reporting. Editable fields include **Facility Name**, **Facility NPI**, **Billing Name**, **Group**, **Phone**, **Default POS Code**, **Tax ID**, **Taxonomy Code**, **CLIA License**, and **Address**.
Facilities can be **archived** (reversible) instead of permanently deleted. An archived facility is removed from its group, loses its tags, continues to exist but is hidden from active pickers, and appears in a dedicated **Archived** section where it can be unarchived later.
### Facility groups
A **facility group** is a collection that holds facilities and/or other facility groups — how you express the structure of your practice (regions, divisions, service lines, etc.).
* Groups can be **nested**: a group can have child groups, which can have their own children.
* A facility belongs to **at most one** group. Moving it into a new group removes it from its previous one.
* Group names must be **unique within your site**.
* Granting a user access to a group automatically grants access to every active facility inside that group **and inside any of its descendant groups**.
### Facility tags
A **facility tag** is a label you apply to facilities to **categorize** and **filter** — for example "Pelvic Health", "Self-Scheduling Enabled", or "Pilot Site". A facility can have many tags, and a tag can apply to many facilities. Tag names must be unique within your site.
**Tags do not grant access.** Tags are purely organizational metadata and are never used to determine which facilities a user can see. Access is controlled exclusively by **facility access** assignments on the user. Filtering a page by tag narrows what is visible — it never expands a user's access beyond what their facility access already permits.
### Facility access
**Facility access** is the per-user setting that determines which facility data the user can see across the platform. It is set when you create or edit a team member, as either **All Facilities** or **Specific Facilities**. If you select a group and also select an individual facility already inside that group, the system automatically deduplicates.
### Roles vs. facility access: an example
Imagine your practice has 8 facilities organized into two groups — **North Region** (4) and **South Region** (4) — and a team member, Jordan, who is a regional billing manager for the South Region only. To give Jordan the right access, an administrator would:
1. Create Jordan as a team member.
2. Assign the **Billing Manager** role (this defines *what* Jordan can do — Claims, Denials, Revenue Analysis, etc.).
3. Set facility access to **Specific Facilities** and select the **South Region** group (this defines *which* facilities' data Jordan can see).
Now Jordan can open the Claims page (because of the role), and every page that supports facility filtering shows only the four South Region facilities (because of the facility access). If a fifth facility is later added to the South Region group, Jordan gains access automatically — no edit required.
## Manage team members
Navigate to **Settings → My Practice → Team Members**.
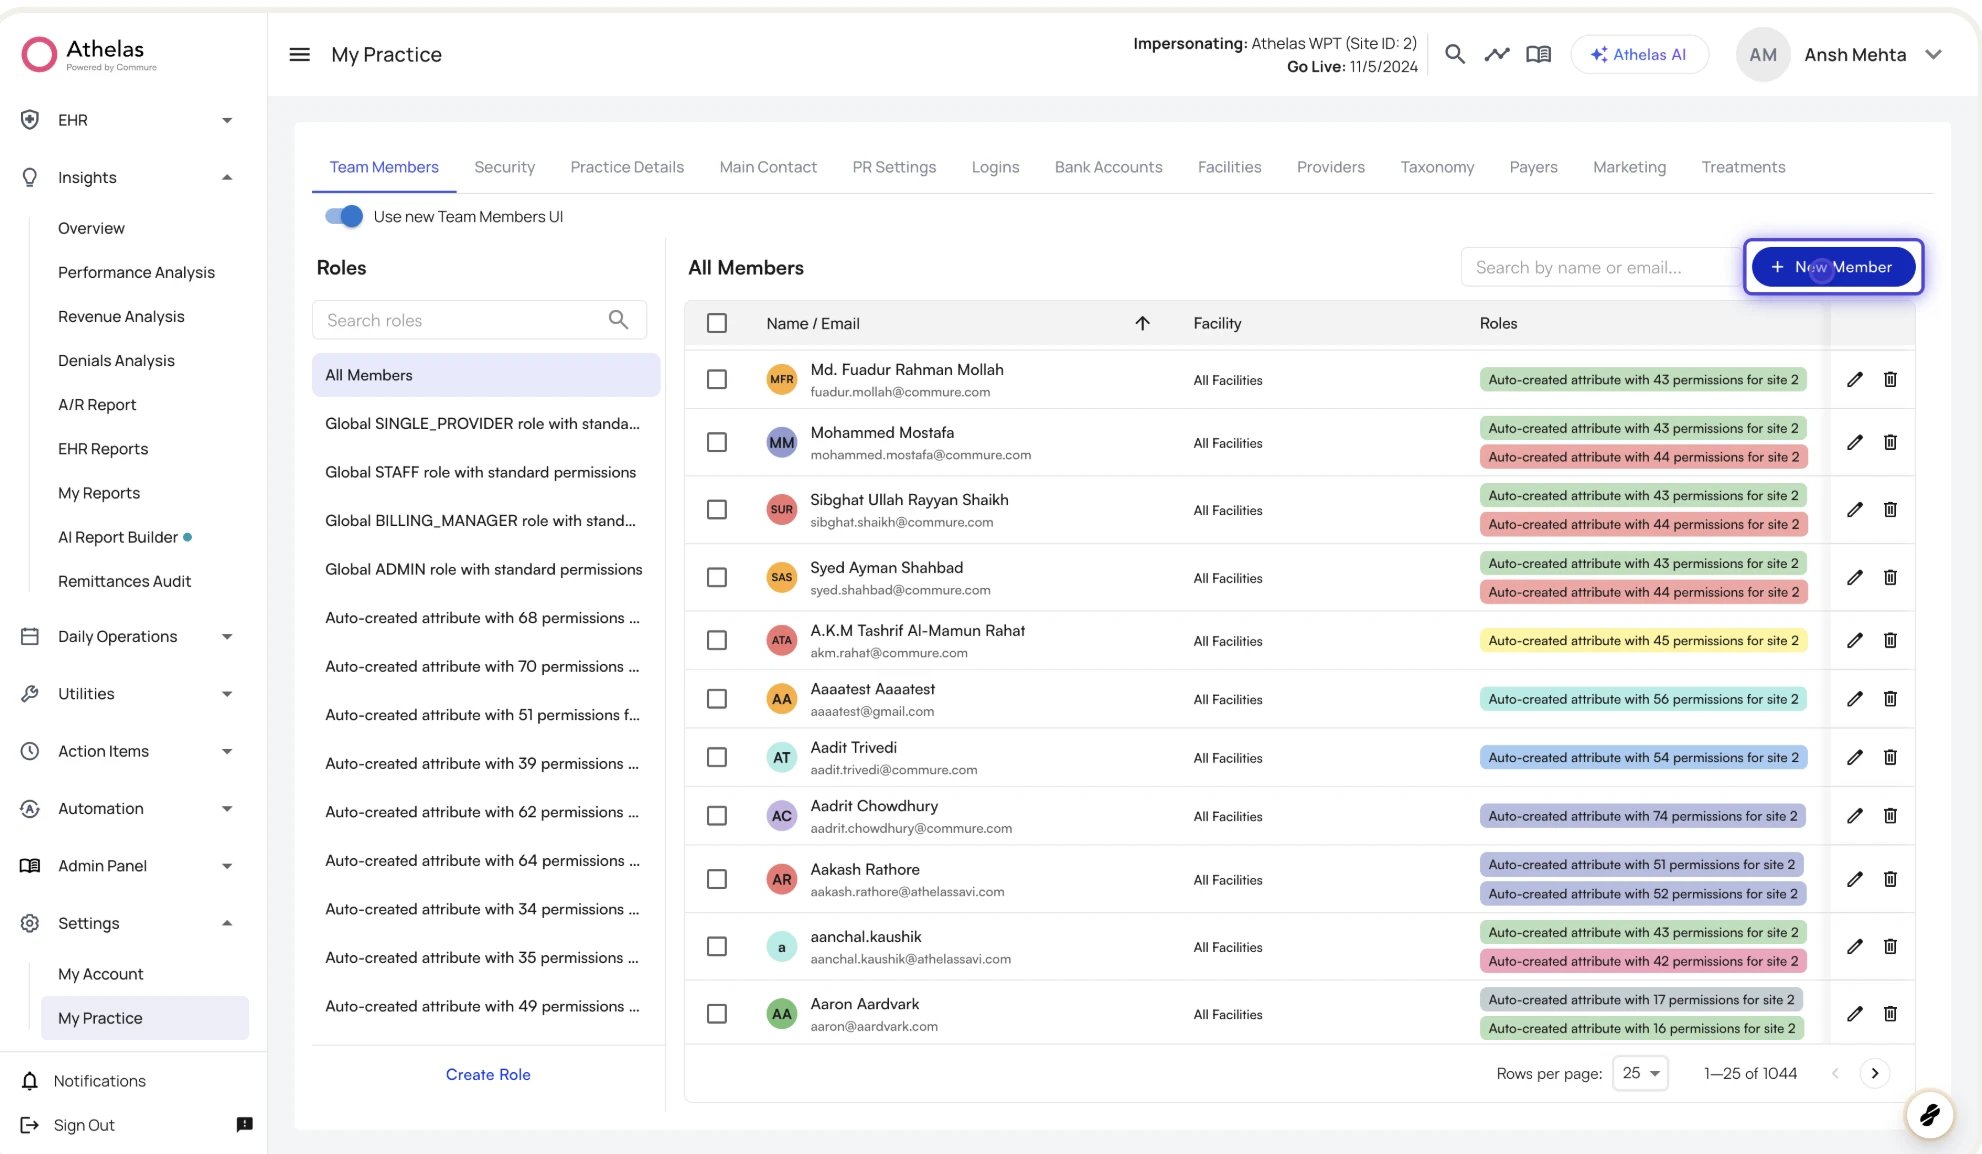 The page has two panels:
* The **Roles sidebar** on the left lists every role on your site, plus an **All Members** entry at the top. Clicking a role filters the table to members who hold it; clicking **All Members** returns to the full list.
* The **main panel** shows the members table with **Search by name or email…**, a **New Member** button, and three columns: **Name / Email**, **Facility**, and **Roles**.
### Add a team member
The page has two panels:
* The **Roles sidebar** on the left lists every role on your site, plus an **All Members** entry at the top. Clicking a role filters the table to members who hold it; clicking **All Members** returns to the full list.
* The **main panel** shows the members table with **Search by name or email…**, a **New Member** button, and three columns: **Name / Email**, **Facility**, and **Roles**.
### Add a team member
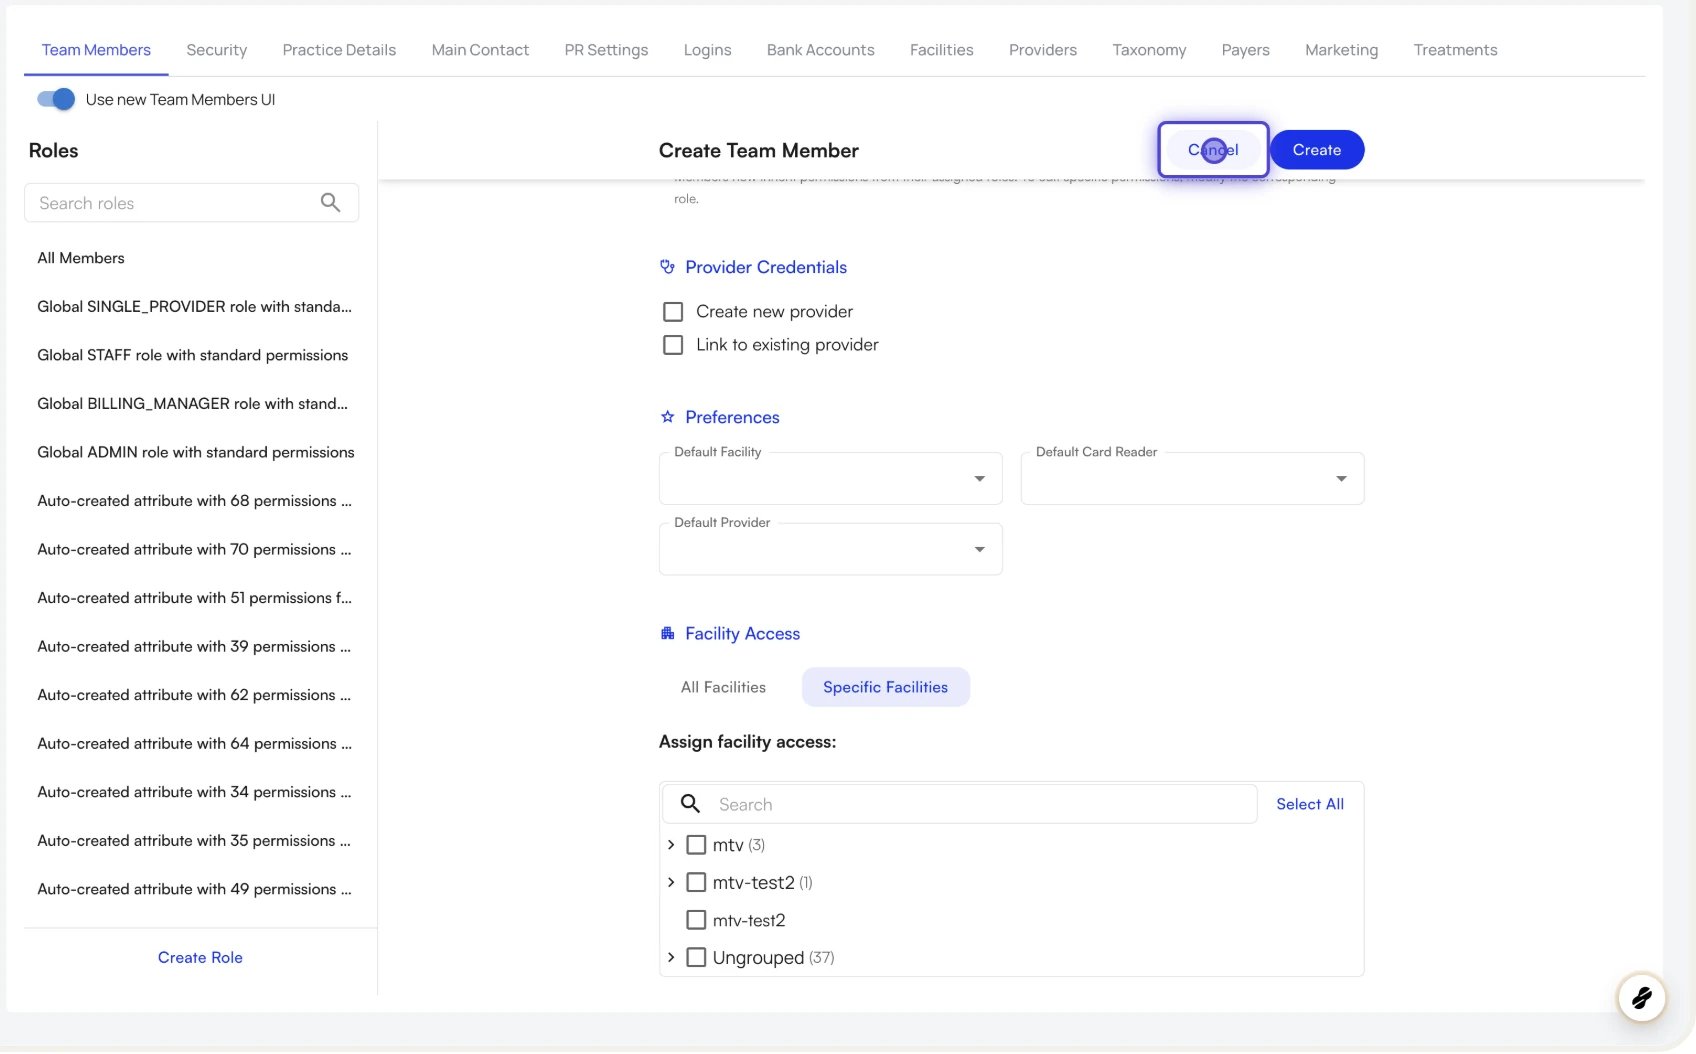 1. Click **New Member**.
2. Fill out **Basic Info**: **Full Name** (required), **Email** (required, cannot be changed later), **Location** (optional), and **Phone Number** (optional).
3. In **Permission Roles**, select one or more roles from the **Roles** picker. You can search by name and select multiple.
4. *(Optional)* Fill out **Provider Credentials** if the team member is also a clinical provider — choose **Create new provider** (supply NPI, DOB, license, Tax ID, and Medicare PTAN) or **Link to existing provider**.
5. *(Optional)* Set **Preferences** — Default Facility, Default Card Reader, and Default Provider. These are convenience defaults and do not affect what data the user can see.
6. In **Facility Access**, choose **All Facilities** or **Specific Facilities** (pick particular groups and/or facilities from the tree, using **Select all** / **Deselect all** and search to navigate quickly).
1. Click **New Member**.
2. Fill out **Basic Info**: **Full Name** (required), **Email** (required, cannot be changed later), **Location** (optional), and **Phone Number** (optional).
3. In **Permission Roles**, select one or more roles from the **Roles** picker. You can search by name and select multiple.
4. *(Optional)* Fill out **Provider Credentials** if the team member is also a clinical provider — choose **Create new provider** (supply NPI, DOB, license, Tax ID, and Medicare PTAN) or **Link to existing provider**.
5. *(Optional)* Set **Preferences** — Default Facility, Default Card Reader, and Default Provider. These are convenience defaults and do not affect what data the user can see.
6. In **Facility Access**, choose **All Facilities** or **Specific Facilities** (pick particular groups and/or facilities from the tree, using **Select all** / **Deselect all** and search to navigate quickly).
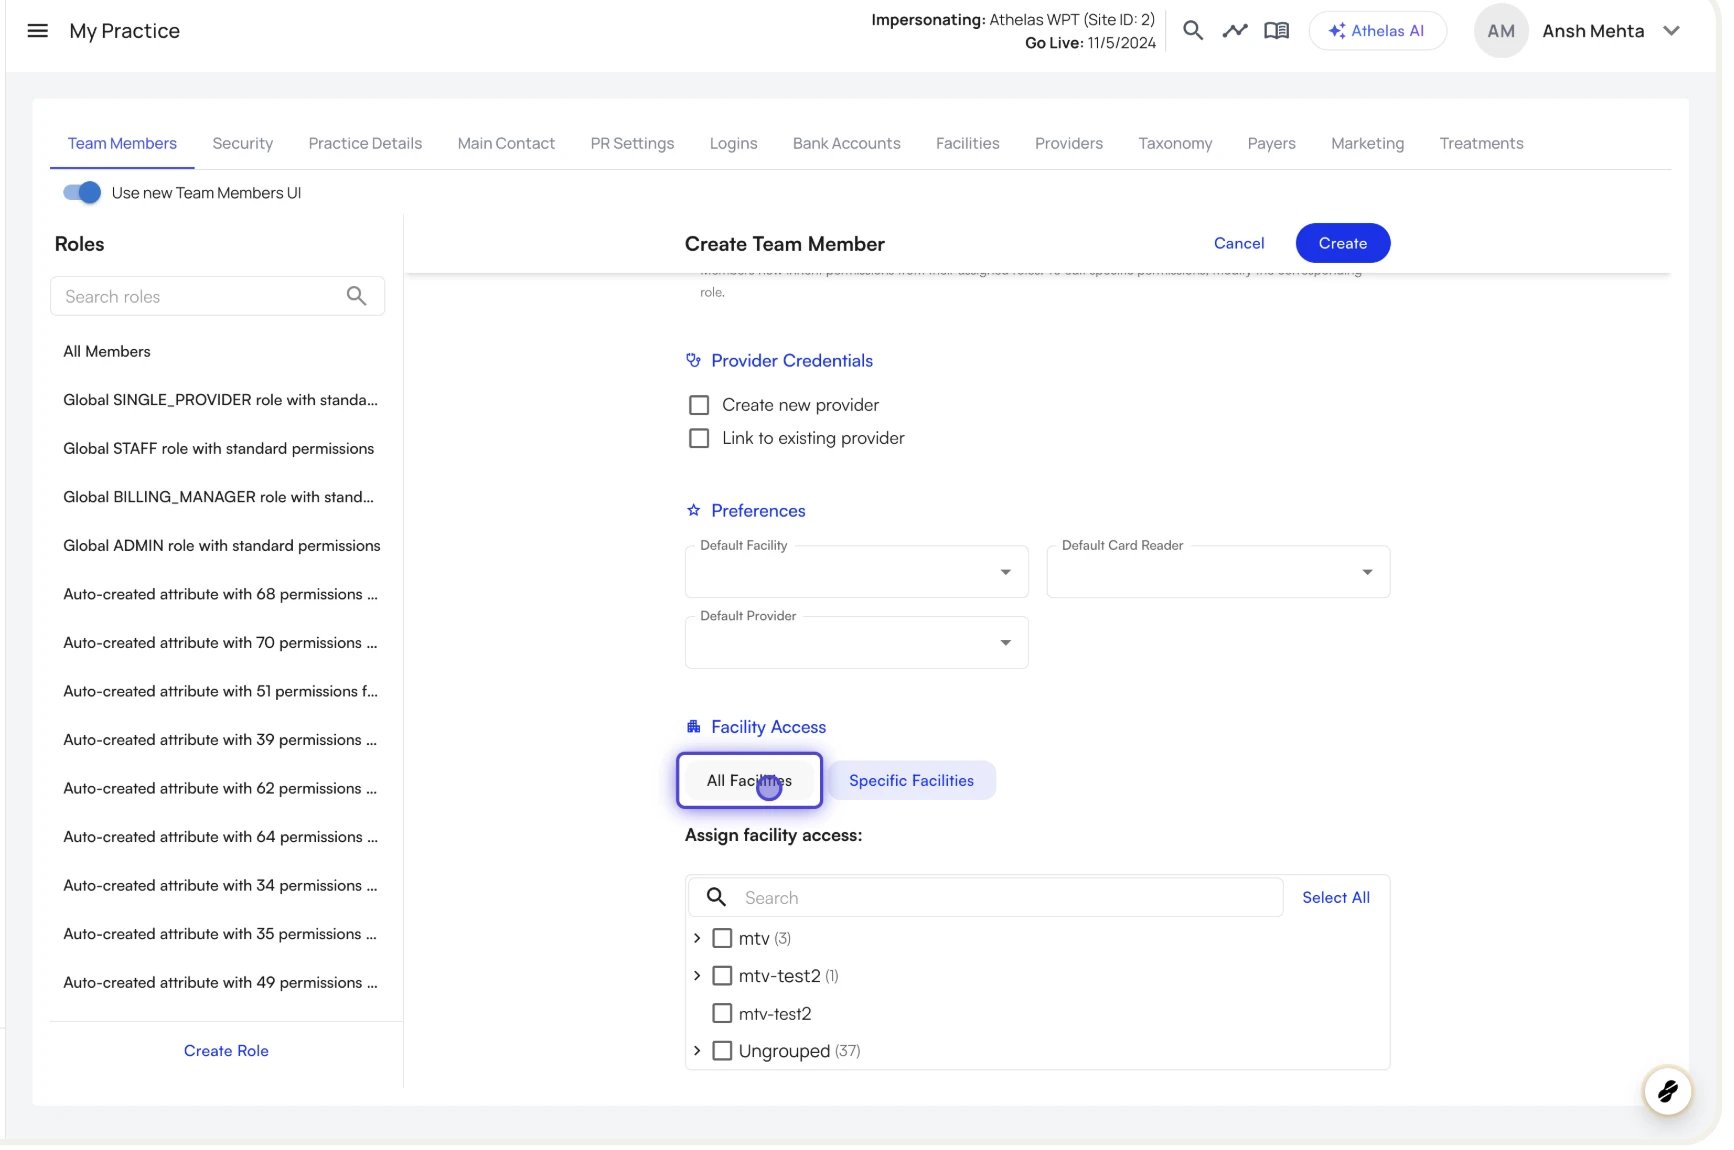 7. Click **Create**.
You will see a confirmation toast, and the new user receives an invitation email at the address you provided.
### Edit a team member
1. Locate the user in the table (use search if needed).
2. Click the **Edit** icon at the end of the row.
3. Change any field (the email is locked). You can add or remove roles, change facility access, link or unlink a provider, and update preferences.
4. Click **Save**.
The change typically takes effect on the user's next page refresh or login. Role changes propagate through the authorization service with a brief synchronization window of a few seconds.
### Remove a team member
1. Click the **Delete** icon at the end of the row.
2. Confirm the deletion in the dialog. This action cannot be undone.
7. Click **Create**.
You will see a confirmation toast, and the new user receives an invitation email at the address you provided.
### Edit a team member
1. Locate the user in the table (use search if needed).
2. Click the **Edit** icon at the end of the row.
3. Change any field (the email is locked). You can add or remove roles, change facility access, link or unlink a provider, and update preferences.
4. Click **Save**.
The change typically takes effect on the user's next page refresh or login. Role changes propagate through the authorization service with a brief synchronization window of a few seconds.
### Remove a team member
1. Click the **Delete** icon at the end of the row.
2. Confirm the deletion in the dialog. This action cannot be undone.
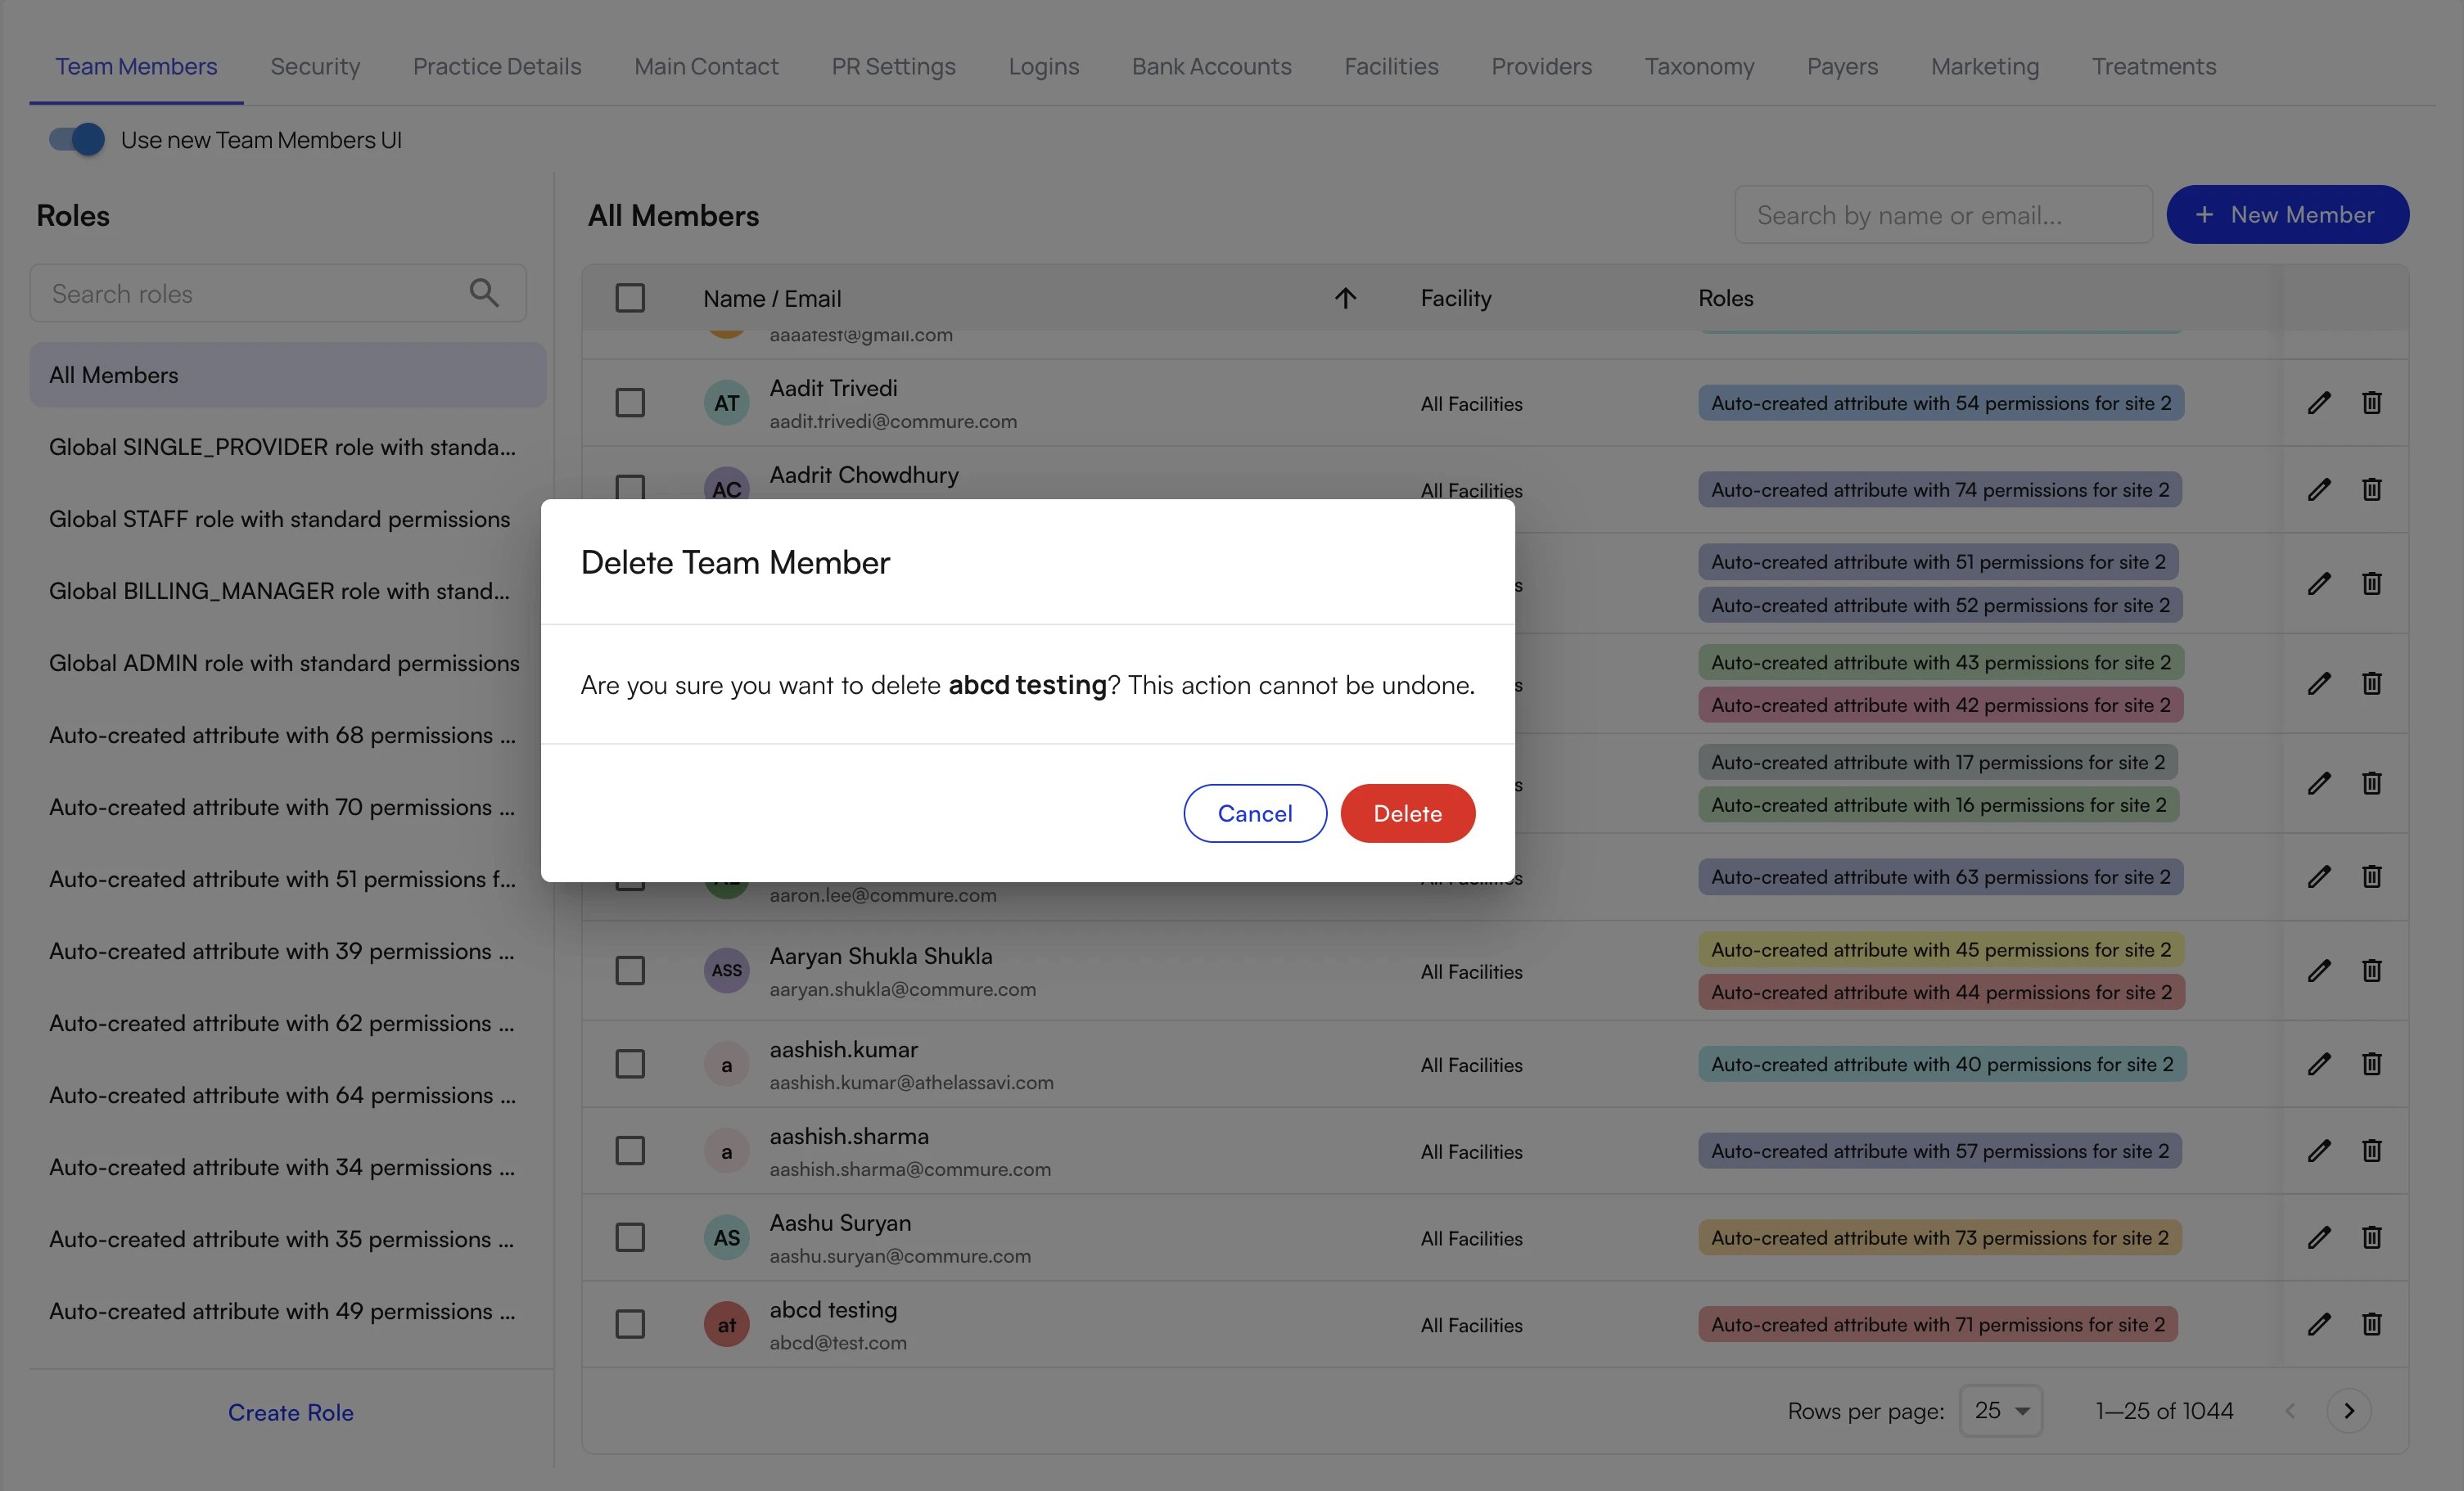 The user is removed from your site immediately.
### Search and filter
* Type a name or email in the **Search by name or email…** box to narrow the table.
* Click any role in the left sidebar to filter to members with that role.
* Combine both to find, for example, all Billing Managers named Smith.
## Manage roles
The **Roles sidebar** is the home for role administration — see every role, search, create new ones, and edit any role not managed by Athelas.
### Create a custom role
The user is removed from your site immediately.
### Search and filter
* Type a name or email in the **Search by name or email…** box to narrow the table.
* Click any role in the left sidebar to filter to members with that role.
* Combine both to find, for example, all Billing Managers named Smith.
## Manage roles
The **Roles sidebar** is the home for role administration — see every role, search, create new ones, and edit any role not managed by Athelas.
### Create a custom role
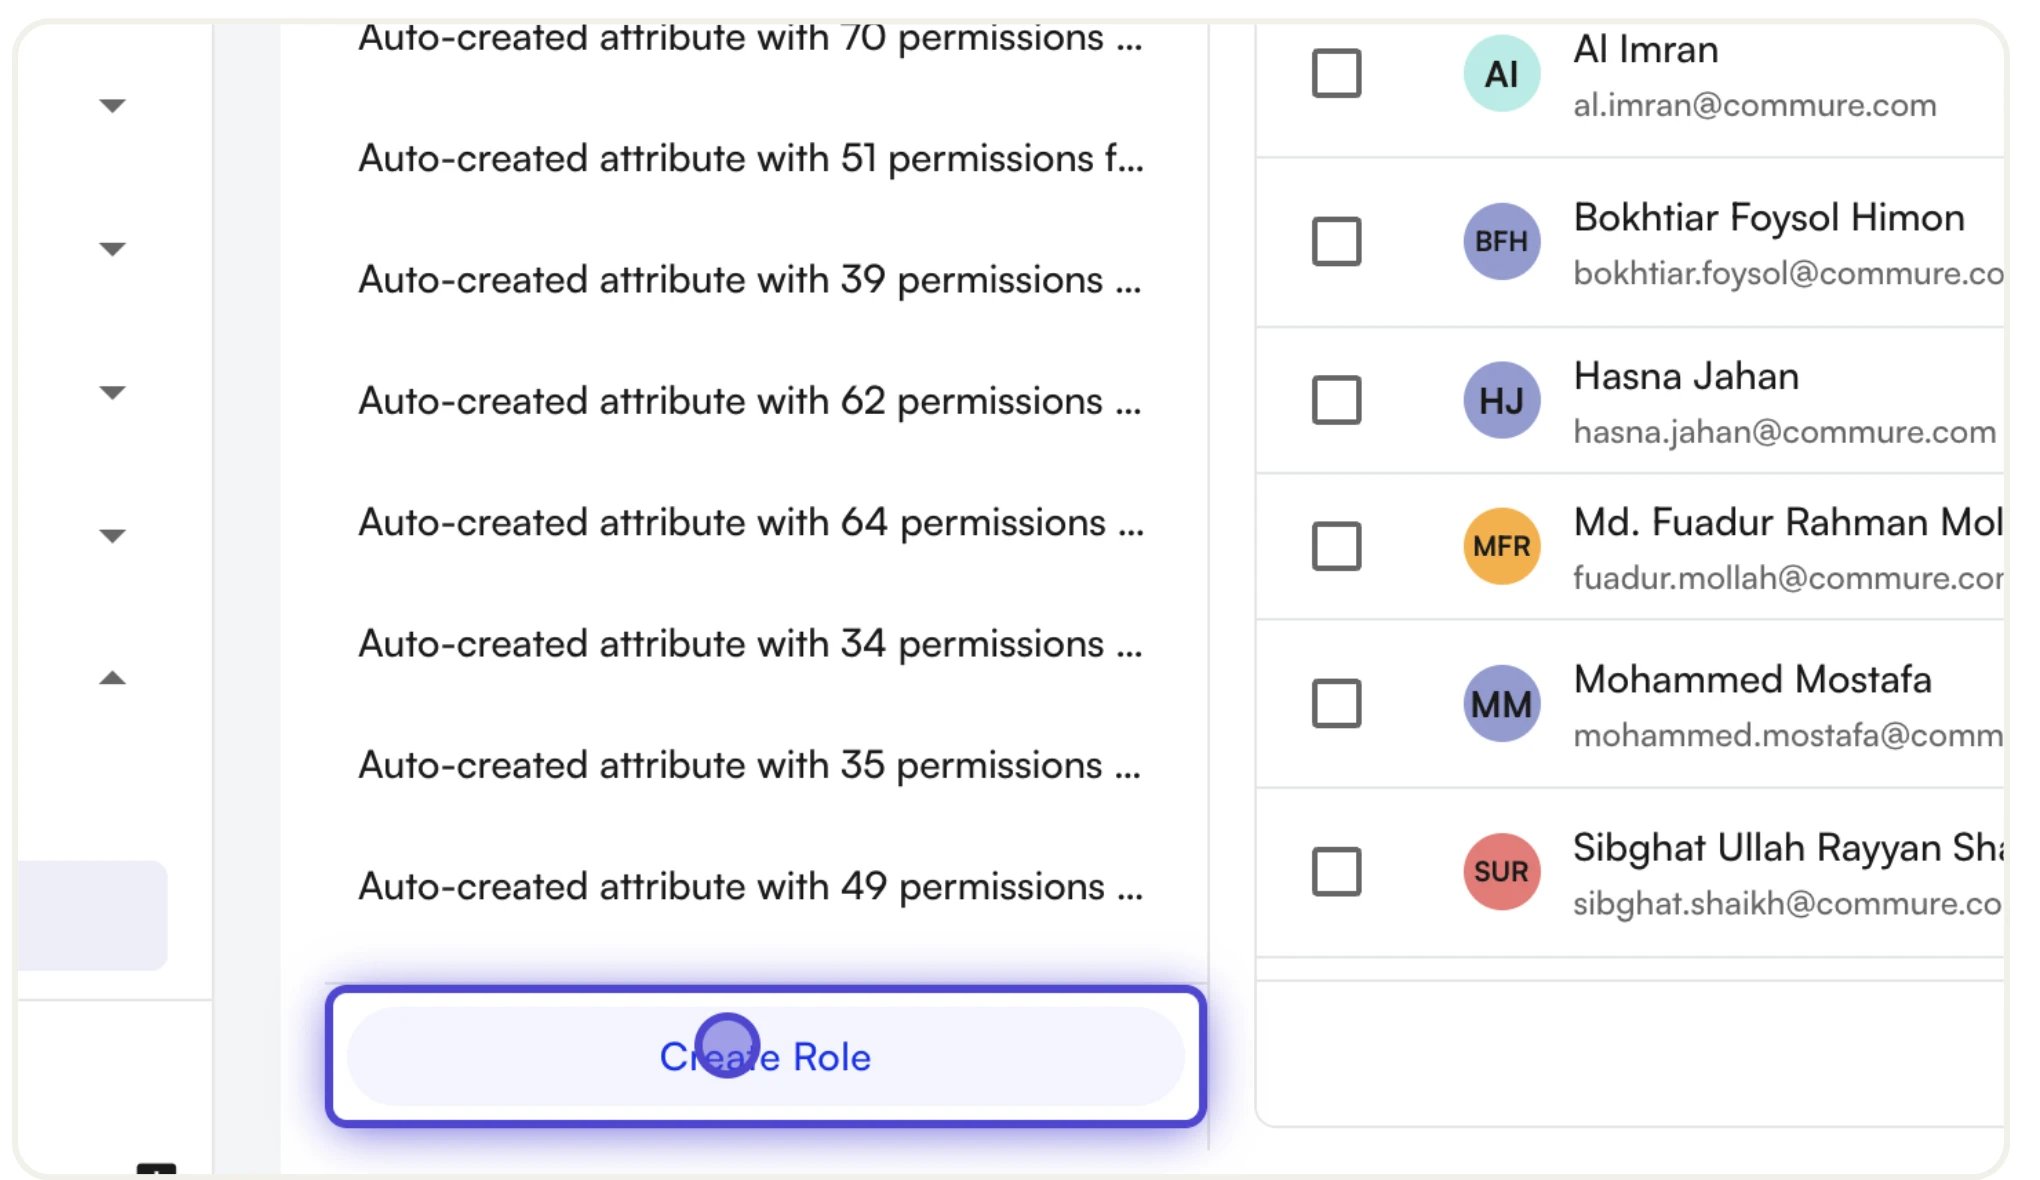 1. In the Roles sidebar, click **Create Role**.
2. From **Start from a template**, pick a role template that closely matches the access this role should have.
3. In the **Role Configuration** panel, enter a **Role Name** (e.g., "Front Desk Lead", "Claims Specialist") and confirm or change the **Role Template**.
1. In the Roles sidebar, click **Create Role**.
2. From **Start from a template**, pick a role template that closely matches the access this role should have.
3. In the **Role Configuration** panel, enter a **Role Name** (e.g., "Front Desk Lead", "Claims Specialist") and confirm or change the **Role Template**.
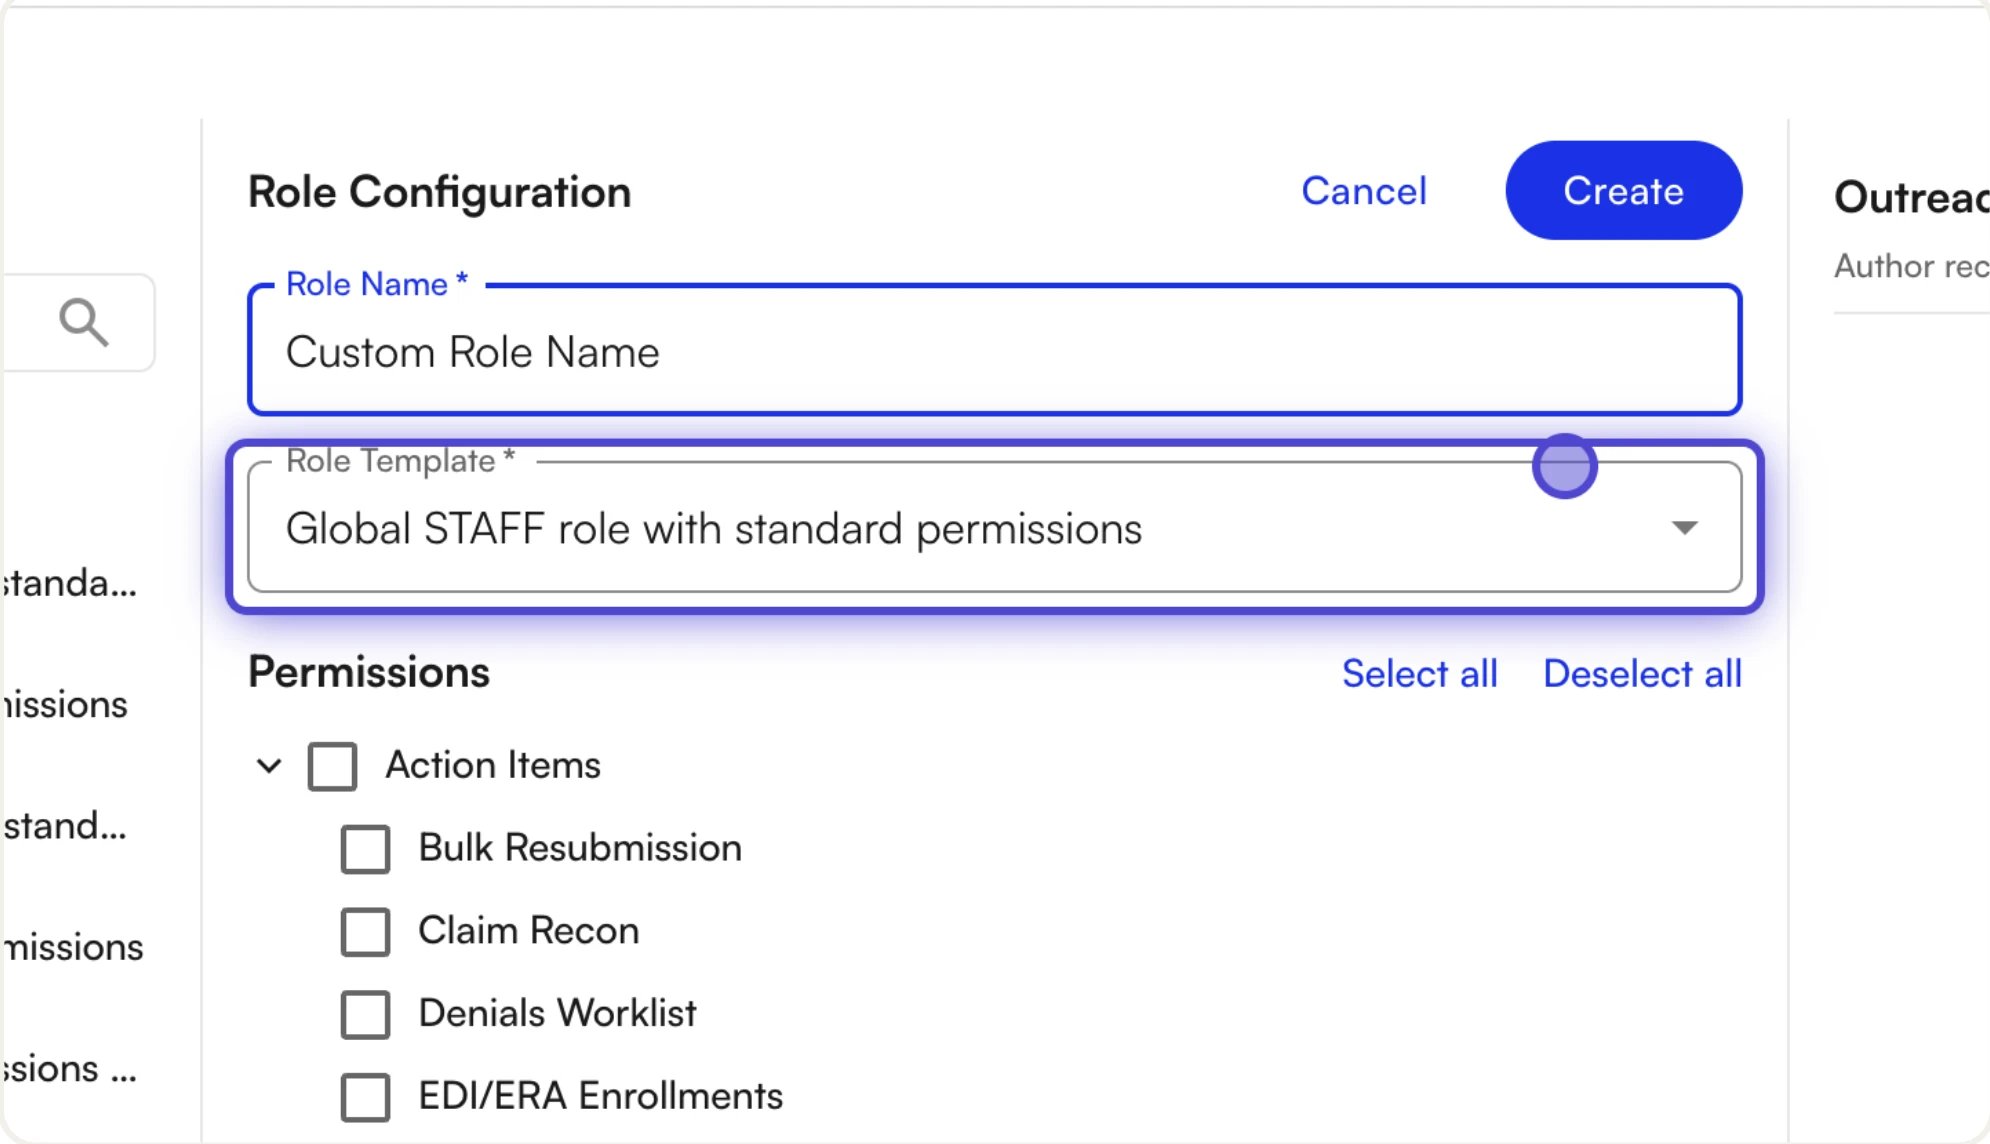 4. Adjust the permission tree: use the left panel to enable/disable entire packages or pages, click any page with sub-permissions to fine-tune individual features in the right panel, and use **Select all** / **Deselect all** where helpful.
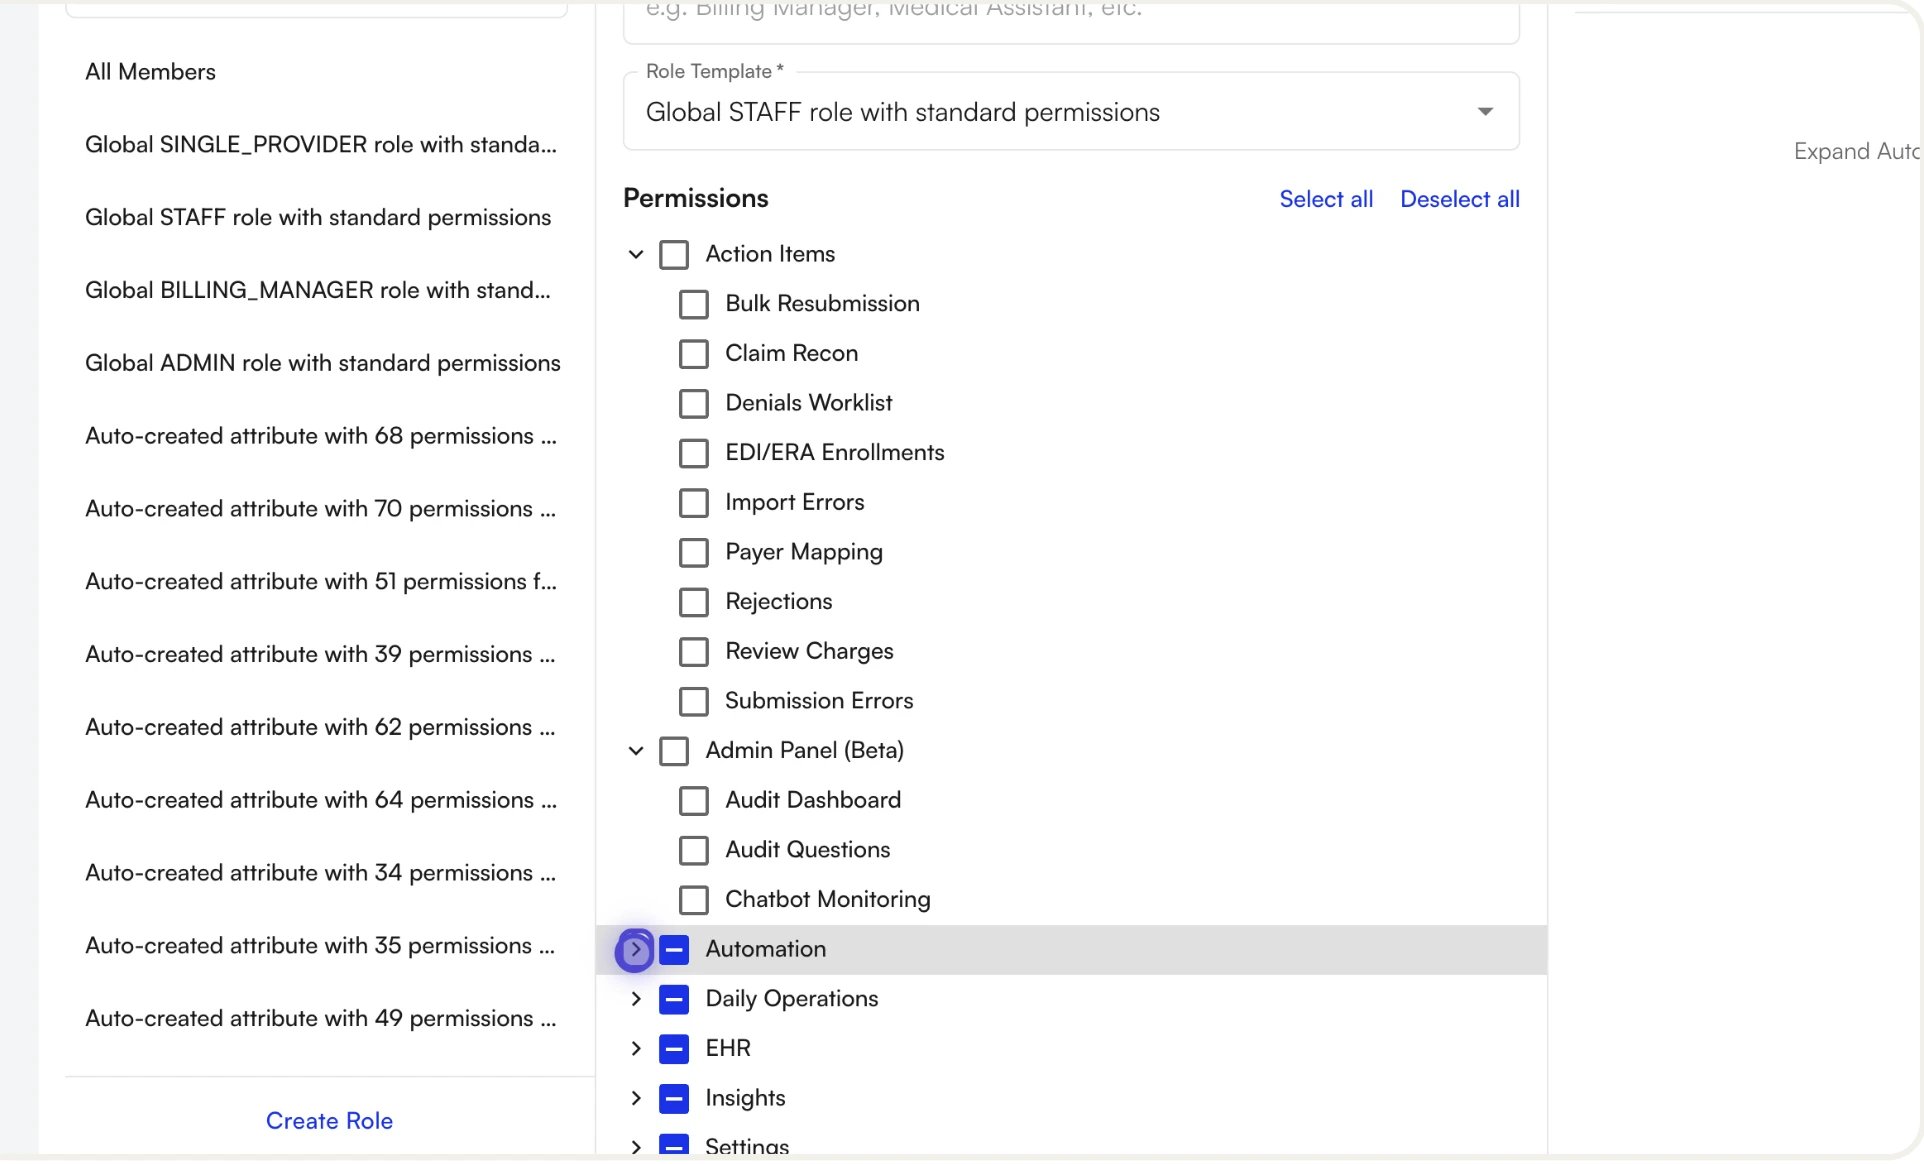 5. Click **Create**. The role is now available in the picker when you create or edit team members.
Changing the **Role Template** of a role discards any custom permission selections you have made. The app asks you to confirm before proceeding.
### Edit or rename a role
1. Hover over the role in the sidebar and click the **Edit** (pencil) icon.
2. Change the name, template, or permissions.
3. Click **Save**.
Every user assigned to the role receives the updated permissions after their next page refresh or login.
### Duplicate a role
Duplicating is the recommended way to create a new role that closely resembles an existing custom role.
1. Hover over the role, open its menu, and click **Duplicate**.
2. The system creates a copy named *"\[Original Name] (Copy)"* with identical permissions.
3. Edit the copy to give it a new name and adjust its permissions.
Athelas-managed roles cannot be duplicated. To build a role similar to a managed one, use **Create Role** and start from the corresponding template instead.
### Delete a role
1. Hover over the role, open its menu, and click **Delete**.
2. Confirm in the **Delete Role** dialog. It shows how many members currently hold the role and warns you if any member would be left with no role.
Deleting a role removes it from every user it was assigned to but does **not** delete the users themselves. Each affected user keeps their other roles; a user who held only this role loses its permissions until you assign them another.
### View Athelas-managed roles
Click any managed role in the sidebar to open it in **view-only** mode. The name field is disabled, the permission tree is read-only, and a banner explains the role is managed by Athelas. You can still see exactly what each managed role grants — useful when deciding which role to assign.
## Manage facilities
Navigate to **Settings → My Practice → Facilities**. The Facilities Manager shows a tree of every facility group and facility on your site: your **facility groups** at the top (with nested child groups and facilities), an **Ungrouped** section, and an **Archived** section at the bottom. The toolbar offers **Search**, a **Tags** button, and an **Add** button.
### Add a facility
5. Click **Create**. The role is now available in the picker when you create or edit team members.
Changing the **Role Template** of a role discards any custom permission selections you have made. The app asks you to confirm before proceeding.
### Edit or rename a role
1. Hover over the role in the sidebar and click the **Edit** (pencil) icon.
2. Change the name, template, or permissions.
3. Click **Save**.
Every user assigned to the role receives the updated permissions after their next page refresh or login.
### Duplicate a role
Duplicating is the recommended way to create a new role that closely resembles an existing custom role.
1. Hover over the role, open its menu, and click **Duplicate**.
2. The system creates a copy named *"\[Original Name] (Copy)"* with identical permissions.
3. Edit the copy to give it a new name and adjust its permissions.
Athelas-managed roles cannot be duplicated. To build a role similar to a managed one, use **Create Role** and start from the corresponding template instead.
### Delete a role
1. Hover over the role, open its menu, and click **Delete**.
2. Confirm in the **Delete Role** dialog. It shows how many members currently hold the role and warns you if any member would be left with no role.
Deleting a role removes it from every user it was assigned to but does **not** delete the users themselves. Each affected user keeps their other roles; a user who held only this role loses its permissions until you assign them another.
### View Athelas-managed roles
Click any managed role in the sidebar to open it in **view-only** mode. The name field is disabled, the permission tree is read-only, and a banner explains the role is managed by Athelas. You can still see exactly what each managed role grants — useful when deciding which role to assign.
## Manage facilities
Navigate to **Settings → My Practice → Facilities**. The Facilities Manager shows a tree of every facility group and facility on your site: your **facility groups** at the top (with nested child groups and facilities), an **Ungrouped** section, and an **Archived** section at the bottom. The toolbar offers **Search**, a **Tags** button, and an **Add** button.
### Add a facility
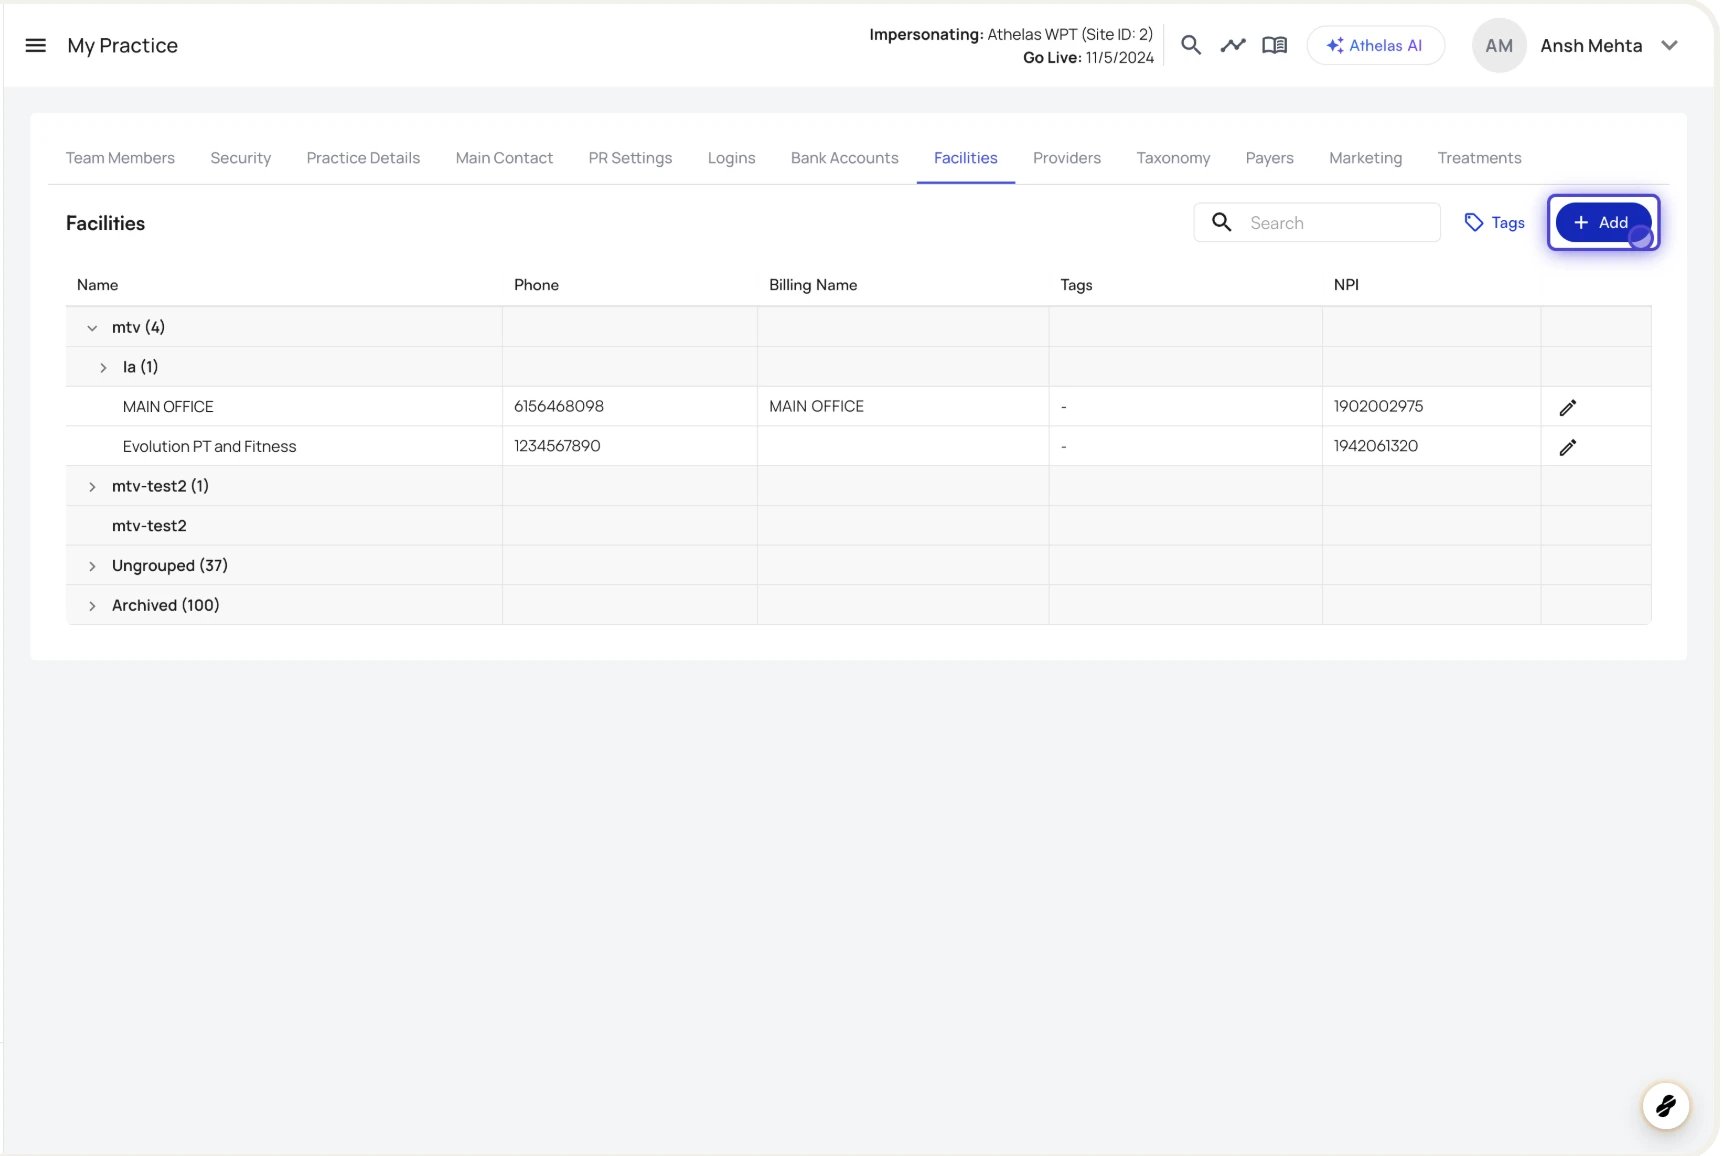 1. Click **Add → Facility**.
2. Fill in the **Create Facility** form: **Facility Name** (required), **Facility NPI** (required), **Billing Name** (required; check **Same as facility name** to copy it), **Group** (optional), **Phone** (required), **Default POS Code**, **Tax ID** (9 digits), **Taxonomy Code** (10 characters), **CLIA License** (10 characters if provided), and **Address** (Line 1, City, State, Zip required).
3. Click **Create**.
### Edit a facility
1. Click the **Edit** icon on the facility row, or click the facility name.
2. Change any editable field. The form won't save invalid values (missing required fields, malformed CLIA, etc.).
3. Click **Save**.
To move a facility into a different group, change the **Group** field — the facility automatically leaves its previous group, since a facility can belong to only one group at a time.
### Archive and unarchive facilities
1. Open the facility in the edit drawer and click **Archive**.
2. Confirm in the **Deactivate Facility** dialog. This action can be reversed later.
When archived, the facility is removed from its group, loses all tags, and moves to the **Archived** section. To bring it back, find it in **Archived** and use **Unarchive**.
The Facilities Manager favors **archiving** over permanent deletion. Archiving is reversible and preserves history; permanent deletion is reserved for administrative cleanup and is blocked if the facility has clinical or billing data attached. In normal day-to-day administration, archive is the right choice.
## Manage facility groups
### Create a group
1. Click **Add → Facility**.
2. Fill in the **Create Facility** form: **Facility Name** (required), **Facility NPI** (required), **Billing Name** (required; check **Same as facility name** to copy it), **Group** (optional), **Phone** (required), **Default POS Code**, **Tax ID** (9 digits), **Taxonomy Code** (10 characters), **CLIA License** (10 characters if provided), and **Address** (Line 1, City, State, Zip required).
3. Click **Create**.
### Edit a facility
1. Click the **Edit** icon on the facility row, or click the facility name.
2. Change any editable field. The form won't save invalid values (missing required fields, malformed CLIA, etc.).
3. Click **Save**.
To move a facility into a different group, change the **Group** field — the facility automatically leaves its previous group, since a facility can belong to only one group at a time.
### Archive and unarchive facilities
1. Open the facility in the edit drawer and click **Archive**.
2. Confirm in the **Deactivate Facility** dialog. This action can be reversed later.
When archived, the facility is removed from its group, loses all tags, and moves to the **Archived** section. To bring it back, find it in **Archived** and use **Unarchive**.
The Facilities Manager favors **archiving** over permanent deletion. Archiving is reversible and preserves history; permanent deletion is reserved for administrative cleanup and is blocked if the facility has clinical or billing data attached. In normal day-to-day administration, archive is the right choice.
## Manage facility groups
### Create a group
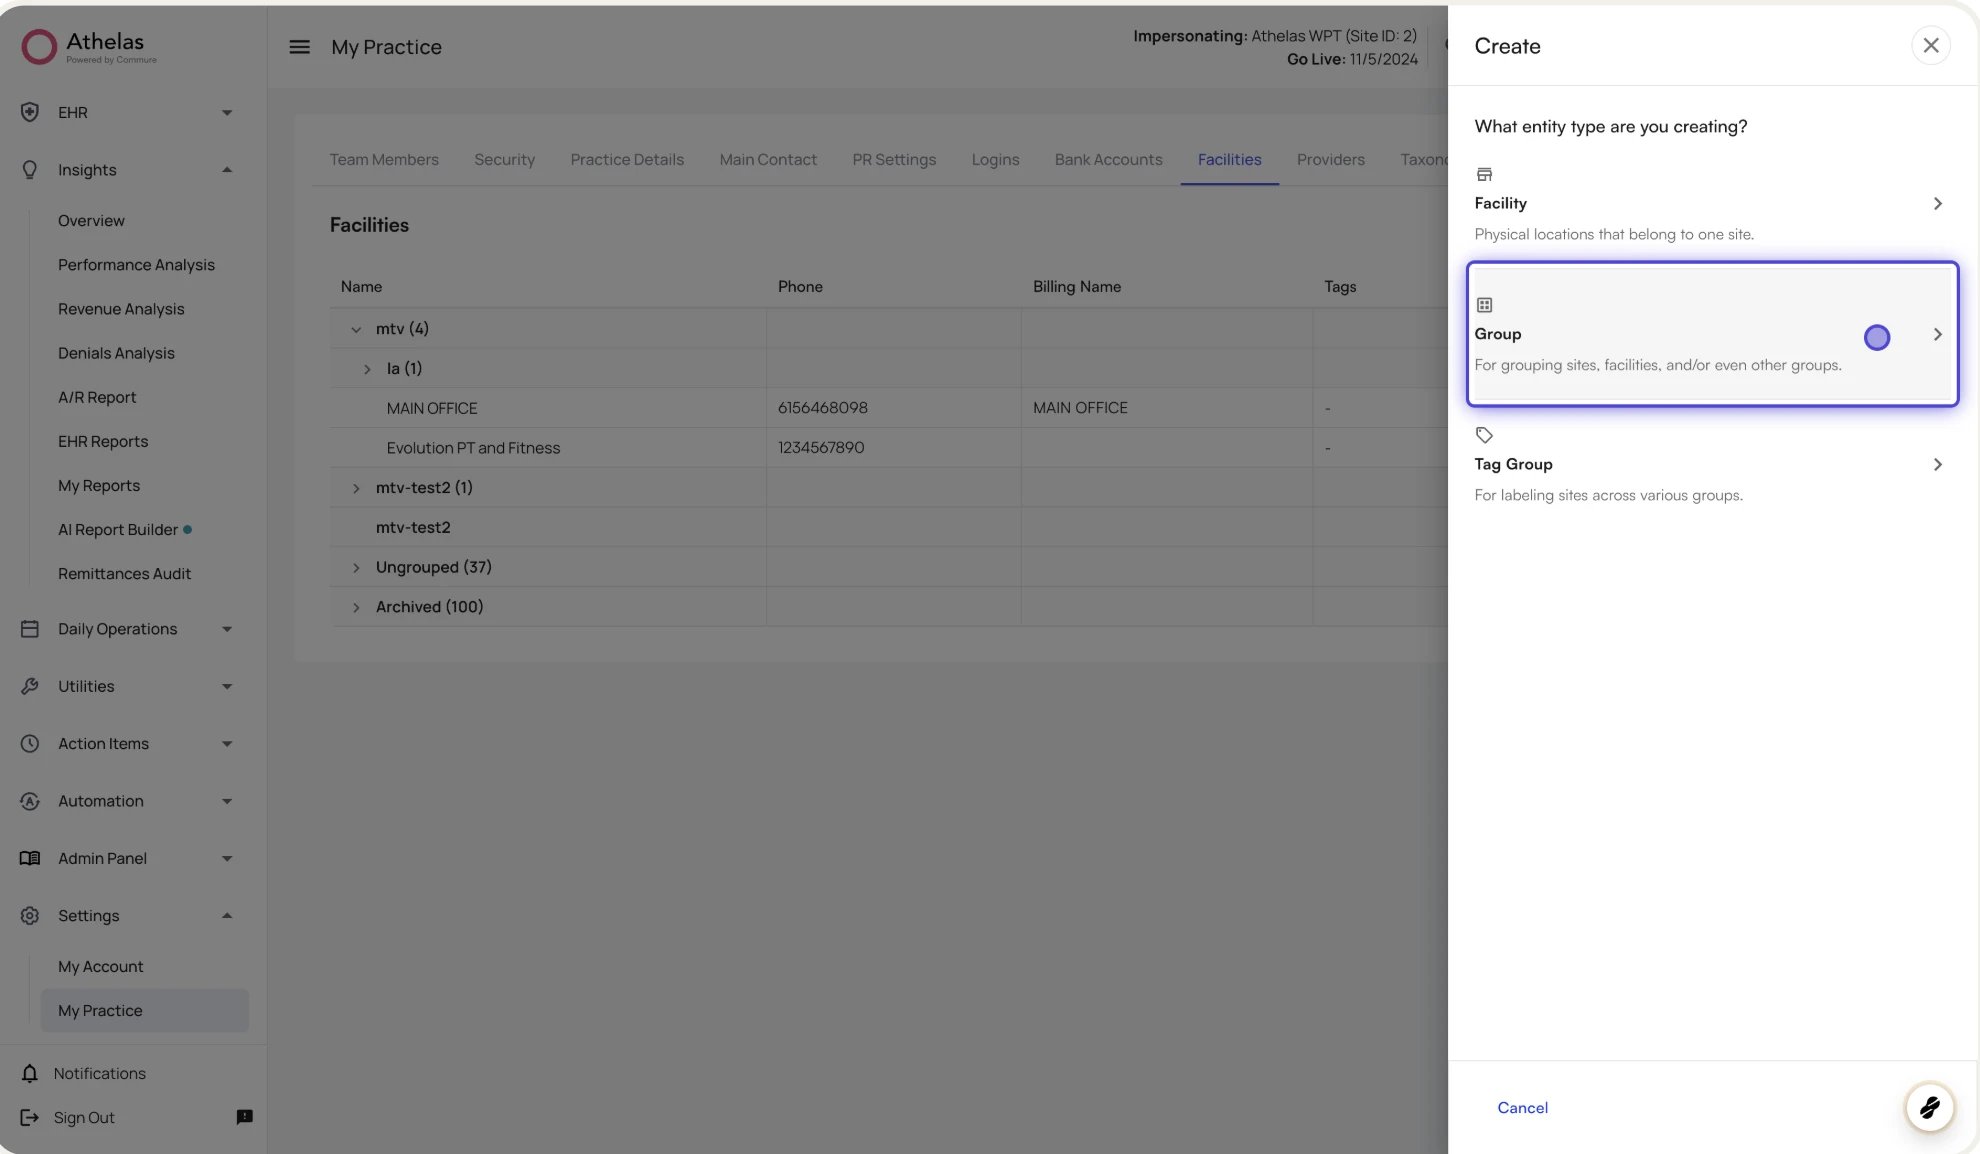 1. Click **Add → Group**.
2. Fill in the **Create Group** form: **Group Name** (required, unique within your site), **Phone Number** (optional), **Parent Group** (optional — pick an existing group to nest under, or leave empty for a top-level group), and **Select child entities** (the facilities and/or top-level groups that should belong to this group).
3. Click **Create**.
**Note:** Child entities must share the same parent to be selected — this prevents accidentally pulling members away from unrelated parents.
### Edit a group
1. Click **Add → Group**.
2. Fill in the **Create Group** form: **Group Name** (required, unique within your site), **Phone Number** (optional), **Parent Group** (optional — pick an existing group to nest under, or leave empty for a top-level group), and **Select child entities** (the facilities and/or top-level groups that should belong to this group).
3. Click **Create**.
**Note:** Child entities must share the same parent to be selected — this prevents accidentally pulling members away from unrelated parents.
### Edit a group
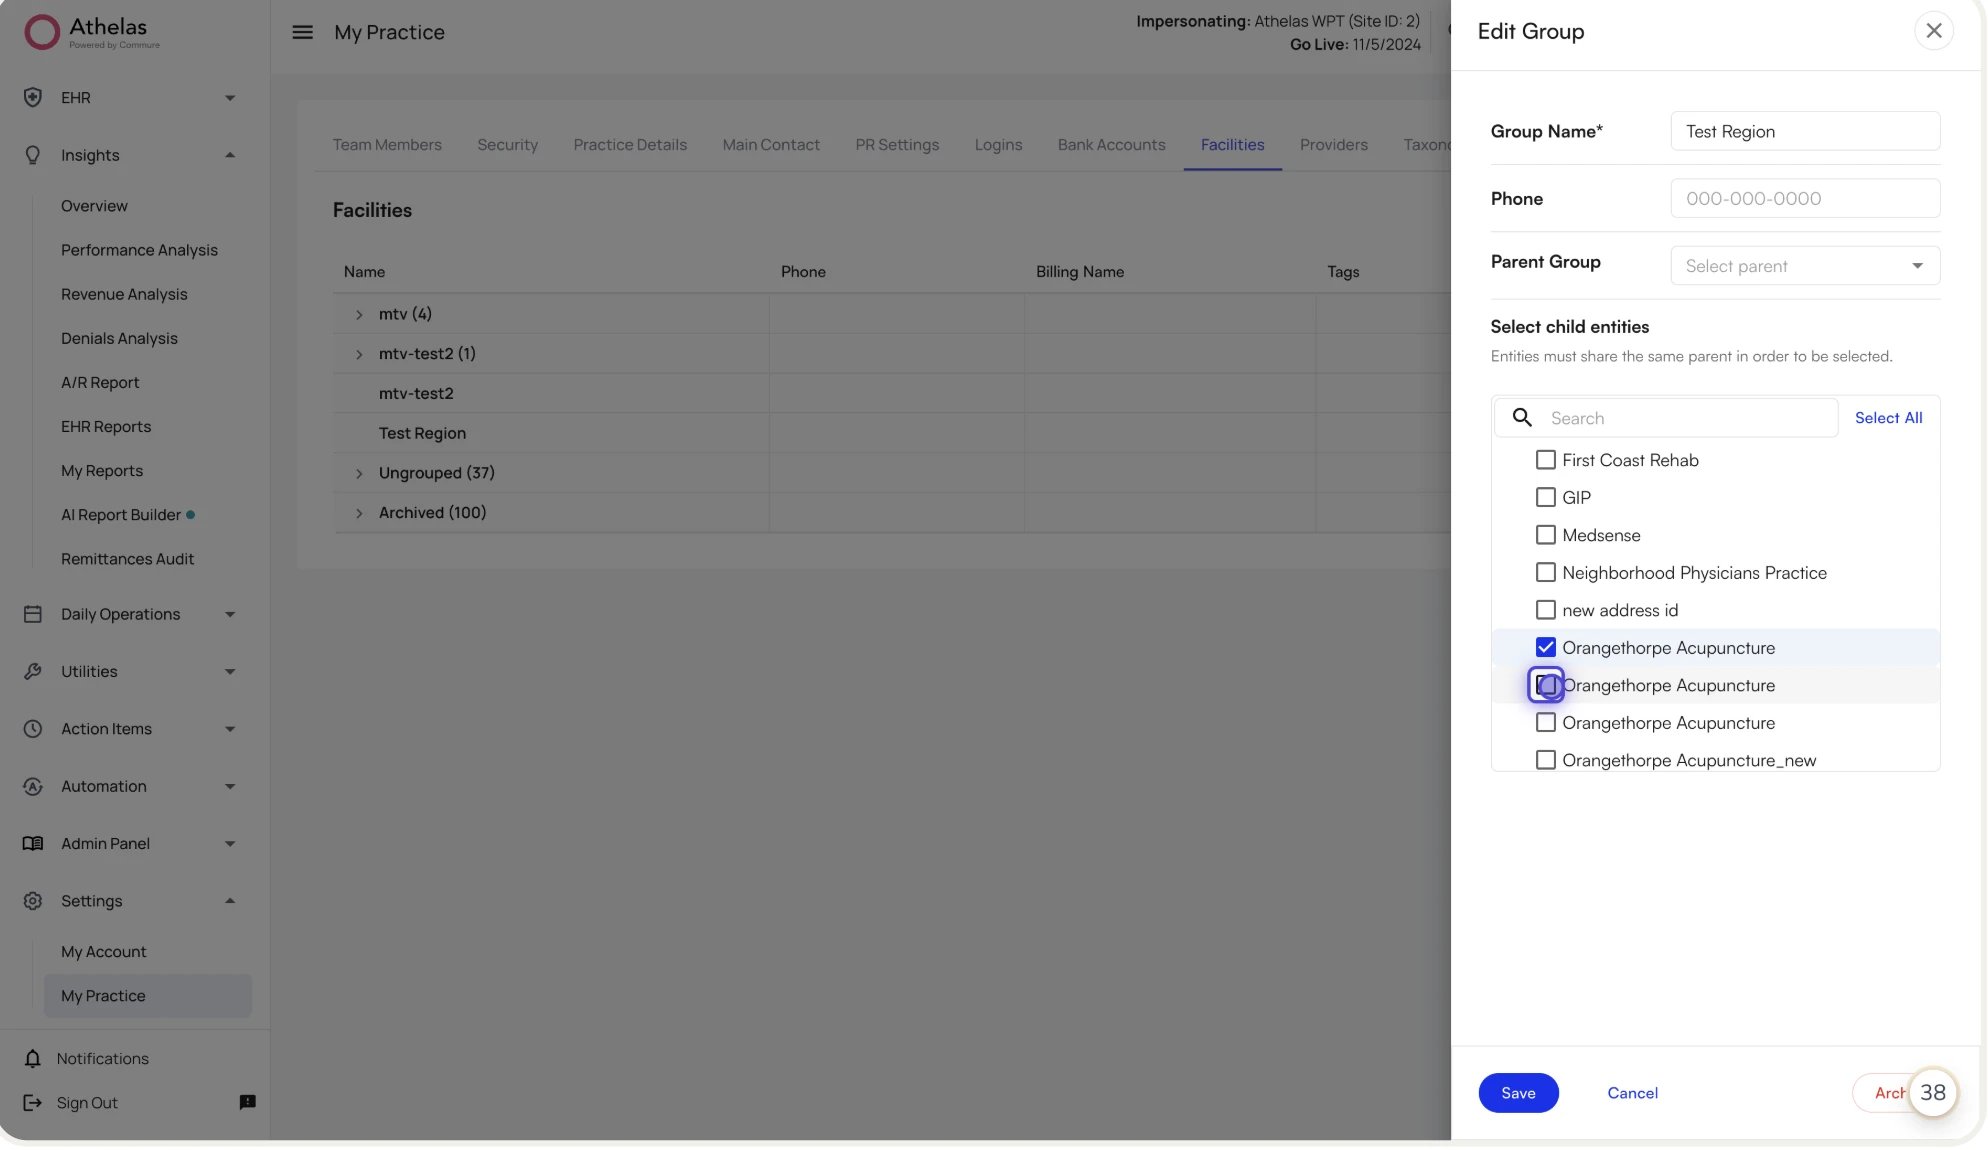 1. Click the **Edit Group** icon on the group row.
2. Rename the group, change its parent, or add/remove member facilities and child groups.
3. Click **Save**.
The system blocks moves that would create a cycle in the hierarchy, and rejects a name that already exists on your site (case-insensitive, ignoring spaces).
### Move facilities between groups
You can move facilities three ways, and in every case the facility leaves its previous group automatically:
* Edit the **facility** and change its **Group** field.
* Edit the **destination group** and add the facility to **Select child entities**.
* From the destination group's row, use **Add to group** to open facility creation with the group preselected.
### Delete a group
1. Open the group in edit mode and click **Archive**.
2. Confirm in the dialog. Facilities in the group become ungrouped.
When a group is deleted, its child groups are reparented to its own parent (or become top-level), and its facilities are reassigned to its parent group or become **ungrouped**. Facilities themselves are **never deleted** as part of group deletion.
### Group hierarchy rules
* **No cycles.** A group cannot be its own ancestor.
* **Unique names per site.** No two active groups can share a name.
* **One group per facility.** Adding a facility to a new group removes it from any prior group.
## Manage facility tags
Tags are managed in a dedicated **Tags** drawer, separate from the main facility tree. Click the **Tags** button in the Facilities toolbar to open **Manage Tags**, which shows each tag and the number of facilities it applies to.
### Create a tag
1. Click the **Edit Group** icon on the group row.
2. Rename the group, change its parent, or add/remove member facilities and child groups.
3. Click **Save**.
The system blocks moves that would create a cycle in the hierarchy, and rejects a name that already exists on your site (case-insensitive, ignoring spaces).
### Move facilities between groups
You can move facilities three ways, and in every case the facility leaves its previous group automatically:
* Edit the **facility** and change its **Group** field.
* Edit the **destination group** and add the facility to **Select child entities**.
* From the destination group's row, use **Add to group** to open facility creation with the group preselected.
### Delete a group
1. Open the group in edit mode and click **Archive**.
2. Confirm in the dialog. Facilities in the group become ungrouped.
When a group is deleted, its child groups are reparented to its own parent (or become top-level), and its facilities are reassigned to its parent group or become **ungrouped**. Facilities themselves are **never deleted** as part of group deletion.
### Group hierarchy rules
* **No cycles.** A group cannot be its own ancestor.
* **Unique names per site.** No two active groups can share a name.
* **One group per facility.** Adding a facility to a new group removes it from any prior group.
## Manage facility tags
Tags are managed in a dedicated **Tags** drawer, separate from the main facility tree. Click the **Tags** button in the Facilities toolbar to open **Manage Tags**, which shows each tag and the number of facilities it applies to.
### Create a tag
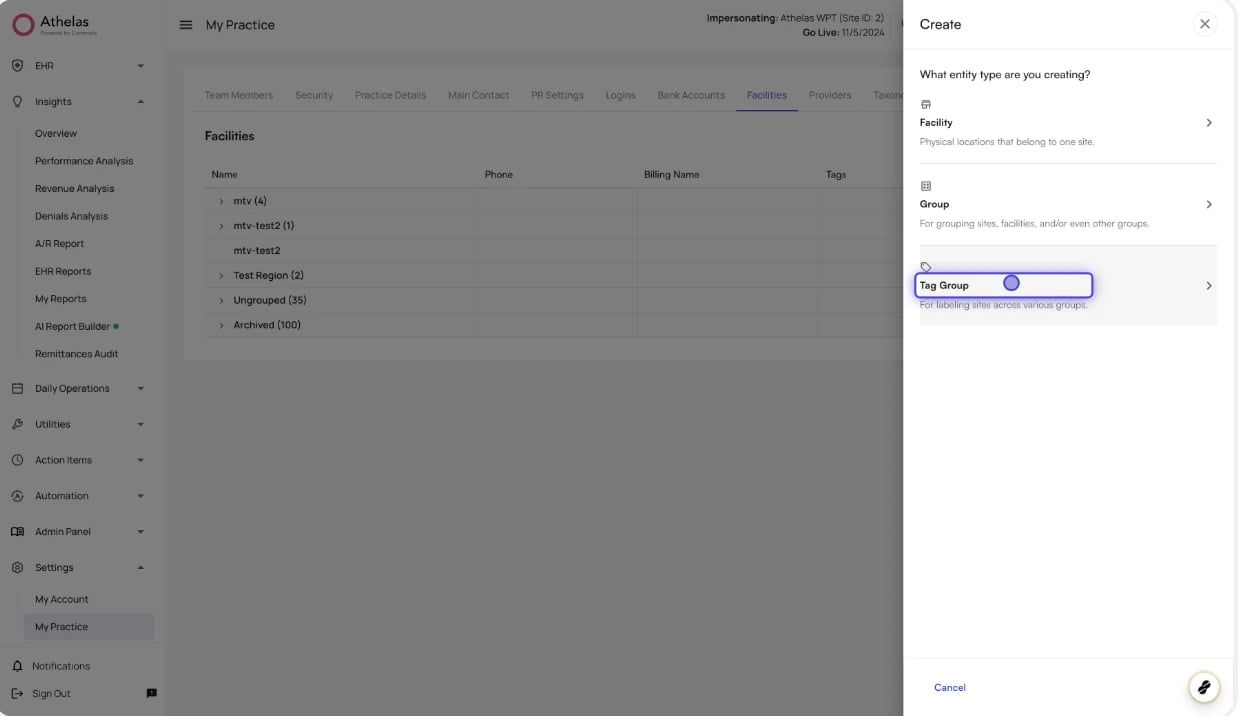 1. Click **Add → Tag**.
2. Fill in the **Create Tag** form: **Tag Name** (required), **Description** (optional), and **Select entities to tag**.
3. Click **Create**.
The new tag appears in **Manage Tags** and as a pill on each tagged facility's row.
### Edit a tag
1. Click **Add → Tag**.
2. Fill in the **Create Tag** form: **Tag Name** (required), **Description** (optional), and **Select entities to tag**.
3. Click **Create**.
The new tag appears in **Manage Tags** and as a pill on each tagged facility's row.
### Edit a tag
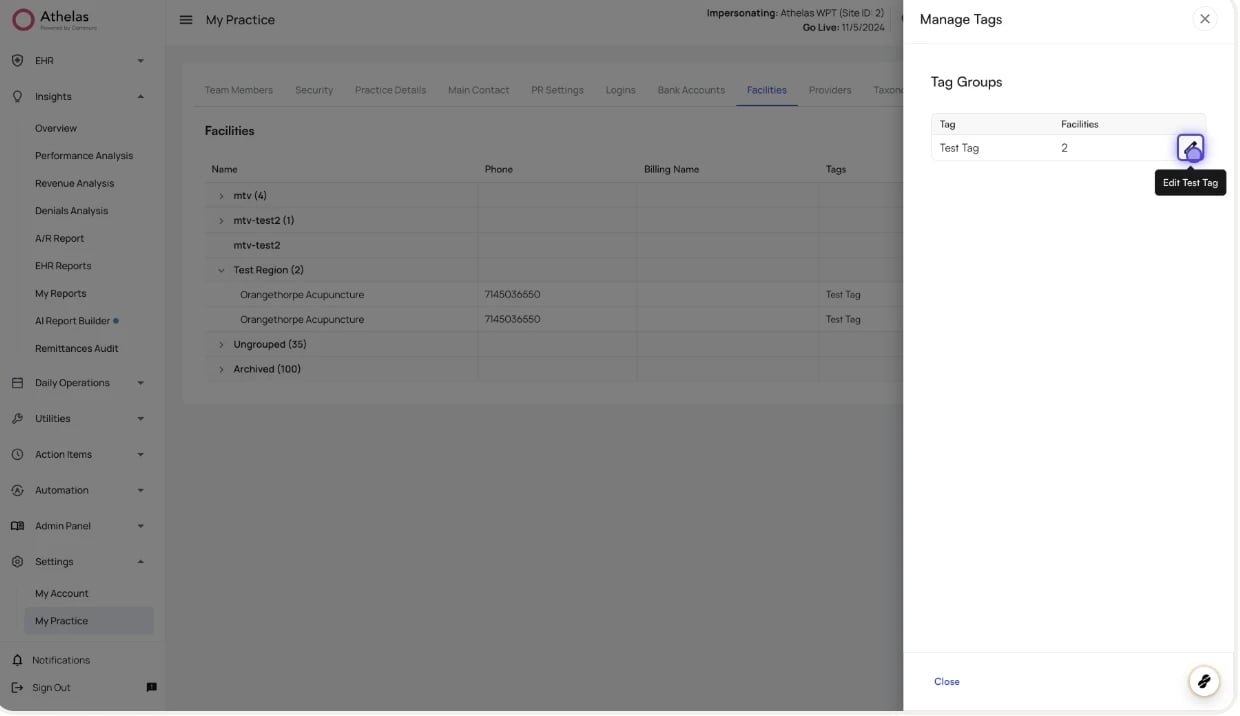 1. Open the **Manage Tags** drawer and click the tag.
2. Change its name, description, or which facilities it applies to.
3. Click **Save**.
Renaming a tag updates the label everywhere; the set of tagged facilities is unchanged.
### Remove a tag or delete it
* **Remove from a facility:** open the tag in **Edit Tag**, deselect the facility in **Select entities to tag**, and **Save**. Other tagged facilities are unaffected.
* **Delete the tag entirely:** open the tag in **Edit Tag** and click **Delete**, then confirm. The label is removed everywhere; the facilities themselves are unchanged.
## Common scenarios
* **New front-desk user at a single clinic** — New Member → enter name and email → assign the **Staff** (or appropriate) role → **Facility Access → Specific Facilities**, select the single facility → **Create**.
* **Regional billing manager** — New Member → assign the **Billing Manager** role → **Facility Access → Specific Facilities**, select the regional group → **Create**. When facilities are added to or removed from the region later, access updates automatically.
* **A "Claims Only" custom role** — Roles sidebar → **Create Role** → start from a billing/claims template → name it "Claims Only" → **Deselect all**, then enable only the **Claims** page and its needed sub-features → **Create** → assign to the relevant users.
* **Give a user multiple roles** — open the user, add an additional role in the **Roles** picker (e.g., *Staff* + *Claims Only*), and **Save**. The user gets the union of both roles' permissions.
* **Reorganize facilities into regions** — Facilities → **Add → Group** to create parent groups, optionally add nested sub-regions, then set each facility's **Group**. Review the facility access of anyone tied to the old structure.
* **Tag facilities offering a specialty service** — Facilities → **Tags → Add → Tag** → name it (e.g., "Pelvic Health") → select the facilities → **Create**. The tag becomes available as a filter wherever facility filtering is supported.
## Glossary
| **Term** | **Meaning** |
| :--------------------- | :---------------------------------------------------------------------------------------------------------------------------- |
| **Team Member / User** | An individual with a login to your practice. |
| **Role** | A named bundle of permissions assigned to one or more users. |
| **Managed Role** | A built-in role provided by Athelas. Read-only — can be viewed and assigned, but not edited, renamed, duplicated, or deleted. |
| **Custom Role** | A role created by your administrators. Fully editable and removable. |
| **Role Template** | A pre-built starting point for a custom role. |
| **Permission** | A single allowed action — to access a page or use a feature within a page. |
| **Page Permission** | Controls whether a user can navigate to and view a page. |
| **Feature Permission** | Controls whether a user can use a specific button, tab, or control inside a page. |
| **Facility** | A physical location belonging to your site. |
| **Facility Group** | A hierarchical container holding facilities and/or other groups. A facility belongs to at most one group. |
| **Facility Tag** | A flat, many-to-many label used to categorize facilities. Does not grant access. |
| **Facility Access** | The per-user setting that determines which facilities' data the user can see (*All Facilities* or *Specific Facilities*). |
| **Site** | The top-level container for a practice. Users, facilities, groups, tags, and roles all belong to a single site. |
| **Ungrouped** | Facilities not assigned to any group. |
| **Archived** | A facility or group that has been deactivated. Reversible, preserves history, hidden from active pickers. |
### FAQ
Yes. A user can hold any number of roles at once. Their effective permissions are the **union** of all their roles — if any role grants access to a page or feature, they have it.
Yes. Permissions and facility access are configured independently. Assign the **Administrator** role (or any role you like) and set **Facility Access** to **Specific Facilities** with only the facilities they should see.
Yes. Granting access to a group grants access to every active facility inside that group and inside all of its descendant groups. If a facility is later added to the group, the user gains access automatically.
Administrator and the other Athelas-managed roles are maintained by Athelas so they stay correct as new features ship. To customize, use **Create Role**, start from the matching template, and edit that new custom role instead.
The role is removed from those users, but the users themselves are not deleted. Each keeps any other roles they had; a user who held only the deleted role loses its permissions until you assign them another.
Most changes apply on the user's next page refresh or login. Role changes propagate through the authorization service, which can take a few seconds. If a user doesn't see the change, ask them to refresh or sign out and back in.
1. Open the **Manage Tags** drawer and click the tag.
2. Change its name, description, or which facilities it applies to.
3. Click **Save**.
Renaming a tag updates the label everywhere; the set of tagged facilities is unchanged.
### Remove a tag or delete it
* **Remove from a facility:** open the tag in **Edit Tag**, deselect the facility in **Select entities to tag**, and **Save**. Other tagged facilities are unaffected.
* **Delete the tag entirely:** open the tag in **Edit Tag** and click **Delete**, then confirm. The label is removed everywhere; the facilities themselves are unchanged.
## Common scenarios
* **New front-desk user at a single clinic** — New Member → enter name and email → assign the **Staff** (or appropriate) role → **Facility Access → Specific Facilities**, select the single facility → **Create**.
* **Regional billing manager** — New Member → assign the **Billing Manager** role → **Facility Access → Specific Facilities**, select the regional group → **Create**. When facilities are added to or removed from the region later, access updates automatically.
* **A "Claims Only" custom role** — Roles sidebar → **Create Role** → start from a billing/claims template → name it "Claims Only" → **Deselect all**, then enable only the **Claims** page and its needed sub-features → **Create** → assign to the relevant users.
* **Give a user multiple roles** — open the user, add an additional role in the **Roles** picker (e.g., *Staff* + *Claims Only*), and **Save**. The user gets the union of both roles' permissions.
* **Reorganize facilities into regions** — Facilities → **Add → Group** to create parent groups, optionally add nested sub-regions, then set each facility's **Group**. Review the facility access of anyone tied to the old structure.
* **Tag facilities offering a specialty service** — Facilities → **Tags → Add → Tag** → name it (e.g., "Pelvic Health") → select the facilities → **Create**. The tag becomes available as a filter wherever facility filtering is supported.
## Glossary
| **Term** | **Meaning** |
| :--------------------- | :---------------------------------------------------------------------------------------------------------------------------- |
| **Team Member / User** | An individual with a login to your practice. |
| **Role** | A named bundle of permissions assigned to one or more users. |
| **Managed Role** | A built-in role provided by Athelas. Read-only — can be viewed and assigned, but not edited, renamed, duplicated, or deleted. |
| **Custom Role** | A role created by your administrators. Fully editable and removable. |
| **Role Template** | A pre-built starting point for a custom role. |
| **Permission** | A single allowed action — to access a page or use a feature within a page. |
| **Page Permission** | Controls whether a user can navigate to and view a page. |
| **Feature Permission** | Controls whether a user can use a specific button, tab, or control inside a page. |
| **Facility** | A physical location belonging to your site. |
| **Facility Group** | A hierarchical container holding facilities and/or other groups. A facility belongs to at most one group. |
| **Facility Tag** | A flat, many-to-many label used to categorize facilities. Does not grant access. |
| **Facility Access** | The per-user setting that determines which facilities' data the user can see (*All Facilities* or *Specific Facilities*). |
| **Site** | The top-level container for a practice. Users, facilities, groups, tags, and roles all belong to a single site. |
| **Ungrouped** | Facilities not assigned to any group. |
| **Archived** | A facility or group that has been deactivated. Reversible, preserves history, hidden from active pickers. |
### FAQ
Yes. A user can hold any number of roles at once. Their effective permissions are the **union** of all their roles — if any role grants access to a page or feature, they have it.
Yes. Permissions and facility access are configured independently. Assign the **Administrator** role (or any role you like) and set **Facility Access** to **Specific Facilities** with only the facilities they should see.
Yes. Granting access to a group grants access to every active facility inside that group and inside all of its descendant groups. If a facility is later added to the group, the user gains access automatically.
Administrator and the other Athelas-managed roles are maintained by Athelas so they stay correct as new features ship. To customize, use **Create Role**, start from the matching template, and edit that new custom role instead.
The role is removed from those users, but the users themselves are not deleted. Each keeps any other roles they had; a user who held only the deleted role loses its permissions until you assign them another.
Most changes apply on the user's next page refresh or login. Role changes propagate through the authorization service, which can take a few seconds. If a user doesn't see the change, ask them to refresh or sign out and back in.